Friday 27 September 2013

STUCK ON U SKETCHES DESIGN TEAM REVEAL - SEPT 27TH - FAMILY


Happy Friday everyone.
WELCOME TO THE STUCK ON U SKETCHES DESIGN TEAM REVEAL.


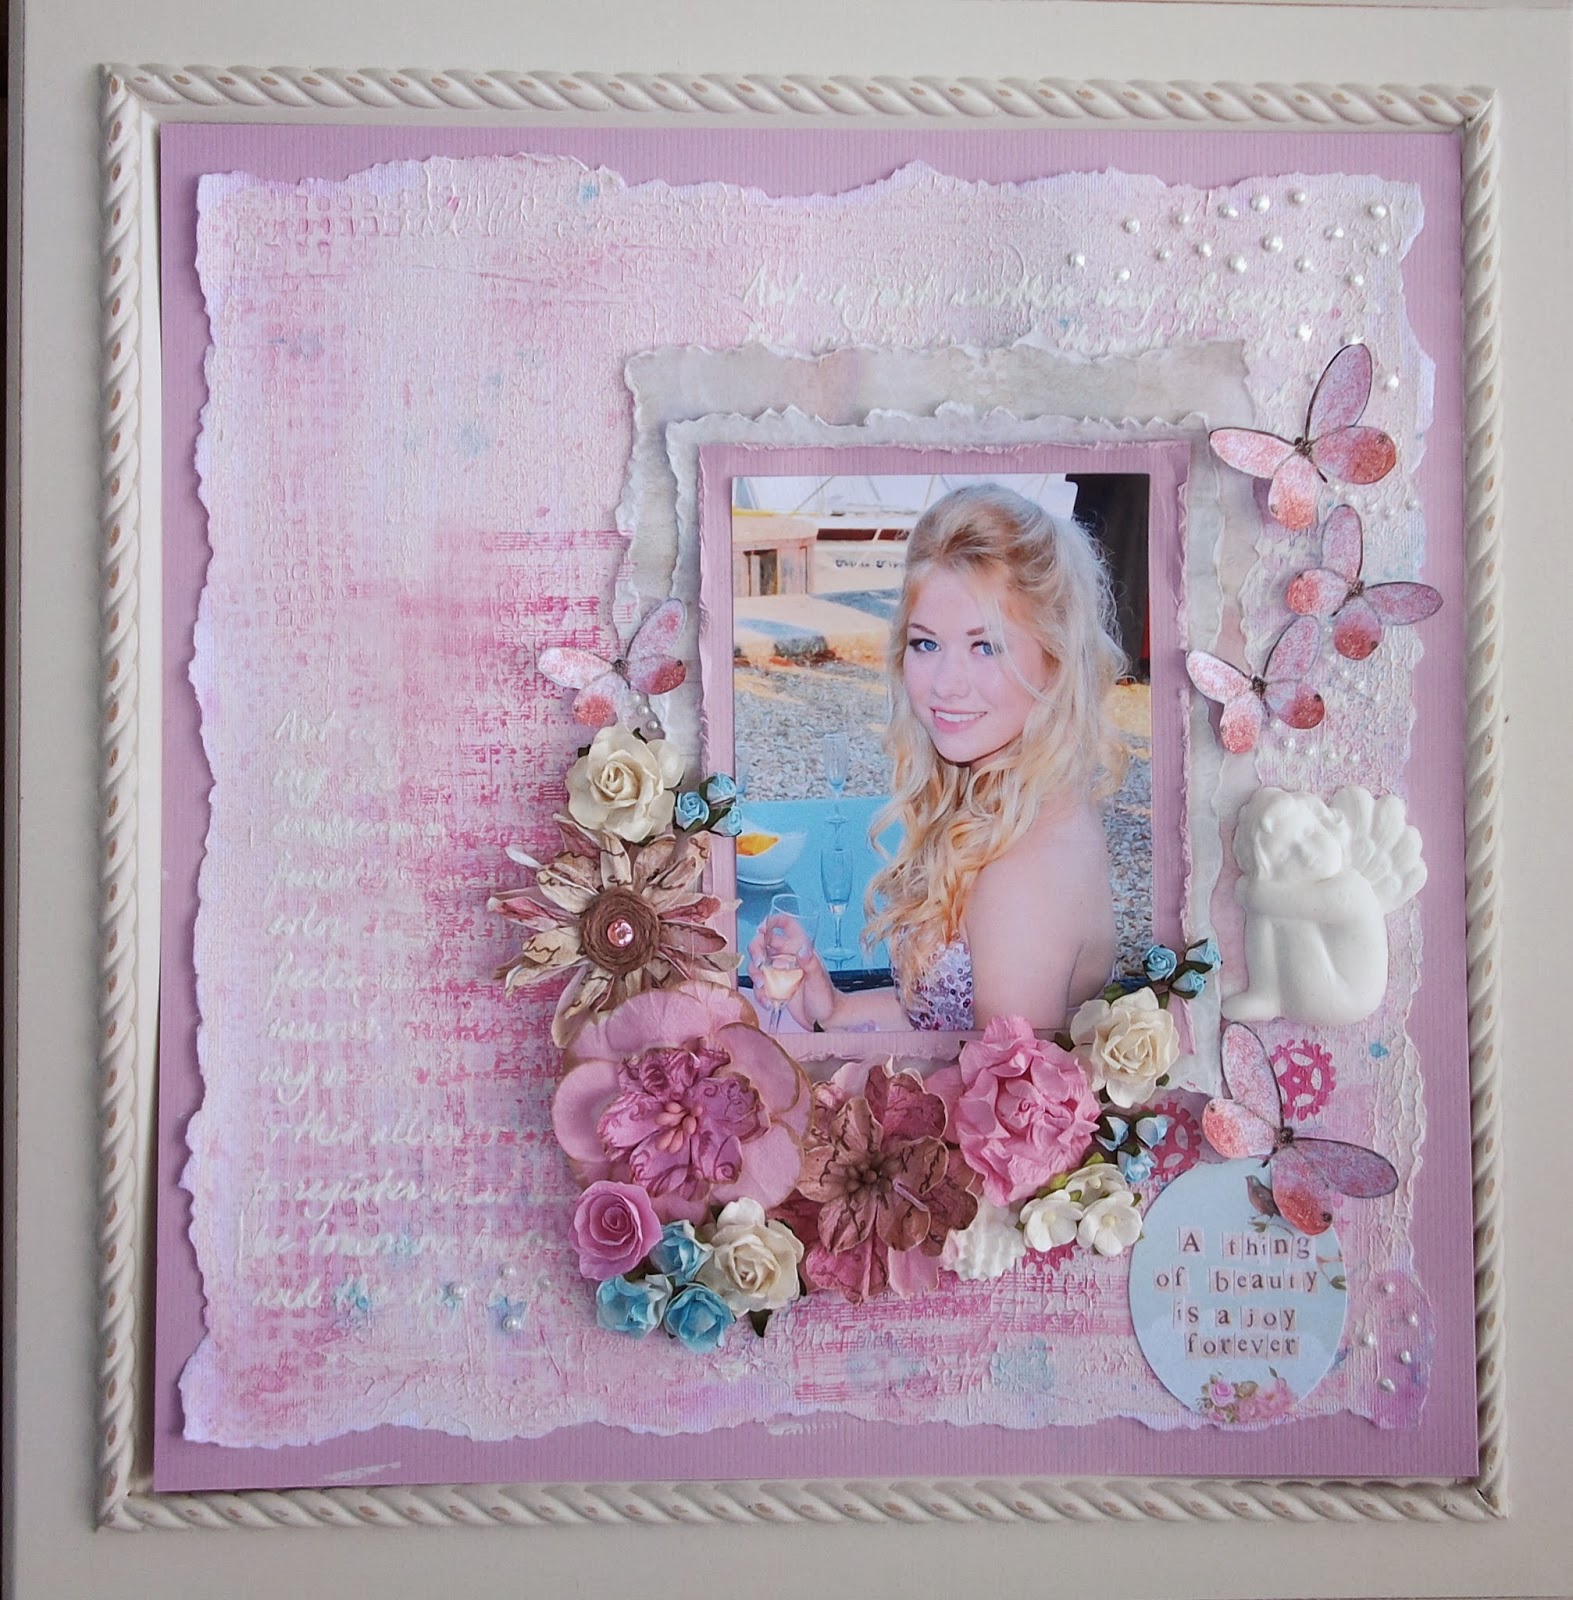
I love this sketch, and found it came together very easily. It shouldn't take too long at all.
Do go visit all the other designers blogs for more inspiration, just click on the link here http://stuckonusketches.blogspot.co.uk/
HOW TO MAKE THIS LAYOUT
First choose your photo, card, paper and embellies.
Tear the edges off the pretty paper and adhere to the backing card.
Add a white doily.
Matt photo and adhere.
Take some cardboard and paint with white paint.
Tear into two strips and add one strip underneath the photo and doily across the base and add one through the right side of the photo.
Take some cotton ribbon, (I sprayed mine with mist), and scrunch up and glue to the base of the cardboard. Attach with hot glue.
Take a small strip of the painted cardboard and attach to the right hand corner of your layout.
So now you have the basis of the layout, its time to decorate.
Add flowers, butterflies, buttons, and ribbon with hot glue.
I sewed on my buttons with thread.
I made beaded bodies for my butterflies.
I added a rub on title and quote.
I hope you like it and give it a go.
SCRAPPY STASH
Plain cardstock in two colours
One sheet of pretty paper
White doily
White acrylic paint
Cardboard
Cotton ribbon in white
Cotton ribbon in cream
Assorted flowers
Mulberry paper to make some of the flowers
Scalloped scissors and flower die to make flowers
Assorted mother of pearl buttons
Butterflies
Beaded pins
Cream thread and sewing needle
Hot glue gun
Title and quote  rub-ons.
For beaded pin tutorial please go here http://theprettypaperpatisserie.blogspot.co.uk/2012/06/hand-made-stick-pins.html
For flower tutorial please go here
http://theprettypaperpatisserie.blogspot.co.uk/2013/03/hand-made-flowers-tutorial.html
HAPPY SCRAPPING, AND THANK YOU SO MUCH FOR VISITING MY BLOG AND LEAVING ME HAPPY COMMENTS. BYE FOR NOW.

I

Wednesday 25 September 2013

A THING OF BEAUTY - BUILD A PAGE


Hi scrappers and happy WEDNESDAY. Today I have used a sketch from Berry 71 Bleu here http://berry71bleu.blogspot.co.uk/search?updated-max=2013-09-25T00:00:00-05:00&max-results=10
September Sketch - Berry 71 Bleu

HOW I DID THIS
For this layout I made my own background paper.
I used a sheet of white card and added lots of texture paste.


I used an embossing folder to add texture


Dry with an air gun.


Add spray mists to colour


Add a texture paste script mask


Add matted photo

 
Add pearly dots
 
Ink areas with pink ink and stamps

Last but not least, decorate to your hearts contend.
 
And there you have it, a multi mixed media layout, hope you like it and give it a go. Bye for now and many thanks for visiting my blog and leaving me lovely comments.
 
SCRAPPY STASH
Plain cardstock
Pretty papers - ScrapBerrys
Texture paste
Script mask
Sizzix embossing folder
Perfect pearls in silver
Spray mists in two colours
Music stamp by Prima
Pink ink
Cogs stamp
Handmade butterflies
Stickles
Clay angel
Assorted flowers.


Friday 20 September 2013

LIFE DREAM LOVE


Morning all - for this layout I have used a lovely sketch from C'est Magnifique .

http://cestmagnifiquekits.blogspot.co.uk/2013/09/welcome-to-our-september-sketch.html


THIS IS WHAT I DID

I have tried to keep quite true to the sketch for this one as it is so pretty.
So first of all I cut down my pretty paper to 11.5x11.5 inches and adhered to my background card.
Then I took the lovely die cut chippy and primed it with gesso then added various mists and attached.
I added small glass beads to the centres of parts of the flowers.
I then added all the die cut pieces to finish making a circle.
With the circle done, I matted my photo and adhered to one side.
I glued some cheesecloth underneath.
Now comes the best bit, decorate and embellish with flowers, beads etc.
A lovely sketch, so I hope you give it a try.
SCRAPPY STASH
Pretty paper - Scrapberrys from the kit
Plain cardstock
Large circular chipboard flower and leaves - from the kit by BLUE FERN STUDIOS
Die cut shapes - Kaisercraft Collectables - True Romance - also from the kit
Cheesecloth
Mini birdcage chippys that I painted - from the kit
White bird - Martha Stewart paper clay set
Clay angel I made using white clay and a fimo mould
Beaded stick pin I made
Mini glass beads
Assorted mini flowers
Paper clay flower
White funky fibres
Small metallic key and angel wings
Pink acrylic paint
Gesso
Spray mists.
THANK YOU FOR VISITING MY BLOG AND LEAVING ME LOVELY COMMENTS.
HAVE A GREAT WEEK END. BYE FOR NOW.

Friday 13 September 2013

STUCK ON U SKETCHES DESIGN TEAM REVEAL - SEPT 13TH - PRE PROM PARTY - BUILD A PAGE

Hi everyone and welcome to the Stuck on U Sketches design team reveal.
If you scroll down you will see I have done a step by step BUILD A PAGE for you.
This is a great sketch by Sandi, so why not give it a go.
http://stuckonusketches.blogspot.co.uk/
 
step 1 - Choose your background paper.

 
 step 2 - Matt your photos and add sticky foam onto the back to give them a lift.


step 3 - Adhere to your background.

 
step 4 - Attach some burlap/hessian.

 
step 5 - Add a piece of lace.


 step 6 - Add a border of flowers.

 
step 7 - Decorate with flowers and butterflies etc and add the title. ( I also sprayed the background with    some pink mist).

SCRAPPY STASH
Plain cardstock
Pretty paper
Foam pads
Lace
Flower sticky back border
Butterflies
Assorted flowers
Sizzix die for the banners
Twine
Two small pink brads
Silver burlap/hessian
Tim Holtz die for the bird
Alphabet stickers
Pink spray mist for the background.
DO GO VISIT ALL THE OTHER BLOGS FOR LOTS MORE INSPIRATION.
BYE FOR NOW AND MANY THANKS FOR ALL YOUR LOVELY COMMENTS AND FOR VISITING MY BLOG.

Friday 6 September 2013

6th FORM


Morning all, today I have a layout for you that I have entered into the September challenge over at http://www.flourishwithabling.com.au/blog/.
I have also entered this into the September challenge over at http://inkido.blogspot.ca/2013/09/september-challenge-layers-and-border.html.
Do go check them all out as the inspiration is amazing.
THIS IS WHAT I DID.
I used the flourish from Flourish With A Bling for my inspiration.
I found a pink sheet of cardstock which I cut down to 11.5x11.5inches then I misted with Purple and silver mist.
I attached this to some white backing card.
I cut down a sheet of black cardstock to 8x8inches and used a border punch down the sides, I adhered this.
I matted my distressed photo onto black cardstock that I also distressed. I adhered this.
I attached a white doily.
I die cut a clock face using chipboard, then glued a black cardstock clock on the top, then added the clock hands and attached this.
I used a doily punch on white card for one of the layers.
I added another layer from some silver hessian/burlap.
I added my FWAB purple swirl.
I added my journaling block.
I then decorated with assorted flowers and beaded butterfly.
I added the title - and that's it. Why not give it a go.
Bye for now.
SCRAPPY STASH
Plain cardstock in three colours
Distressing tool - Prima
White doily
Martha Stewart border punches in small and large
FLOURISH WITH A BLING purple flourish
Assorted flowers
Mulberry paper for the hand made large flower
Butterfly made using Martha Stewart paper clay
Beaded pin for body
Tim Holtz weathered clock die
Tim Holtz alphabet die for the title.
Cosmic shimmer mist in purple
Tattered angels shimmer mist in silver
Sparkly centres for the flowers.
  
BYE FOR NOW


Monday 2 September 2013

KEEP CALM AND GRADUATE - OFF THE PAGE - CANVAS


HI scrappers its September and the start of a new term, so I look forward to lots of scrappy time.
I know this looks like a layout, but its actually a 12x12 canvas.
THIS IS WHAT I DID
I glued down a sheet of black cardstock onto the canvas so that you could just see a small edge of canvas.
I cut down a sheet of Prima script paper and distressed the edges, I misted this with some tattered angels mists, then adhered with some PVA glue.
I matted my photos onto polka dot paper in black to match the neck tie, and in grey to match the suit.
I attached these then added a few layers using mulberry paper that I ripped and inked.
I decorated with assorted flowers, leaves, twine and tags.
I added the title using an alpha die.
Part of the title is missing , it must have fallen off, oops - the Keep Calm and - is missing, but as I have now given this away as a gift I cannot retake the photo! Hope you like it anyway.
SCRAPPY STASH
One 12 inch (just over) canvas - The Works
Black cardstock  - Bazill
Script paper - Prima
Polka dot paper - My Minds Eye
Distressing tool - Prima
Assorted flowers and leaves
Green twine
Tags - stationers
Brown chalk ink - Prima
Mulberry paper
Tim Holtz alpha die
Dewdrop flower centres in brown.
THATS IT FOR NOW - HAPPY SCRAPPING EVERYONE.