Monday 29 February 2016

BERRY71BLEU DESIGN TEAM REVEAL FEBRUARY - #ME


Hi everyone and welcome to my blog and the Berry71Bleu February Mood Board.
This is a fabulous challenge, I hope you love it too and have a go.


 FOR MY INSPIRATION
 I chose from the board;
  The lock and key, gold, black, lace, the gems on the key and the crackle paint effect.
HERE IS HOW
First of all choose some gold and black background paper
 Take some texture paste and a crackle stencil and stencil around the page, allow to dry
Matt photo in soft yellow card
Matt again in gold card
Using the gold card cut a layer 6 x 6.5 inches and adhere to the top right hand corner
Adhere some music paper 4.5 x 6 inches, ink edges
Add a matt that is crackle painted white and gold
Add matted photo
Add soft yellow card in the bottom left hand corner 6 x 6.5 inches
Add music paper 4.5 x 6 inches, ink edges
Now you have the main body of the layout, start to decorate
Cut a gold paper doily in half and adhere as per the layout
Attach a black swirly border down one side
Adhere gold flowers using hot glue
Die cut three swirly leaves and attach
Die cut or punch out two large butterflies, adhere
Add gold gems for the bodies
Add lock and key
Add some swirly stems
Die cut a frame and add the title
Add some journaling stickers.
And there you have it, a lovely golden layout.
SCRAPPY STASH
Pretty paper in gold and black
Soft yellow and gold cardstock
Brown, gold chalk ink
Gold paper doily
White texture paste
Gold acrylic paint
Gold Prima Flowers
Curly flower stems
Two large black butterflies
Gold gems
Lock made from paper clay
Die cut frame
Swirly leaves
Key and Hashtag ME - CREATIVE EMBELLISHMENTS


AND NOW FOR THE PRIZES

Our Sponsor this month is:

"Viva Las VegaStamps! is a US based manufacturer of deeply etched pink rubber stamps. Super high quality makes for beautifully stamped images. Our near 20,000 image inventory ranges from steampunk to vintage, realistic to sayings, people to animals and more. Our stamps are great for scrapbooking, mixed media, art journaling, cards, jewelry, food, wax and more!" 
Connect with us!
 Visit us on FACEBOOK https://www.facebook.com/vlvstamps
 View our BLOG http://vivalas.blogspot.ie/
 We're on INSTAGRAM  https://instagram.com/vivalasvegastamps/
               PINTEREST  https://www.pinterest.com/vlvstamps/
 Our shop can be found https://www.atvlvstamps.com 

Viva Las Vegas Stamps give one winner a $30 Gift Certificate to use in their store!

Please note: International winners may be responsible for shipping costs.
Please be sure to follow our CHALLENGE RULES.

 We appreciate each and every challenge entry and share the designs that catch our eye on our Facebook page and Pinterest Boards.

Thank you and I am looking forward to meet with your great projects on our challenge!
XXX
I hope you followed along. Thank you so much for joining me today, do come back again soon to see more design team work.
BYE FOR NOW
xxx

Saturday 27 February 2016

SWEET

 
Hi everyone, welcome to my blog and my latest layout.
Today I have chosen to use a sketch from STUCK SKETCHES for my inspiration.
 
 
This is a fab sketch, I chose to follow along, adding a few extra flowers along the way!
Once you have chosen everything this should come together quite quickly
The photo isn't very clear, it was taken ages ago on an old camera phone hence the blurred image.
STEP BY STEP
Choose photo, embellishments and papers etc
Start with a coordinating 12 x 4 inches paper strip down the middle, slightly off centre
Add a scalloped border to one side
Add a flowery border strip to the other side
Lightly adhere matted photo
Add a layer 5x7 inches beneath the photo
Add two die cut circles on either side of photo
Using a pencil and a plate to draw round, add circles to the layout
Stamp these with a stitch stamp
Add a lined journaling spot
Hand cut a tag and add to one side
Start to decorate with hearts, flowers, button and twine and a small banner.


SCRAPPY STASH
Polka dot papers
Flowery papers
Pink cardstock
Pale pink cardstock
Brown, black chalk ink
White button
White twine
Lined paper
Stitches stamp
Heart die
Assorted flowers.
xxx
I hope you enjoyed my step by step and followed along
I would love it if you became a follower of my blog
Look out for more scrappy and card inspiration soon as I am back on Monday with the fabulous Berry71Bleu Design Team. 
Many thanks
BYE FOR NOW.
xxx 


Thursday 25 February 2016

IT'S A WONDERFUL LIFE - More than Words Challenge

Hi everyone and welcome to my blog and my latest layout.
Today I have made a layout using the MORE THAN WORDS CHALLENGE BLOG Challenge for February for my inspiration.
 
For this challenge we have to use the word Wonderful and then use Sparkle to make our project shine!
I used the word WONDERFUL in my title
IT'S A WONDERFUL LIFE
 I used sparklers all over my page and sparkly glitter card in green
 I also used sparkly mists for my background but unfortunately you can't see them all that much
I also did a lot of mixed media on my layout.
I brushed gesso all over the page
I took lots of cheesecloth and spread it out all over the page with glue
I then sprayed various mists all over the page
When dry I stamped and speckled the page with black ink.
I then started to layer up my page starting with matting my photo in green glitter cardstock
I added a doily, brick chipboard, lots of flowers, corner embellies, sparklers, sparkly buttons, butterflies, pearls, lace and a few mini titles. I hope you like it.


That's all for now.
I WOULD LOVE IT IF YOU BECAME A FOLLOWER AND LEFT ME SOME HAPPY FEEDBACK
MANY THANKS AND HAPPY SCRAPPING
XXX


Monday 22 February 2016

CR AFTERS PALETTE PAGE MAP FEBRUARY CARD

Hi everyone welcome to my blog and  the latest CRAFTERS PALETTE  page map for February.
For this months page map I used the rest of my KAISERCRAFT RUSTIC HARMONY COLLECTION and made a card.
xxx
 
 
I chose to turn the map on its side and used flowers for where the hearts should be.
I love using layers so I found this really fun.
Once you have gathered all your supplies together this shouldn't take long at all.
 
FOR MY SUPPLIES I USED
Rustic Harmony Collection by Kaisercraft
Butterfly punch - Woodware
Grass leaf punch - Woodware
Bazill cardstock
Flat flowers
Doily
Bricks chipboard
White acrylic paint
Brown ink
Corrugated card
Lace
Self adhesive pearls
Dew drops.
xxx
So there you have it, one layered up card using the rest of my Kaisercraft Rustic Harmony Collection Kit.  (I need to buy a new kit I think!). Using layers is a great way to use up all your bits and pieces, like small pieces of lace and scraps of card for the punched out butterflies and leaves etc.
I hope you enjoyed my project, see you next time.
Bye for now
xxx


Sunday 21 February 2016

Robins Nest Design Team Reveal February - Boscombe Pier

Hi everyone and welcome to my blog and my latest
ROBINS NEST Design Team Reveal.
If you saw my Rainbow layout in January, this is a photo of the same evening but from the other end of the beach.
 
 
SUPPLY LIST
Teen girl stickers
Brown cardstock
Soft yellow cardstock
Brown ink pad
White doily
Random print paper from the internet.
STEP BY STEP
 Step 1
Choose background paper
 
Step 2
Add a border strip of brown card 12 x 2 inches
Step 3
Double matt the photo and adhere
 Step 4
Add some layers
 
Step 5
Die cut or punch out lots of flowers, adhere randomly around photo
Add in some of the flower stickers
 
Step 6
Add lots of Dew Drops for the flower centres
Add title and any journaling
CLOSE UPS


Thank you so much for stopping by, don't forget to visit all the other designers for more inspiration this month.
I WOULD LOVE IT IF YOU WOULD FOLLOW ME!
Bye for now
xxx

Saturday 20 February 2016

SNEAK PEAK FOR ROBINS NEST - FEBRUARY

Here is a sneak peak of what's coming up on the Robins Nest Blog.
Do check them out here
I would love it if you could please come and follow me so you can keep up to date.
Many thanks
xxx


Friday 19 February 2016

CRAFTERS PALETTE FEBRUARY CHALLENGE - FANCY FOLIAGE - PRETTY COOL

 
Hi everyone and Welcome to my blog and my latest CRAFTERS PALETTE challenge layout. This challenge is called FANCY FOLIAGE and we had to create a layout inspired by all things leafy and floral. For those of you who know my style you know this is right up my street as I love using flowers. I also used this fab collection of papers RUSTIC HARMONY COLLECTION  by Kaisercraft. Just use your favourite flower punches or dies to create a floral delight!
   
PRODUCTS USED
Rustic Harmony Collection papers
Rustic Harmony Collection Collectables
Flower die cuts
Sticky back pearls
Brown ink pad
Leafy die.
DESCRIPTION
I love this Kaisercraft Collection, they are great quality and perfect for my soft shabby style
Just take out some favourite dies and punches and make as many flowers as you can fit on the page! I love using layering, which is really easy when you buy a collection as everything matches.
Add some foliage and pearls and there you have one quick and easy page.


 I hope you like my layout and the inspiration, don't forget to keep an eye out for more projects from the team this month.
Thank you so much for visiting today. I would love it if you left me some comments and became a follower so you don't miss anything.
Have a great happy scrappy day, Bye for Now.
xxx 


Thursday 11 February 2016

MY TOP TEN FAVS FROM 2015

Hi everyone and welcome to my blog and my TOP TEN PICKS from 2015.
Click on the link below each picture and you will be taken to full instructions.
I didn't realize until I looked back that I seem to use the same titles over and over again. Think I may need to be a bit more creative!
Enjoy.
 
 
MANY THANKS FOR VISITING TODAY
I WOULD LOVE IT IF YOU WOULD COME AND FOLLOW ME FOR LOTS MORE INSPIRATION.
BYE FOR NOW
XXX


Tuesday 9 February 2016

TO ALL MY LOVELY FOLLOWERS

Hi everyone, welcome to my blog.
TO ALL MY LOVELY FOLLOWERS
I have just realized that I have lost lots of followers, more than 100, that were following me on Google+.  It seems Google + is no more.
Please could you re-follow me by signing up for a Google Account. With a Google Account you will get blogs added to your Reading List, making it easier for you to see latest posts and activity of the blogs you follow. My followers are really important to me, I am so sorry to have lost so many of you, and look forward to you re-following soon.
If you are a new follower or a re-follower please let me know and I will put you in the drawer to win a prize.
Many thanks, Bye for Now
Carole
x


Saturday 6 February 2016

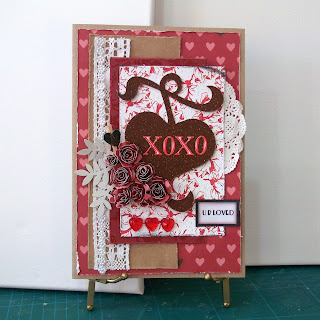
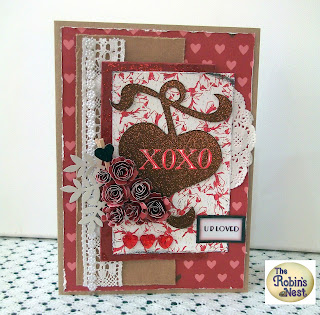
THE ROBINS NEST DESIGN TEAM REVEAL - FEBRUARY U R LOVED Valentines Card


Hi everyone and welcome to my blog and my latest project for 
THE ROBINS NEST Design Team.
As its nearly Valentines Day I thought I would make a large Valentines card using an A4 sheet of kraft card folded in half as my base and adding lots of Robins Nest goodies. If you would like to follow along, see the step by step below. 


SUPPLY LIST
Kraft card x 2 A4 sheets
Rusty Rose Card kit Rusty Rose card kit
Rusty Rose Valentine Hearts paper Rusty Rose Collection
Rusty Rose Hearts Dew Drops Rusty Rose Hearts Dew Drops
Heart Paper clips Heart paper clips
Red glitter alphabet stickers Alphabet stickers
Chipboard glitter heart Chipboard glitter heart
Small white doily
Small leafy branches
Scrap of black card
Mini string pearls
Black ink
Quilling tool
Hot glue
Scalloped scissors for the flowers.

So here is how I put this card together
Step 1
Take the 12x12 sheet of valentine hearts paper and an A4 sheet of kraft card. Fold the kraft card in half.

Step 2
Cut a 5.5 x 8 inch piece of heart card, distress the edges and adhere to the card

Step 3
Cut a 3 x 7.5 inch piece of kraft card, distress the edges, adhere to one side
Step 4
Add a strip of lace
Step 5
Cut a sheet from the card kit to 3.5 x 6 inches, distress edges, adhere

Step 6
Take another sheet from the card kit and cut to 3.5 x 5.5 inches,  distress and ink edges, adhere
Step 7
Add the glitter heart
Step 8
Add the matted title from the card kit
Make mini roses and add with hot glue
Step 9
Add the heart dew drops, some leafy branches, small doily, alpha stickers,  string pearl, mini roses and black heart peg
And there you have it.
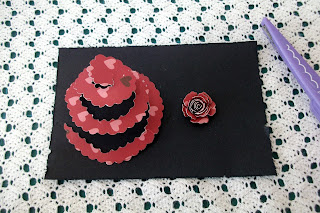
HOW TO MAKE THE MINI ROSES


Using the heart paper, scalloped scissors and a quilling tool


Cut out a circle spiral

Start to roll up with the quilling tool

When you get to the end add a dollop of hot glue and secure

Attach to card using hot glue


I hope you like my card and followed along. Dont forget to visit all the other designers for more inspiration for February.
 And if you would like to visit my blog please click on the link below
http://theprettypaperpatisserie.blogspot.co.uk/
xxx