Wednesday 26 April 2023

APRIL 26th HEARTFELT CREATIONS IRIS GARDEN COLLECTION Slimline card - Just For You

 Morning lovely crafting friends, 

Its Inspiration Wednesday here at Heartfelt Creations today and I have a Birthday card for you using the

Iris Garden Collection 

If you would like to know how I made this, please scroll down for instructions.


If you would like to save $20.00 off your first Heartfelt Creations purchase, please CLICK HERE


INSTRUCTIONS

Cover a 9" x 4" card blank with yellow paper from the Iris Garden Paper Collection. Die cut three Slim Elegant Rectangles, shaped inner edges, from the Slim Elegant Rectangles Die Set. Two in white card and one in Luxe Silver card. Adhere with Dries Clear Adhesive together so that you can see the silver card as a slight shadow. Adhere to card front. Die cut another one in green paper from the same paper Collection. Adhere the centre piece only, to the card front. Die cut the next size down centre piece die, in white card and the next size down again in yellow paper from the Paper Collection, adhere with foam tape.

Stamp onto Deluxe Flower Shaping Paper in Ranger Archival Olive ink, three sets of Iris Garden Petals. Die cut with the matching dies. Color the edges with Olive ink using a Dauber. Add a little Memento Grape Jelly ink using a Dauber. Place in the Iris Garden Flower Shaping 3D Mold, lightly mist with water and run through a die cutting machine. Lightly shape and curl the petals with the stylus from the Deluxe Flower Shaping Kit. Pierce a hole in each petal with the tool from the Deluxe Flower Shaping Kit. To make two small Irises, start with a white Bead Stamen, thread on small petals set, face down, squish together and add Dries Clear Adhesive. Add a small set of petals, face up, followed by a medium set, face up. Cut one medium set of petals in half and add an extra petal. Repeat. Make a large Iris by starting with a medium set of petals for the bud, followed by two sets of large petals. Add hot glue to the base and offset the petals as you go. Adhere the large Iris to the centre of the card, adhere the two smaller Irises to either side.

Stamp onto Deluxe Flower Shaping paper in Olive ink, three sets of Iris Garden Accents, from the Iris Garden Accents Cling Stamp Set. Color with Olive, Grape Jelly and Ranger Archival Sunflower inks using the Daubers. Die cut with the matching dies. Lightly shape with the stylus from the Deluxe Flower Shaping Kit. Adhere into the Iris bouquet with hot glue. Adhere the birdhouse with foam tape. Stamp two small Dragonflies from the Decorative Dragonfly Collection in Olive ink. Color with Grape Jelly and Sunflower inks using the Daubers. Adhere one on top of the other. Adhere to side of birdhouse.

Stamp a sentiment from the Just For You Sentiments Cling Stamp Set, onto white cardstock in Olive ink. Die cut with the smallest die from the Slim Elegant Rectangle Die Set. Adhere with foam tape. Sponge Dries Clear Adhesive over the card, add clear glitter.


PRODUCTS USED


OTHER PRODUCTS

Card blank - 9" x 4", white card, water mist bottle, Memento Grape Jelly ink pad, die cutting machine, foam tape, hot glue, clear glitter.


VIDEO 


Many thanks for visiting me today, come back soon for lots more inspiration 
Bye for now
xxx

Wednesday 19 April 2023

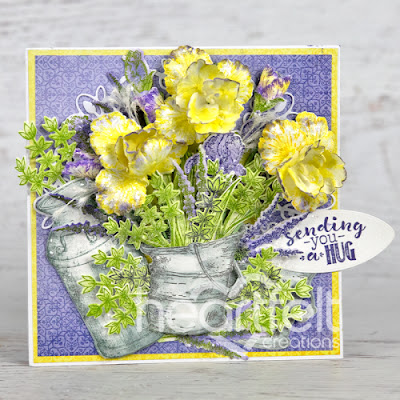
APRIL 19th HEARTFELT CREATIONS IRIS GARDEN COLLECTION Sending You a Hug


 Morning lovely crafting friends, 

Its Inspiration Wednesday here at Heartfelt Creations and I have a  card up for you today using the

IRIS GARDEN COLLECTION

If you would like to know how I made this, please scroll down for instructions.


If you would like to save $20.00 off your first Heartfelt Creations purchase, please CLICK HERE


INSTRUCTIONS

Cover a 6"x6" card blank with yellow paper form the Iris Garden Paper Collection, cut to 5 3/4" square. Cut a piece of purple paper from the Paper Collection to 5 1/2" square. Adhere to card front with Designer Dries Clear Adhesive. Die cut one Simply Elegant Centrepiece from the Simply Elegant Centrepiece Die Set in white card. Cut another one in yellow paper from the Paper Collection. Adhere the white Simply Elegant Centrepiece to card front. Adhere the small centre yellow piece from the second Simply Elegant Centrepiece to the middle.

Stamp and color in Ranger Archival Sunflower yellow ink, onto Deluxe Flower Shaping Paper, three small and eight medium Iris Petals, from the Iris Garden Petals Cling Stamp Set. Die cut with the matching dies. Add a little Memento Grape Jelly ink to the edges. Place in the Iris Garden Flower Shaping Mold, lightly mist with water and run through a die cutting machine.  Pierce a hole in the middles with the tool from the Deluxe Flower Shaping Kit. Lightly shape the Iris petals with the shaping tool. Shape the small petals to face in and up, shape the medium petals to face and curl downwards.

 Make three Irises by threading a yellow Petite Pollen Stamen onto a small Iris petal, face down. Add hot glue to base. Add a medium petal, face down. Add hot glue to the base.  Add another layer of medium Iris petals, face up. Add hot glue.  Cut two medium Iris petals in half. Adhere one of these to the base of the three Irises with hot glue, face up. Off set the petals as you go. Add hot glue to the rear and cut off the stems.  Make three Iris buds with three small Iris Petals. Color with yellow and Memento Grape Jelly inks with Daubers. Thread one set of small Iris petals onto a stamen, face down. Roll to form a bud, glue the edges down. 

Stamp and color with Ranger Archival Watering Can ink, onto Deluxe Flower Shaping Paper, one Rustic Sunflower Can and two Rustic Sunflower Buckets from the Rustic Sunflower Collection. Die cut with the matching dies. Color with Watering Can ink using a Dauber. Lightly shape with a shaping tool from the Deluxe Flower Shaping Kit. Stamp and color all the accents from the Iris Garden Accents Cling Stamp Set, with Ranger Archival Leaf Green ink, six times. Stamp one set of small leaves in Memento Grape Jelly ink. Color, using Daubers, in Leaf Green and Grape Jelly inks. Die cut with the matching dies. Lightly shape with the shaping tool.

Take a set of EZ Stem Floral Wires in light green and one of the buckets. Adhere the EZ Wire Stems set inside the bucket and adhere to card front, leaving the top and sides of the bucket free of glue. Adhere another bucket to the side. Adhere the Can with foam tape. Adhere three yellow Irises onto the Stems with hot glue. Adhere three buds onto the longest bud sets from the Iris Garden Accents Cling Stamp set. Adhere to the EZ wire stems.

Adhere the Iris Garden Accents into the bucket with hot glue. Adhere the small green leaves to either side of the bucket. Cut apart the set of leaves in Grape Jelly into three pieces, adhere. Make three sets of fluffy stamens, from the white Bridal Bouquet Stamens Set. Fold in half, wrap florist tape around the base and glue into the Iris bouquet with hot glue. Stamp a sentiment from the Just for You Sentiment Cling Stamp Set in Grape Jelly ink, onto Flower Shaping Paper. Die cut with a small oval from the Royal Elegance Frame Die Set. Sponge Designer Dries Clear Adhesive over the card, sprinkle on clear glitter. All done.


PRODUCTS USED

Iris Garden Paper CollectionHCDP1-2150
Iris Garden Petals Cling Stamp SetHCPC-31020
Iris Garden Petals DieHCD1-7456
3D Iris Shaping MoldHCFB1-5014
Iris Garden Accents Cling Stamp SetHCPC-31022
Iris Garden Accents DieHCD1-7458
Simply Elegant Centerpiece DieHCD1-7370
Rustic Sunflower Can & Freezer Cling Stamp SetHCPC-3963
Rustic Sunflower Can & Freezer DieHCD1-7365
Rustic Sunflower Bucket Cling Stamp SetHCPC-3964
Rustic Sunflower Bucket DieHCD1-7366
Royal Elegance Frames DieHCD2-7307
Just For You Sentiments Cling Stamp SetHCPC-3845
Deluxe Flower Shaping KitHCST1-401
Deluxe Flower Shaping Paper Pack of 50 - WhiteHCPP1-475
Petite Pollen Stamens - MediumHCS1-499
EZ Stem Floral Wire - Pack of 12HCSF1-498
Bridal Bouquet Stamens-SmallHCS1-460


OTHER PRODUCTS
6" x 6" card blank, white card, Ranger Archival Watering Can ink, water bottle mister, hot glue, foam tape, florist tape, clear glitter.


VIDEO 


Many thanks for visiting me today, come back soon for lots more inspiration 
Bye for now
xxx

Wednesday 12 April 2023

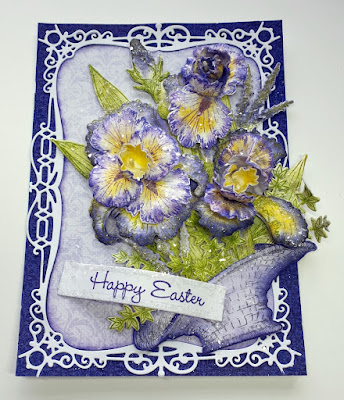
APRIL 12th HEARTFELT CREATIONS IRIS GARDEN COLLECTION DEBUT - Happy Easter


Morning lovely crafting friends

HAPPY EASTER

Its Inspiration Wednesday here at Heartfelt Creations and
I have an Easter Card up for you with the


IRIS GARDEN COLLECTION


                        If you would like to know how I made this, please scroll down for instructions.


If you would like to save $20.00 off your first Heartfelt Creations purchase, please CLICK HERE

HAPPY EASTER

INSTRUCTIONS

Take a 5" x 7" card blank, adhere a piece of purple paper cut to 5" x 7", from the Iris Garden Paper Collection with Designer Dries Clear Adhesive. Die cut two Slim Elegant Rectangles from the Slim Elegant Rectangle Die Set, one in white card and one in lilac paper from the Iris Garden Paper Collection. Adhere the white Elegant outline die to card front. Ink the edges of the lilac inner piece with Memento Grape Jelly ink using a Dauber. Adhere to card.

Stamp onto Deluxe Flower Shaping Paper, one Floral Basket from the Floral Basket Cling Stamp Set, in Ranger Archival Black ink. Color with Grape Jelly ink using a Dauber. Cut open the basket halfway across the middle with a craft knife, ink the cut edge with the same ink.

Stamp and color two Garden Blooms from the Garden Blooms Cling Stamp Set and die cut with the matching die. Stamp with Ranger Archival Leaf Green ink. Color with Leaf Green, Ranger Archival Sunflower and Grape Jelly inks. Adhere one Garden Blooms inside the Floral Basket. Adhere to card front with foam tape. Die cut the second Garden Blooms die into pieces using the separate Iris Die shapes. Cut the bud out by hand. Shape all pieces with the shaping tool from the Deluxe Flower Shaping Kit. Adhere the Iris pieces onto the Garden Blooms die-cut on the front of the card.

Stamp, color and die cut the Iris Garden Accents from the Iris Garden Accents Cling Stamp Set, using the same inks. Lightly shape with the stylus from the Deluxe Flower Shaping Kit. Adhere in and around the basket and Iris Blooms. Stamp, color and die cut three small Iris petals and leaves from the Iris Garden Petals Cling Stamp Set. Repeat with four medium and two large petals. Place in the Iris Garden Shaping Mold, lightly mist with water and run through a die cutting machine. Pierce holes in the centres of the Irises with the stylus from the Flower Shaping Kit. Thread the smallest Iris petals onto a yellow Petite Pollen Stamen, face down, squish together to make a bud. Add glue. Add more layers onto the stamens, offset the petals, add hot glue. Make three Irises. Adhere these to the Iris Blooms.

Stamp a Sentiment from the Dogwood Chapel Cling Stamp Set with Grape Jelly ink. Die cut with a die from the Ornamental Tags Die Set. Sponge glue onto card, add clear glitter. All done.


PRODUCTS USED


OTHER PRODUCTS

5"x7" card blank, white card, foam tape, Memento Grape Jelly ink pad, water mist bottle, craft knife, die cutting machine, clear glitter, hot glue.


VIDEO 


Many thanks for visiting me today, come back soon for lots more inspiration 
Bye for now
xxx