Wednesday 29 March 2023

MARCH 29th HEARTFELT CREATIONS SLIM GATEWAY RECTANGLE CARD with GARDEN LILIES


Morning lovely crafting friends, 

Its Inspiration Wednesday here at Heartfelt Creations and 

If you would like to know how I made this, please scroll down for instructions.


If you would like to save $20.00 off your first Heartfelt Creations purchase, please CLICK HERE


INSTRUCTIONS

For this 9" x 4" card, take an A4 sheet of white cardstock, cut to 9" x 8". Score and fold in half, at 4" on the 8 " side. Take the outside edge of the Slim Gateway Rectangle Die and some low tack tape, tape to the folded card, making sure to keep the folded side free of cutting lines. Run through a die cutting machine. Using the same Rectangle Die, die cut two more in yellow paper from the Garden Lily Paper Collection. Die cut another one in green paper from the Paper Collection. Adhere one yellow die cut to card front. Adhere the other two to the inside of the card. Take the inside edge of the same die and die cut in white card. Adhere to card front.

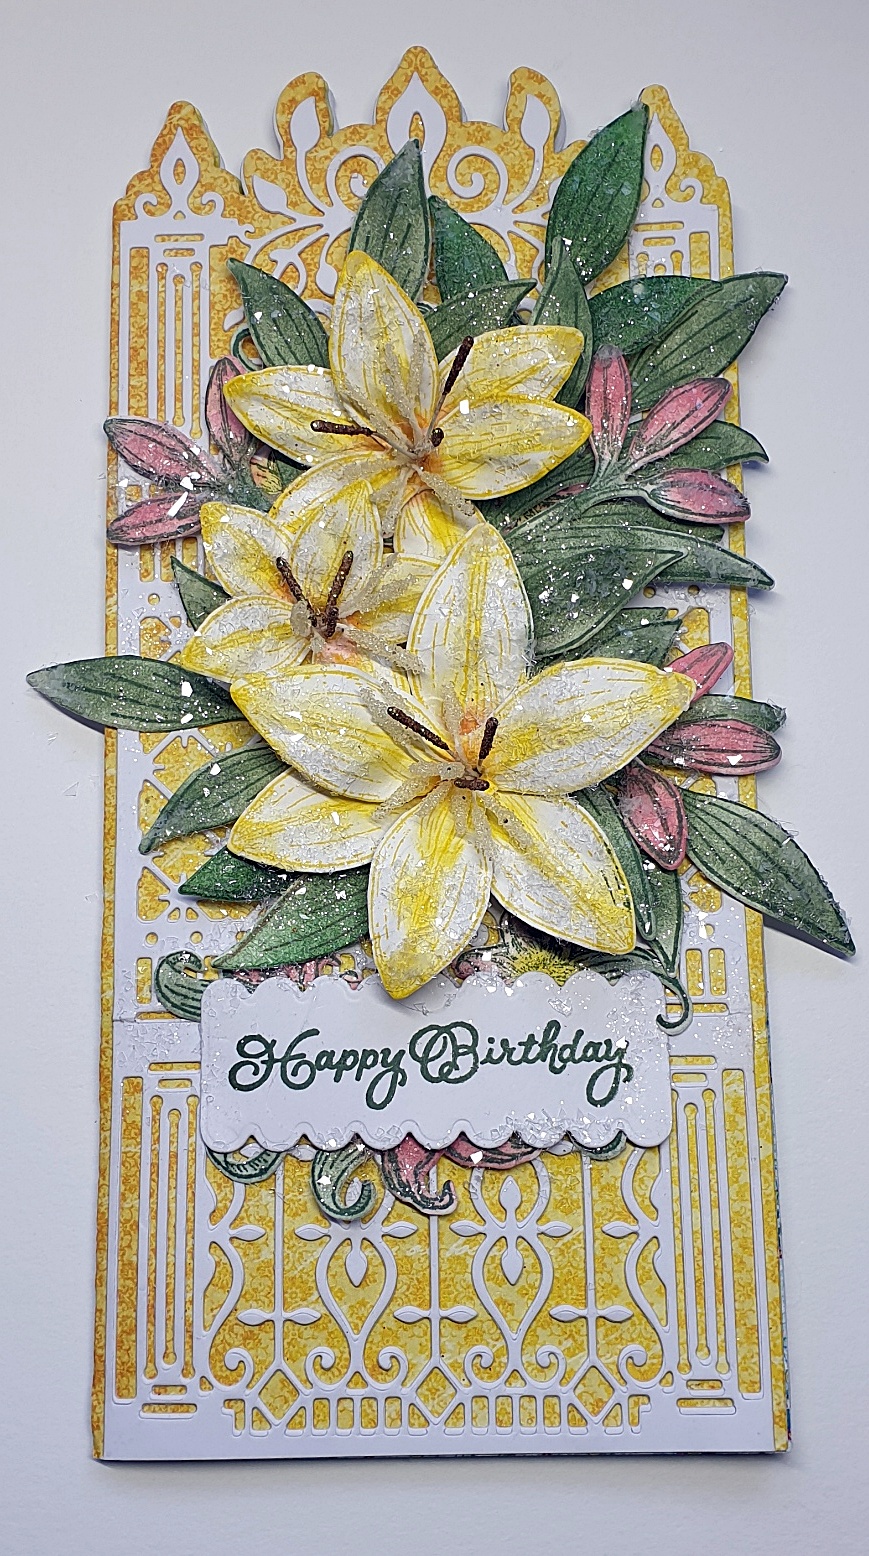
Stamp and color in Ranger Archival Sunflower ink, two sets of Lilies from the Garden Lily Cling Stamp Set, onto Deluxe Flower Shaping Paper. Add a little Pink Peony ink to the middle of the Lilies. Die cut with the matching dies. Place in the Garden Lily Flower Shaping Mold, lightly mist with water and run through a die cutting machine. Make double layers for each Lily, pierce a hole in the middle with the tool from the Deluxe Flower Shaping Kit. Thread through Petite Pollen Stamens and Rock Candy Stamens. Off set the petals and add Designer Dries Clear Adhesive. Stamp and color in Ranger Archival Olive ink a few Garden Lily Leaves onto Deluxe Flower Shaping Paper. Die cut with the matching die. Lightly shape with the stylus from the Deluxe Flower Shaping Kit. Adhere Lilies and Lily Leaves in a group on the card front with hot glue.

Stamp in Olive ink, three sets of buds and one large Bouquet from the Garden Lily Bouquet and Buds Cling Stamp Set. Color with Pink Peony ink. Die cut with the matching dies. Lightly shape the Buds with the stylus from the Deluxe Flower Shaping Kit. Stamp the small Bouquet from the Garden Lily Spray and Fillers Die in Olive ink onto Deluxe Flower Shaping Paper. Color with Pink Peony ink. Die cut with the matching die. Adhere the small Bouquet to card front below the Lilies. Adhere the large Bouquet to the inside of the card.

Stamp a Sentiment from the Special Birthday Sentiments Cling Stamp Set, onto white card, in Olive ink. Die cut with a tag die from the Ticket & Tags Die Set. I used the base of the scalloped one, twice. Adhere Sentiment across the small Garden Lily Bouquet Spray. Sponge Designer Dries Clear Adhesive over the Lilies, Leaves, Bouquet Spray and edges of the Tag. Add clear glitter. All done


OTHER PRODUCTS

A4 white heavy weight cardstock, scoreboard, low tack tape, die cutting machine, white card, water spray bottle, hot glue, clear glitter.


VIDEO 


Many thanks for visiting me today, come back soon for lots more inspiration 
Bye for now
xxx

Wednesday 22 March 2023

MARCH 22nd HEARTFELT CREATIONS INSPIRATION WEDNESDAY with Feathery Florals and Vellum Lilies

Morning lovely crafting friends, 

Its Inspiration Wednesday here at Heartfelt Creations and 
I have a card up for you made with Vellum and Feathery Florals

If you would like to know how I made this, please scroll down for instructions.


If you would like to save $20.00 off your first Heartfelt Creations purchase, please CLICK HERE


INSTRUCTIONS

For this 9 1/2" x 4" card, take a piece of A4 white cardstock, cut to 8" x 9 1/2", score at 4"on the 8" side and fold in half. Cover with orange floral paper from the Feathery Florals Paper Collection.

Die cut a piece of Luxe Gold Cardstock using the largest die from the Slim Basic Rectangle Die Set, which is 9 ¼" x 3 ¾". Adhere to card. Die cut the second size down in orange paper from the paper collection. Adhere to card. Take the Slim Eyelet Die Set, die cut the second size down in Luxe Gold Cardstock. Adhere to card front. Cut a piece of orange paper from the Feathery Florals Paper Collection to 8" x 3 ¼". Adhere to card front.

Take the Slim Lattice Oval Die and die cut in white card. Die cut again in Luxe Gold Cardstock.  Remove the white Decorative Oval Die from the center and stamp a Sentiment from the Just for You Cling Sentiments Stamp Set, in Ranger Archival Olive ink.  Adhere the two Lattice die sets together, slightly offset, with Designer Dries Clear Adhesive.  Adhere the gold and Stamped Ovals.

Stamp one set of small Garden Lilies from the Garden Lily Cling Stamp Set, onto Vellum cardstock, in Versacolor white pigment ink. Add opaque white embossing powder and heat with a heat tool. Die cut with the matching dies. Color the centers with Olive ink using a Dauber. Pierce a hole in the middle with a tool from the Deluxe flower Shaping Kit and thread through three white Petite Pollen Stamens and one white Bead Stamen. Adhere to card with hot glue on either side of the sentiment. Stamp and color two sets of Lily Leaves from the Garden Lily Cling Stamp Set in Olive ink onto Deluxe Flower Shaping paper. Die cut with the matching dies and place in the Garden Lily Shaping Mold. Run through a die cutting machine and adhere to either side of Lilies

Stamp two sets of Floral Feathers from the Floral Feathers Cling Stamp Set onto Vellum cardstock, in Versacolor white pigment ink. Add opaque white embossing powder and heat with a heat tool. Die cut with the matching dies. Adhere around the Vellum Lilies with hot glue. Sponge Dries Clear Adhesive over the Leaves, Feathers, and Lilies. Add clear glitter. All done.

PRODUCTS USED


OTHER PRODUCTS
A4 white cardstock, scoreboard, white card, heat tool, hot glue, die cutting machine, clear glitter.


VIDEO 


Many thanks for visiting me today, come back soon for lots more inspiration 
Bye for now
xxx

Wednesday 15 March 2023

MARCH 15th HEARTFELT CREATIONS Feathery Florals


Morning lovely crafting friends, 

Its Inspiration Wednesday here at Heartfelt Creations and I have a Feathery Floral Card for you

If you would like to know how I made this, please scroll down for instructions.


If you would like to save $20.00 off your first Heartfelt Creations purchase, please CLICK HERE


INSTRUCTIONS

Take a 5" x 7" card blank and cover with pink paper from the Feathery Florals Paper Collection. Take the two seven inch dies from the Filigree Accents Die Set, tape them together with low tack tape onto white card. Die cut twice. Adhere each piece top and bottom of the tent fold card. Cut a piece of green paper to 7" x 1 ½", adhere across center of card.  

Stamp onto Deluxe Flower Shaping Paper with Ranger Archival Olive ink, two sets of Petite Feathery Florals. Color with Olive ink using a Dauber. Color the flowers and butterfly with a Zig Clean Color Real Brush Pen ink in 025 Pink. Die cut with the matching dies. Stamp onto Deluxe Flower Shaping Paper in Olive ink one set of Floral Feathers. Color in with olive ink using a Dauber. Die cut with the matching dies.

Stamp onto Vellum paper with Versacolor white pigment ink, two Sets of large Feathery Florals from the Feathery Florals Cling Stamp Set. Add white embossing powder and dry with a heat tool. Die cut with the matching die. Repeat with the Floral Feathers.

Stamp onto Vellum paper with Versacolor white pigment ink, two sets of the Garden Lilies from the Garden Lily Cling Stamp Set. Add white embossing powder and dry with a heat tool. Die cut with the matching dies. Adhere two medium Lilies and one large Lily together with Dries Clear Adhesive. Pierce a hole in the middle with the piercing tool from the Deluxe Flower Shaping Kit and add four white Petite Pollen Stamens and one green Beaded Stamen. Offset the petals and add Dries Clear Adhesive as you go.

Adhere the large Vellum Feathery Floral to the center of the card. Adhere two Petite Feathery Florals in card, across the middle, overlapping in the center. Adhere the Lily using hot glue. Adhere the Olive Floral Feathers and all the Vellum Floral Feathers around the card. Cut apart the spare large Feathery Floral, add the leaves to the card.

Stamp in Olive ink a sentiment from the Thank You Sentiment Cling Stamp Set. Die cut with the small oval from the Slim Lattice Oval Die. Adhere to card with foam tape. Sponge Dries Clear Adhesive all over the card, add clear glitter. All done.


PRODUCTS USED


OTHER PRODUCTS

5" x 7" card blank, die cutting machine, low tack tape, white card, heat tool, hot glue, foam tape, clear glitter.

VIDEO

Many thanks for visiting me today, come back soon for lots more inspiration 
Bye for now
xxx

Wednesday 8 March 2023

March 8th HEARTFELT CREATIONS INSPIRATION WEDNESDAY DEBUT of the FEATHERY FLORALS COLLECTION Thank You Card

Morning lovely crafting friends

Its Inspiration Wednesday here at Heartfelt Creations and the debut of the

FEATHERY FLORALS COLLECTION

If you would like to know how I made this, please scroll down for instructions.


If you would like to save $20.00 off your first Heartfelt Creations purchase, please CLICK HERE


INSTRUCTIONS

Take a 7” x 5” card, tent fold, cover with purple paper from the Feathery Florals Paper Collection. Take the Rectangle Filigree Frame Die Set and die cut the outside edge in white card, twice. Adhere together with Designer Dries Clear Adhesive. Die cut the inside Frame of the large Filigree Frame in purple paper from the paper collection. Die cut the smaller Filigree Frame in pink paper from the paper collection. Adhere all these to the front of the card.

Stamp onto Deluxe Flower Shaping Paper, the largest Feathery Florals Cling Stamp from the Feathery Florals Cling Stamp Set, three times, in Ranger Archival Olive ink.  Stamp the smaller Feathery Floral once. Stamp the butterfly from the Petite Feathery Florals Cling Stamp Set, once. Color in with Olive ink and Ranger Distress Dusty Concord ink, using Daubers. Die cut with the matching dies.  Shape all the leaves with the stylus from the Deluxe Flower Shaping Kit.

Adhere the large Feathery Floral Flower to the middle of the card.  Cut the flowers from two large Feathery Floral Flowers, adhere the flower layers using foam tape, to the Feathery Floral die cut. Cut apart the smaller Feathery Floral, adhere to one corner. Adhere the butterfly. Apply Dries Clear Adhesive to the flower centers. Add Lettuce Entertain You Prills. Stamp a sentiment from the Thank You Sentiments cling stamp set in Olive ink. Die cut with a tag from the Arrows and Banner Die Set. Adhere to the small Feathery Floral. Sponge Dries Clear Adhesive over the flowers, leaves, and butterfly, add clear glitter.  All done.   

PRODUCTS USED


OTHER PRODUCTS
7" x 5" card blank, white card, Ranger Distress ink - Dusty Concord, foam tape, clear glitter.


VIDEO 


Many thanks for visiting me today, come back soon for lots more inspiration 
Bye for now
xxx