Monday 30 November 2015

ROBINS NEST - BELIEVE

 
Hi everyone and welcome to my blog and my take on the November
ROBINS NEST sketch challenge.
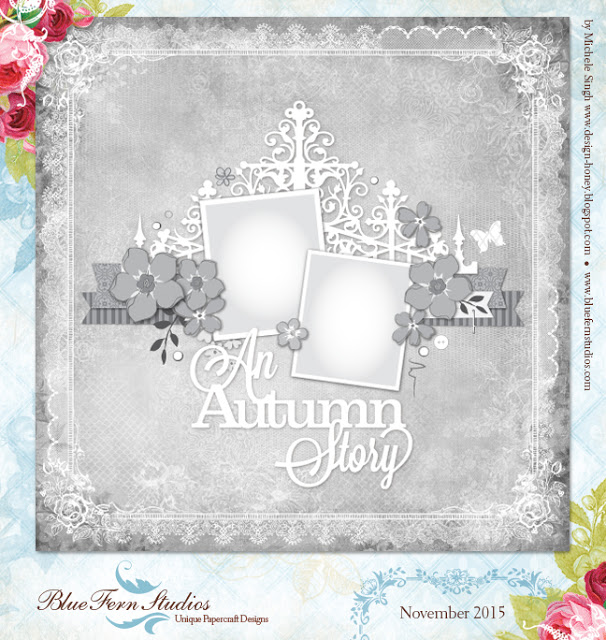
This is a fabulous sketch by Bev Code which I really love because I get to use lots of flowers. Scroll down for a step by step and to see the stash I used.


STEP 1
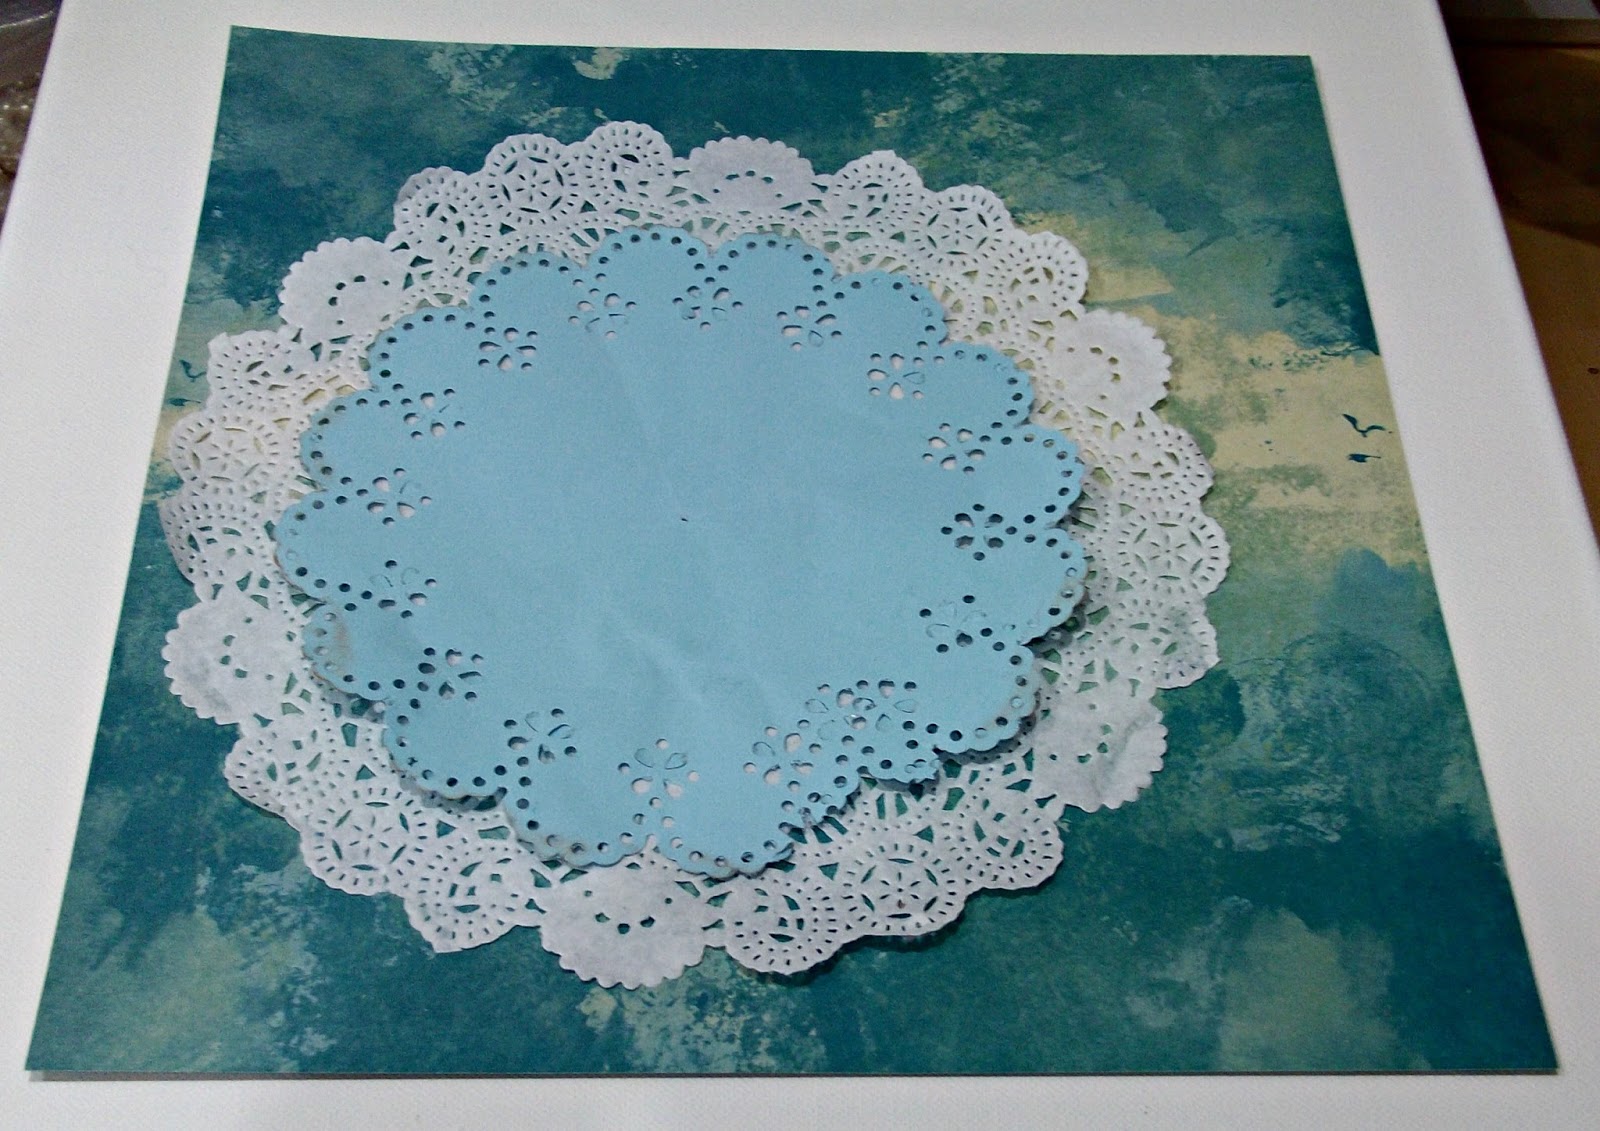
Adhere a large white doily to pretty background paper
I chose the blue-y greens from my photo
 
 STEP 2
Add another smaller doily
I cut this using a doily cutter

STEP 3
Adhere matted photos
 
STEP 4
Add border strips as per the sketch


STEP 5
Add three chipboard strips (painted white)

  
STEP 6
Decorate with flowers and leaves
 STEP 7
Take some modelling paste and a small lid


 STEP 8
Add the circles with the small lid dipped into the paste
then add the title
STEP 9
Add some micro beads with glue


CLOSE UPS


SCRAPPY STASH USED
 
Pretty paper - All Time Favourites, The Works, uk
Plain cardstock - four different colours
White doily
Martha Stewart Doily Cutter
Chipboard pieces by Prima
White acrylic paint
Mini pearls
Assorted flowers, leaves, stamens and stick pins
Tim Holtz Sizzix Pine Cone die -  for the sparkly leaves
Butterflies with stick pin bodies
Modelling paste
Pop micro beads - American Crafts
Title alphas from a Sizzix strip die.
XXX

PRIZES
One lucky winner, selected by a random draw, will receive a $25 prize package of Robin's Nest Scrapbook Products!
XXX
ROBINS NEST BLOG http://chatteringrobins.blogspot.co.uk/
ROBINS NEST WEB SITE http://www.robinsnest-scrap.com/home.html
ROBINS NEST SHOP http://www.shop.robinsnest-scrap.net/main.sc

XXX
 
THATS ALL FOR NOW - hope you enjoyed the tutorial and give the sketch a go. Have fun.
XXX
 

Saturday 28 November 2015

SCRAP OUR STASH DESIGN TEAM REVEAL - NOVEMBER SKETCH CHALLENGE Nov 15th - 29th - TRUST


                          Hi everyone and welcome to my blog and the latest sketch and stash challenge at
 SCRAP OUR STASH
This is a fabulous sketch, and if you fancy some paper weaving,
Plus the Bingo Card was fun. I used column 2 - Paper clip, Doily, Glitter, Journal and Metal bird charm. Why not give it a go, and of course as always there are PRIZES!
So here's how
Choose photo, cardstock, pretty paper and embellies
Cut down the pretty paper to 11x11inches, distress the edges and tear out a few sections as per the sketch
Adhere to background card
Matt photo, ink the edges
Cut out lots of small strips in various lengths and widths, ink edges
Lightly adhere photo
Start layering the strips behind the photo, you can weave as you go
Add a few strips in the bottom left corner
Now start to embellish
I added a beautiful crochet doily, some cogs that I painted and glittered, a butterfly and a small silver metal bird charm.
Add a journaling box and the title.
SCRAPPY STASH
Plain cardstock
Pretty paper -Prima
Brown Ink
Handmade crochet doily
Mini Cogs - Creative Embellishments
Small silver metal bird charm - from my stash
Glitter glue
White paper clip - from my stash
Butterfly and stick pin
Journaling block
Title from my stash.
Close Ups


PRIZE 
 
Photography by
I WOULD LOVE IT IF  YOU BECAME A FOLLOWER 
MANY THANKS - BYE FOR NOW


Tuesday 24 November 2015

HARMONY


Hi everyone and welcome to my blog and my latest layout.
For my inspiration I have used a sketch from Blue Fern Studios
I loved this sketch and had just the photo.
xxx
HERES HOW
Choose photo, papers, card and embellishments
Matt Photo onto card stock
Lightly adhere to the background paper
Cut out two banner borders, one in corrugated card and one in textured card, place under the photo
Paint some chipboard in white 
Adhere the large chipboard peice to the top of the photo
Adhere the two smaller pieces on either side of the photo
Start to decorate with assorted flowers, butterflies and some pearls
Finish off with the title.
xxx
SCRAPPY STASH
Papers - Prima Timeless Collection
Chipboards from Blue Fern Studios
Blue card stock
White paint dabber
Corrugated card in brown
Textured card in cream
Butterflies and beaded pin bodies
Small pearls from Kaisercraft
Title from my stash
Hot glue to attach the flowers.
xxx


Photography by 
Many thanks for stopping by, I hope you like my take on the sketch. I would really appreciate your comments and would love it if you became a follower - many thanks
Bye for now. 
xxx

Friday 20 November 2015

BERRY71BLEU DESIGN TEAM REVEAL - NOVEMBER MOOD BOARD - FAITH - RIDDERSHOLM DESIGNS


Hi everyone and welcome to my blog and the latest BERRY71BLEU Mood Board
This mood board is so pretty and vintage looking, I hope you like it and give it a go.
HERE IS HOW I DID MINE
Choose photo, cardstock, pretty paper and embellishments
Matt photo
Cut out three border pieces into banners and ink the edges
Attach down one side of the page, add the photo
Add a border of lace below and under the photo
Add a lace doily
Add another small banner under the doily
Start to embellish with photo frames, mini roses, a photo corner and a set of keys and a bow
Add the title.
SCRAPPY STASH
Plain cardstock in brown petrol blue and dark blue
Pretty paper by RIDDERSHOLM DESIGNS - Barn Market
Lace doily and lace offcut from my stash
Mini frames made with a Martha Stewart Paper Clay kit
Brown and teal chalk inks
Mini roses
Key and lock die cuts - Sizzix
Silver key - my stash
Bow - Seam binding
Photo Corner - Prima
Title - Creative Embellishments.
CLOSE UPS


PRIZES

1st Prize 
Full set of 11 Christmas Cosy papers by Riddersholm Designs


Random Prize

Special Vintage kit prepared by our DT member Sylwia
Make sure you visit her blog http://www.tandiart.blogspot.ie 

Sponsor:


Riddersholm Design is a company created by Connie Riddersholm,  who has been designing & manufacturing unique, high quality scrapbooking papers since 2010. Her beautiful papers can be used for scrapbooking, card making and other art projects. The papers are selected especially to Connie's style and product. Paper is an environmentally correct produced quality mark. First collection has been launched in March 2010 and now they are being sold in Denmark, Sweden, Norway, Poland, Australia, England, Finland, Germany, Holland, France and USA
Website: http://riddersholmdesign.dk/home
Facebook:  https://www.facebook.com/riddersholmdesign/?fref=ts

Photography by Shealean Faere Butler Photography
 

MANY THANKS FOR VISITING TODAY
BYE FOR NOW
XXX


Wednesday 18 November 2015

BOYS FOOD plus STEP BY STEP and three layouts for the FLYING UNICORN


Hi everyone here is a masculine page for a change, always a challenge for me as what to do instead of flowers!
Here I have used cogs to replace them and think it works ok.
I have also entered this into the colour challenge at WORDS AND PAINTERY

 
Heres How  in ten easy Steps
 
1. Matt photo onto coordinating paper, distress the edges
2. Lightly place onto background paper
3. Start to layer up
4. For the first layer cut Kraft card down to 7x9 inches, ink edges
5. Add corrugated card 5x7 inches, ink edges and  paint in white
6. Add layers underneath the corrugated card inking as you go
7. Take some honeycomb chipboard, paint and ink, glue to  coordinating paper and add to side of matted photo
8. Now add two hand cut banners as per the layout, ink edges
9. Start to decorate with chicken wire chipboard, painted and inked, add an assortment of cogs, a few leaves and a tag
10. Add the title.
SCRAPPY STASH
Background and all the pretty paper - Prima, Timeless collection
Kraft card
Corrugated card
White paint dabber
Brown chalk ink
Silver ink
Aqua ink
Chipboards from Creative Embellishments
Sizzix sizzlets leafy branch die
Mini tag from my stash.
I hope you like it.
xxx
SOME CLOSE UPS


THREE LAYOUTS FOR THE FLYING UNICORN DESIGN TEAM CALL
 
 SMILE


CRAZY HAPPY
click on the links to be taken to the info.

 
Thank you for visiting today, I would love it if you left some comments and became a follower many thanks 
Bye for now
xxx


Saturday 14 November 2015

SCRAP OUR STASH DESIGN TEAM REVEAL - NOVEMBER 15TH - 30TH, U & ME


Hi everyone and welcome to my blog and the latest Scrap our Stash challenge.
For this challenge create a layout and include an item from your stash for each letter in the word A - L - B - U - M - S

http://scrapourstash.blogspot.co.uk/

HOW I DID THIS
Choose photo, papers card and embellies
Matt photo in cardstock
Lightly adhere to centre of page
Cut two doilies adhere behind the photo
Add some lace
Cut three border strips, cut ends into banner shapes to go behind the photo
Add a length of lace down the side
Add a music paper layer
Add another border strip to the centre right side
Start to decorate 
I used lace flowers, mini roses and rose buds, buttons, clock face, butterfly, arrows, stick pins and a corner piece
Add the title.
STASH USED FOR THE CHALLENGE
A L B U M S
A - Arrows
L - Lace, Layering
B - Buttons, Butterfly
U - Letter U
M - Music paper, Martha Stewart doily cutter, Metal
S - Stick pins.
STASH USED IN LAYOUT
Background paper by Prima
Plain cardstock
Music paper from a book
Brown chalk ink
Martha Stewart Doily Circle Cutter
Lengths of lace
Prima mini resin corner piece
Metal butterfly
Mini stick pins handmade
Clock face
Metal brooch
Lace flowers
Buttons
Arrow die cuts
Mini roses and rosebuds
Assorted alphas from my stash.
Hi I hope you like this challenge and give it a go.
PRIZE