Wednesday 30 November 2022

NOVEMBER 30th HEARTFELT CREATIONS CYBER MONDAY CARD - Thinking of You Slimline card

 Morning lovely crafting friends, 

Its Inspiration Wednesday here at Heartfelt Creations and it's the 

CYBER MONDAY DIE SET

We have a wonderful new die for you today

If you would like to know how I made this, please scroll down for instructions.

If you would like to save $20.00 off your first Heartfelt Creations purchase please CLICK HERE


INSTRUCTIONS

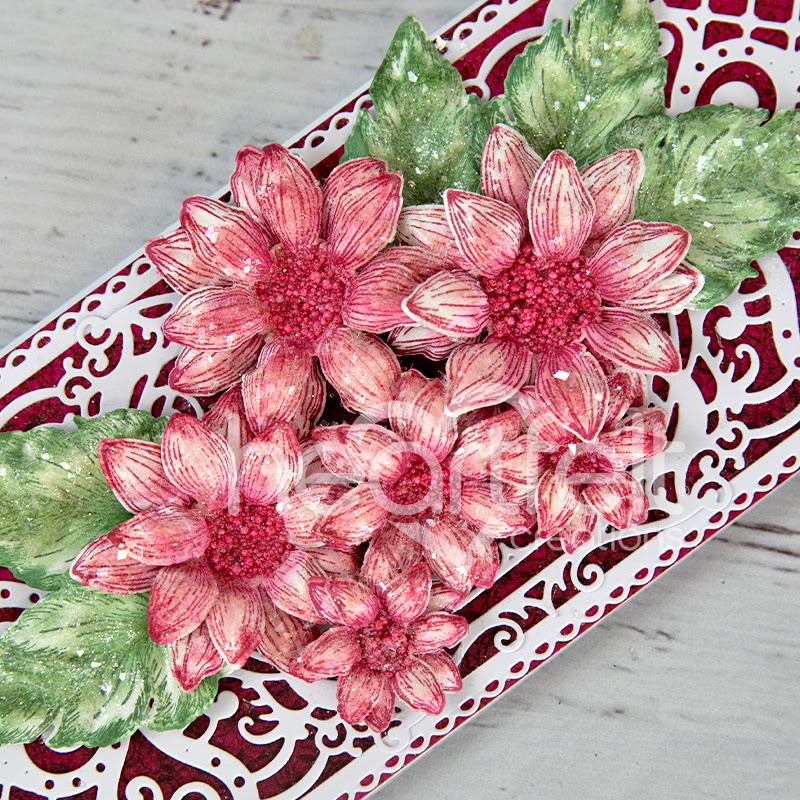
Take a 9" x 4" slimline card, adhere a piece of pink paper Sheet 3A, from the Friendship Rose Collection Paper Pad, cut to the same size. Use Designer Dries Clear Glue for this. Die cut all the pieces of the Slim Star Lattice Rectangle Die in white card.  Adhere the largest Lattice to the card front. Die cut the smaller Lattice outside edge, in green paper, Sheet 10B. Adhere the smaller white Lattice piece to the green piece. Adhere to center of card with foam tape.

Stamp in Memento Lilac Posies ink, onto Deluxe Flower Shaping Paper, an assortment of Classic Roses from the Classic Roses Cling Stamp Set. Color with the same ink using a Dauber. Die cut with the matching dies. Place in the 3D Floral Basics Shaping Mold. Lightly spray with water. Run through a die cutting machine. Tap out and lightly shape with the Stylus from the Deluxe Flower Shaping Kit, on the reverse. Ink the edges in Lilac Posies ink.

Make five buds using the extra small Classic Rose Petals. Apply Dries clear glue to the reverse and bring all the petals up into the middle and hold for a few moments to allow the glue to dry. Add petal layers to each bud with Dries Clear Glue. Off-set the petals as you go.  Make one Large, two medium and two small Classic Roses.

Stamp in Ranger Archival Leaf Green ink, onto Deluxe Flower Shaping Paper, two sets of Leafy Accents Leaves from the Leafy Accents Cling Stamp Set. Stamp two sets of leaves from the Classic Rose Cling Stamp Set.  Color with the same ink using a Dauber. Die cut with the matching dies. Place in the Leafy Accents and 3D Floral Basics Shaping Mold and lightly spritz with water. Run through a die cutting machine, tap out, and when dry, ink the edges in Ranger Archival Olive ink.

Adhere one large Leafy Accent Leaf spray onto the center of the card, using hot glue. Adhere the largest Classic Rose with hot glue to the center. Adhere two medium Roses to either side. Adhere two smaller Roses to the center of the Classic Rose Leaf Sprays. Adhere the smaller Rose sprays to either side. Add in a few more leaves cut from the smaller Leafy Accent Spray.

Stamp a sentiment from the Friendship Sentiments Cling Stamp Set, onto Deluxe Flower Shaping Paper in Lilac Posies ink. Cut the sentiment to size, adhere to base of the Roses and leaves. Using a small sponge apply Dries Clear Glue over the Roses and leaves. Sprinkle on clear glitter. All done. 


PRODUCTS USED


OTHER PRODUCTS

9"x 4" card blank, white card, foam tape, water spray bottle, die cutting machine, hot glue, clear glitter.


VIDEO 


Many thanks for visiting me today, come back soon for lots more inspiration 
Bye for now
xxx

Friday 25 November 2022

NOVEMBER 25TH HEARTFELT CREATIONS BLACK FRIDAY RELEASE - Easel Card


 Morning lovely crafting friends, Its Heartfelt Creations

BLACK FRIDAY

with the Debut of the Black Friday Release Die Sets

If you would like to know how I made this, please scroll down for instructions.


If you would like to save $20.00 off your first Heartfelt Creations purchase, please CLICK HERE


INSTRUCTIONS

To make this 8 1/2" x 3 3/4" slim line, tent fold, Easel card, take a piece of A4 white card, cut to 8 1/2" x 7 1/2", fold in half and score. Fold one side in half again and score. Put to one side.

To make the Slim Lattice panel, die cut the Slim Lattice Oval Die, including the fancy frame and small oval, in white card. Set the fancy oval and small oval to one side.  Cut a rectangle of red paper from the Friendship Rose Paper Collection to 8" x 3 1/4". Adhere the white Slim Lattice Oval to the rectangle of red paper.   

 Cut a rectangle of red paper  to  3 1/2" x 8 1/2". Die cut a Slim Eyelet Rectangle, second size down, in white card. Adhere the white Slim Eyelet Rectangle to the red rectangle. Adhere the matted Slim Lattice Oval panel on top.  Glue this panel to the half fold of the card, making sure to add glue to the bottom half of the panel only. Cut a panel, 1 3/4" x 8 1/2" in white card and glue to the back of the top half of the Lattice panel, to neaten.

For the other side of the card, die cut another rectangle of red paper with the Slim Eyelet Rectangle die, second size down. Adhere. Take the fancy oval piece from the Slim Lattice Oval Die cuts and adhere to the lower center of the red paper. Stamp a sentiment from the Friendship Sentiments Cling Stamp Set, onto the small oval, in Ranger Archival ink - Light House. Ink the edges using a Dauber in Light House ink.  Adhere to the middle of the fancy oval with foam tape.

Stamp a variety of Rustic Sunflowers in Light House ink, onto Deluxe Flower Shaping Paper.  Stamp the co ordinating leaves, in Ranger Archival Olive ink. You will need five leaves and six large, two medium, and six small Sunflower layers. Color with the same inks. Die cut with the matching dies. Ink the edges of the Sunflowers in Light House ink using a Dauber. Ink the edges of the leaves in Olive ink. Place in the Rustic Sunflower Shaping Mold, lightly spritz with water and run through a die cutting machine. Tap out and lightly shape on the reverse with the stylus from the Deluxe Flower Shaping Kit. Glue two of each size of petals together with Dries Clear Glue, offset the petals as you go. Add a circle of Dries Clear Glue to the middle of each Sunflower, then add lots of Stop Whining Prills. Adhere the Sunflowers to the center of the card with hot glue. Adhere the leaves around the Sunflowers with hot glue. Adhere a small Sunflower next to the sentiment. Apply Dries Clear Glue to the flowers and leaves. Sprinkle on clear glitter. All done.


PRODUCTS USED


OTHER PRODUCTS

A4 white card, white card, paper trimmer, score board, foam tape, water bottle spritzer, die cutting machine, hot glue, clear glitter.


VIDEO 

(30) How to Create Rustic Sunflowers - YouTube


Many thanks for visiting me today, come back soon for lots more inspiration 
Bye for now
xxx

Wednesday 16 November 2022

NOVEMBER 16th HEARTFELT CREATIONS FRIENDSHIP ROSE COLLECTION SCRAPBOOK PAGE - You're One in a Million


Morning lovely crafting friends, 

Its Inspiration Wednesday here at Heartfelt Creations and I have a Scrapbook Page with the FRIENDSHIP ROSE COLLECTION 
for you. If you would like to know how I made this, please scroll down for instructions.


If you would like to save $20.00 off your first Heartfelt Creations purchase, please CLICK HERE


INSTRUCTIONS

For this 12"x 12" scrapbook page, use sheet 11B, brown paper, from the Friendship Rose Collection Paper Pad, for the background paper. Top Tip: if you want to save paper, gut the inside of sheet 11B with a paper trimmer, you can save the center piece for later. Take sheet 6A from the paper pad and cut to 11 1/2" square. Adhere to sheet 11B. Cut the left-over piece of sheet 11B to 3 3/4" x 5 1/4".  Adhere a 3 1/2" x 5" photo. Die cut the Decorative Heart Die in white card. Remove the center Heart pieces and put to one side. Adhere the Decorative Heart at a slight angle onto the 12" x 12" page. Adhere the matted photo on top.

Stamp the Budding Rose Heart Cling Stamp Set onto Deluxe Flower Shaping paper, in Ranger Archival Leaf Green ink. Color with Ranger Archival Leaf Green and Rose Madder inks, using the Daubers.  Die cut with the matching dies. Ink the edges in Ranger Archival Olive ink. Put to one side. Stamp the single Roses from the Budding Rose Heart Cling Stamp Set three times in Leaf Green ink. Color with Leaf Green and Rose Madder inks. Die cut with the matching dies. Put to one side.

Die cut the Scalloped Heart from the Decorative Heart Die set in green, sheet 10B, from the paper pad. Use the Scalloped Heart Die to die cut the Fancy Heart from out of the paper that is left over from die cutting the Decorative Heart.  Adhere the white fancy Scalloped Heart to the green Scalloped Heart. Adhere the Budding Rose Stamped Heart onto the Scalloped Heart. Stamp a sentiment from the Friendship Sentiments Cling Stamp Set, onto the smallest Heart that you put to one side, in Leaf Green ink. Ink the edges in Leaf Green ink using a Dauber. Adhere to center of the Budding Rose Heart with foam tape. Adhere all this to side of photo with foam tape.

Make one Extra Large, two Large and one Medium Rose by stamping the Classic Rose Cling Stamp Set, with Rose Madder ink, onto Deluxe Flower Shaping paper. Color with Rose Madder ink using a Dauber. Die cut with the matching dies. Place in the 3D Floral Basic Flower Shaping Mold and lightly spritz with water. Run through a die cutting machine and tap out. Ink the edges with Rose Madder ink using a Dauber. Lightly shape on the reverse with the stylus from the Deluxe Flower Shaping Kit. Make four buds by using the extra small petals. Add Designer Dries Clear Glue to the reverse and gently push each petal together to form a bud. Hold for a few moments for the glue to dry.  Add small, medium, large and extra-large layers, according to size, using Dries Clear Glue. Offset the petals as you go. Adhere three Roses to one side of the photo with hot glue.

To make the leaves, stamp onto Deluxe Flower Shaping paper with Leaf Green ink, Leafy Accents Leaves from the Leafy Accents Cling Stamp Set. Die cut with the matching dies. Place in the Leafy Accents Shaping Mold and lightly spritz with water. Run through a die cutting machine and tap out. Ink the edges of the leaves with Ranger Archival Olive ink using a Dauber. Cut into small segments. Adhere the leaves around the Roses with hot glue. Adhere the Rose Stems at the base of the floral heart with hot glue, three to either side. Adhere a small Rose. Using a brush or a small sponge, apply Dries Clear Glue wherever you would like glitter. Add clear glitter. All done.


PRODUCTS USED


OTHER PRODUCTS
Paper Trimmer, foam tape, die cutting machine, water spray bottle, hot glue, clear glitter.


VIDEO 


Many thanks for visiting me today, come back soon for lots more inspiration 
Bye for now
xxx

Wednesday 9 November 2022

9th November HEARTFELT CREATIONS FRIENDSHIP ROSE COLLECTION SHAKER CARD


 Morning lovely crafting friends, 

Its Inspiration Wednesday here at Heartfelt Creations and the Debut of the 

FRIENDSHIP ROSE COLLECTION

If you love Roses, then this collection is for you.
If you would like to know how I made this, please scroll down for instructions.


If you would like to save $20.00 off your first Heartfelt Creations purchase, please 


INSTRUCTIONS

For this 5" x 7" card, cut Sheet 9B from the Friendship Rose Collection Paper Pad to 5" x 7", adhere to a 5" x 7" card blank, with Designer Dries Clear Glue. Cut a piece of Sheet 5B from the Paper Pad to 4 1/2" x 6 1/2", adhere to card front. Die cut the Decorative Heart Die in white card using the large outside edge, adhere to card front with Dries Clear Glue. 

Take the Friendship Rose Heart Cling Stamp Set and the Budding Rose Heart Cling Stamp Set and stamp onto Deluxe Flower Shaping paper with Ranger Archival Leaf Green ink. Color with Ranger Archival Rose Madder and Leaf Green inks using the Daubers. Die cut with the matching dies. Die cut the center from the Friendship Rose Heart only. Put the Rose Stems aside for later. 

To make the shaker element for the card, die cut a Scalloped Heart from the Decorative Heart Die Set in Clear Cardstock. Adhere this to the back of the smaller Friendship Rose Heart Die cut, with Dries Clear Glue. Apply thin foam tape around the reverse edge of the Friendship Rose Heart, taking care to keep inside the frame. Make sure there are no gaps. Adhere the larger Budding Rose Heart Die cut to the Decorative Heart Die cut on the front of the card. Place sequins and beads into the center of the Budding Rose Heart Die cut. Adhere the smaller Friendship Rose Heart onto the larger Budding Rose Heart, firmly pressing the foam tape down. 

To make the Roses, stamp onto Deluxe Flower Shaping Paper, lots of Roses from the Classic Rose Stamp Set with Rose Madder ink. Color with Rose Madder ink using a Dauber. Die cut with the matching dies. Place in the 3D Floral Basics Shaping Mold, lightly spray with water and run through a die cutting machine. Tap out and lightly shape on the reverse with the stylus from the Deluxe Flower Shaping Kit. Make five Extra Small buds by adding Designer Dries Clear Glue to the reverse of the petals and slowly bring each petal up together and hold for a few minutes for the glue to dry. For the three smallest Roses, adhere two layers of small petals to a bud, offset the petals as you go. To make the Medium Roses add one small layer and two medium layers to a bud. You will need three small and two medium Roses.  Adhere one Medium and three small Roses around the frame with hot glue.

For the leaves, stamp Leafy Accents onto Flower Shaping paper in Leaf Green ink. Color with Leaf Green ink using a Dauber. Die cut with the matching dies. Place in the Leafy Accents Shaping Mold, lightly spray with water and run through a die cutting machine. Tap out and cut into small segments. Ink the edges in Ranger Archival Olive ink using a Dauber.  Adhere around the Roses using hot glue.

Take the Rose Stems and lightly shape with the Stylus from the Deluxe Flower Shaping Kit. Cut the stems a little to make them shorter. Adhere them across the base of the heart at a slight angle. Place in two sets of three, one large, medium and small stem. Make sure to leave a gap in the middle for the Sentiment and Rose.

Stamp onto Deluxe Flower Shaping paper a sentiment from the Friendship Rose Sentiments Cling Stamp Set in Leaf Green ink. Die cut with the 2" x 1 1/4 " tag from the Ticket and Tags Craft Die Set. Ink the edges with Leaf Green ink using a Dauber. Apply foam tape to the reverse. Adhere into the middle of the Rose Stems at an angle with foam tape. Add a medium Rose using hot glue.  Take a small sponge and Dries Clear Glue, apply glue wherever you would like glitter. Add clear glitter. All done.


PRODUCTS USED


OTHER PRODUCTS

5" x 7" card blank, white card, Sizzix Sequins & Beads in Ballet Slipper, 1/4" foam tape, water spray bottle, die cutting machine, hot glue, clear glitter. 


VIDEO 


Many thanks for visiting me today, come back soon for lots more inspiration 
Bye for now