Wednesday 22 June 2022

June 22nd HEARTFELT CREATIONS CONGRATULATIONS with the MUSHROOM COTTAGE COLLECTION


Morning lovely crafting friends, its Inspiration Wednesday at Heartfelt Creations. 
If you would like to know how I made this scrapbook layout please scroll down for instructions.


If you would like to save $20.00 off your first Heartfelt Creations purchase please CLICK HERE

INSTRUCTIONS

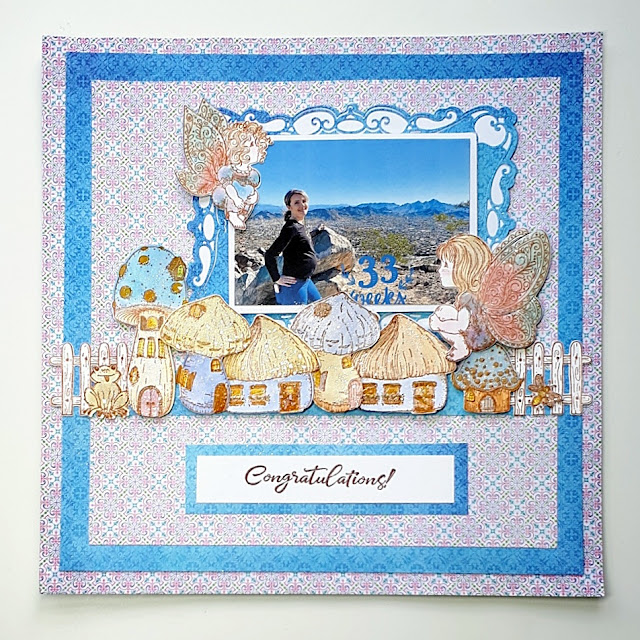
Cut the patterned paper to 10 x 10 inches, adhere onto blue paper cut to 11 x 11 inches, adhere onto 12 x 12 patterned paper, adhere to page using Dries Clear Glue.

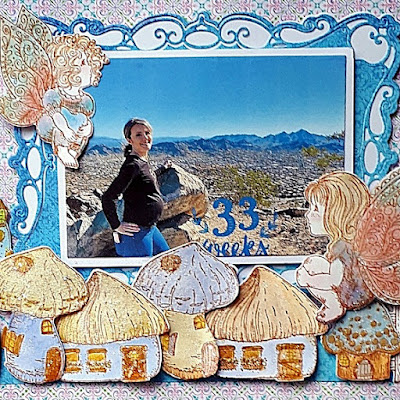
Take the largest outline die from the Flourish Companion Frame Dies Set, 5 x 7 inches, cut one in white card. Adhere to the page slightly off center with foam tape. Die cut the 4.75 x 8.75 inches die, in blue paper, adhere both parts on top of white frame. Mat a 5 x 3.5 inches photo onto white card, adhere with foam tape.

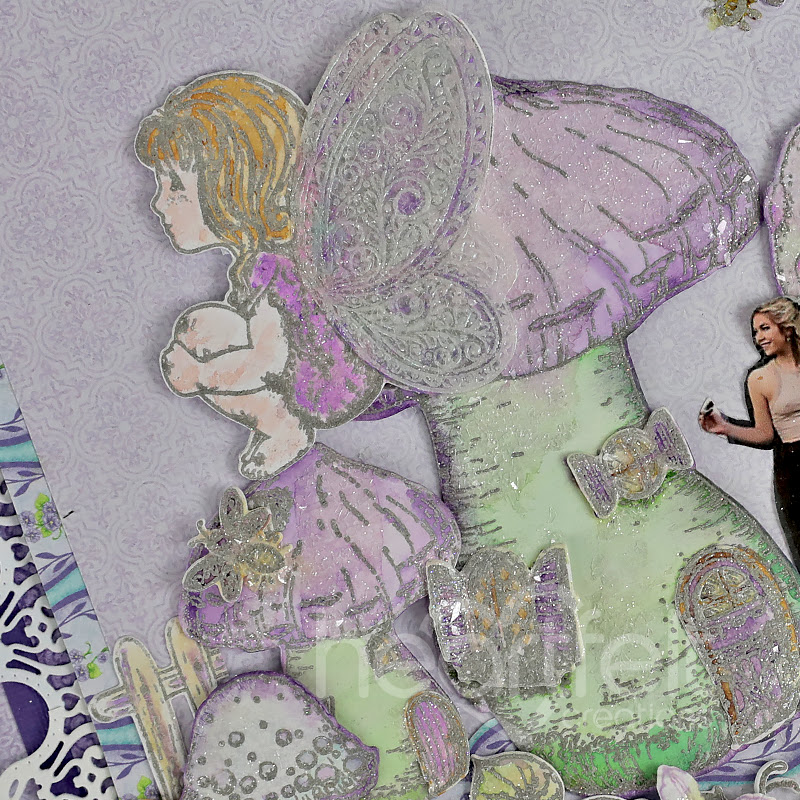
Stamp using Coffee ink, color and die cut with the matching dies, six Mini Mushroom Cottages. Color in using inks and zig watercolor markers and a water brush. Stamp, color and die cut with the matching dies, two Mushroom Fairies. Stamp, color and die cut the little frog from the Large Mushroom Cottage Stamp and Die set. Stamp, color and die cut with the matching die, the small fence from the Mushroom Cottage Accents Stamp and Die set. You will need two. Stamp, color and die cut with the matching die the little lightening bug from the same set.

Cut a border strip from the blue paper 10 x 1 inches. Adhere across the page four inches from the bottom of the page. Adhere the two fences at either end of the border. Adhere six cottages across the border strip. Adhere the frog and bug at either end. Adhere the fairies either side of the photo using Dries Clear Glue and Foam Tape.

Stamp Congratulations in Coffee ink onto white card cut to 5.5 x 1 inch, glue onto a blue strip cut to 6 x 1.5 inches. Adhere below the Mushroom Cottages.

Add Glossy Accents to all the windows and doors of the Mushroom Cottages and to the Fairies' dresses and wings. Using Dries Clear Glue, add glue with a brush or sponge to everywhere you would like glitter, add Clear Glitter. All done.


PRODUCTS USED

Mushroom Cottage Paper CollectionHCDP1-2140
Large Mushroom Cottage Cling Stamp SetHCPC-3989
Large Mushroom Cottage DieHCD1-7407
Mini Mushroom Cottages Cling Stamp SetHCPC-3990
Mini Mushroom Cottages DieHCD1-7408
Mushroom Cottage Accents Cling Stamp SetHCPC-3992
Mushroom Cottage Accents DieHCD1-7410
Mushroom Fairies Cling Stamp SetHCPC-3991
Mushroom Fairies DieHCD1-7409
Flourish Companion Frame DieHCD2-7399
Deluxe Flower Shaping KitHCST1-401
Deluxe Flower Shaping Paper Pack of 50 - WhiteHCPP1-475
Stack and Store Daubers-Pack of 30HCDA2-450
Designer Dries Clear Adhesive159723
Ranger Archival Ink Pad - CoffeeRACP451
Zig Clean Color Real Brush Markers - 48 Pack478594
Color In Watercolor Brush - Fine409311

OTHER PRODUCTS USED

Purple card, White card, Foam tape, Clear Glitter, Embossing Powder - Pewter, Heat-able Acetate, Water brush, Heat Gun, Hot Glue Gun, Ranger Distress Inks – Dusty Concord, Mowed Lawn, Victorian Velvet, Versamark -Watermark Stamp Pad, Pale Yellow ink pad, Water brush


MANY THANKS FOR VISITING ME TODAY

BYE FOR NOW

XXX

Wednesday 15 June 2022

June 15th HEARTFELT CREATIONS GOOD THINGS TAKE TIME


Morning lovely crafting friends, its Inspiration Wednesday at Heartfelt Creations. 
If you would like to know how I made this please scroll down for instructions.


If you would like to save $20.00 off your first Heartfelt Creations purchase 
please CLICK HERE


INSTRUCTIONS

Cut  Lilac Sheet 7B to 6 3/4 x 7 3/4 inches from the Mushroom Cottage Collection Paper, mat onto white card cut to 7 x 8 inches, adhere onto Sheet 12B from the Paper Pad. Die cut one border strip from the Classic Companion Border Die Set in white card, cut in half, adhere to either side.

Die cut the second largest Filigree Companion Frame Die size 4.75 x 6.75 inches in lilac sheet 7B, adhere to center. Die cut the next size down outline die in blue sheet 9B, adhere inside the white outline die-cut. Ink the edges of the smaller lilac center piece and adhere with foam tape to the middle of the frame Die cut the inner 3.5 x 5-inch die in blue sheet 9B paper, adhere. Die cut the next size outline die in white card, adhere around the edge. Die cut the inner outline die in lilac sheet 7B, adhere around the edge inside the white frame. Die cut the photo in the smallest die and adhere to the center of the frame.

Stamp in Deep Purple ink the Sentiment from the Simple Moments In Time Timepiece, Cling Stamp Set – Good Things Take Time. Die cut with the 2.25-inch circle from the Simple Moments Timepiece Die set, Ink the edges in Dusty Concord ink, adhere to the shaped die cut. Add Dries Clear Glue on one side and foam tape on the other so that it sits well. Stamp in Ranger Distress Antique Linen and die cut the little bee from the Mushroom Cottage Accents Stamp and die set, color in with Antique Linen ink. Adhere.

Stamp in Deep Purple ink three small Wild Roses, shape with the Shaping Stylus from the Flower Shaping Tool Kit, glue a small pearl stamen in the middle, adhere to side of page. Stamp in Leaf Green ink two small leaves from the Leafy Accents Cling Stamp Set, die cut with the matching die. Shape with the Deluxe Flower Shaping stylus and add a little Dusty Concord ink to the edges. Adhere around the Wild Roses.

Stamp in Deep Purple ink, five assorted sizes of Garden Zinnias. Die cut with the matching dies. Place in the Garden Zinnias Flower Shaping Mold, lightly spritz with water and run through a die cutting machine. Tap out and lightly and finish shaping with the stylus from the Deluxe Flower Shaping Tool Kit. Add a little extra ink to the edges with the Daubers and curl the edges up with a pair of tweezers. When dry, pierce a hole in the centers and thread purple stamens through, using a small piece of doubled over wire. Add a little glue between each layer, offset the petals as you go. Adhere to page with hot glue.

Stamp, color using the Daubers and Leaf Green ink and die cut with the matching die, three Large Wild Roses Leaves. Place in the Large Wild Roses Flower Shaping Mold, lightly spritz with water and run through a die cutting machine. Tap out and when dry add a little Deep Purple ink to the edges of the leaves. Adhere around the Zinnia with hot glue. All done.

Other Products: White card, Foam tape, Ranger Distress Ink – Dusty Concord, Hot glue gun, Hot glue sticks, Ranger Distress Antique Linen Ink, Die cutting machine, Piercing Tool, Clear Glitter.


If you would like to save $20.00 off your first Heartfelt Creations purchase please CLICK HERE

Many thanks for visiting me today, come back soon for lots more inspiration.

BYE FOR NOW

XXX

Wednesday 8 June 2022

June 8th HEARTFELT CREATIONS EVERYDAY MOMENTS with the MUSHROOM COTTAGE COLLECTION


Morning lovely crafting friends, its Inspiration Wednesday at Heartfelt Creations. 

And its the debut of the amazing MUSHROM COTTAGE COLLECTION

If you would like to know how I made this scrapbook layout please scroll down for instructions.


If you would like to save $20.00 off your first Heartfelt Creations purchase please CLICK HERE


INSTRUCTIONS

Cut Sheet 12B from the Mushroom Cottage Collection Paper Pad to 11 inches square, adhere to a sheet of purple card cut to 11 ½ inches square, adhere to sheet 7B from the paper collection.
Cut Sheet 7B from the collection to 10 inches square, adhere to sheet 2B cut to 10 ½ inches square, adhere with foam tape 2 inches in from the edge as you need to leave room for the border dies.
Die cut eight lacy border strips from the Classic Companion Border Die Set, in white card, adhere around the page tucking in under sheet 2B. Cut four single border flourishes, adhere to the corners.
Cut out a border strip from sheet 2B, adhere across the page 1/3 of the way up.

Stamp the Large Mushroom Cottage Die, onto Deluxe Flower Shaping Paper, twice, using Versamark Embossing Ink. Emboss with embossing powder and a Heat gun. Die cut with the matching dies. Die cut just the windows and doors from the second set.
Stamp the Mini Mushroom Cottages, twice, using Versamark Embossing Ink. Emboss with embossing powder and a heat gun. Die cut with the matching dies. Die cut just the windows and doors from the second set.

Stamp, color and die cut two Fairies form the Mushroom Fairies Stamp Set using embossing ink and embossing powder. Color in and die cut with the matching dies.
Stamp the Fairies again onto heat- able acetate using Versamark ink. Add embossing powder, heat and when cool, cut out the wings, glue to the Fairies with Dries Clear Glue

Color everything in with Dusty Concord and Mowed Lawn Distress inks with a water brush. Use Antique Lace ink for the lights in the windows.
Cut out a figure from a photograph, adhere to the center of the border strip.
Adhere all the Mushroom Cottages across the border strip with foam tape.
Adhere the two Fairies on top of the Mushroom Cottages with foam tape.
Glue all the windows and doors on the Mushroom Cottages using Dries Clear Glue.

Stamp with embossing ink the snail, frog, fence and three bees from the Mushroom Cottage Accents Stamp Set, color in and die cut with the matching dies. Cut the fence in half, adhere to either end of Mushroom Cottages. Cut the mini mushrooms in half, adhere to either end of the fences. Adhere the frog and snail to either ends. Adhere the three bees around the page.

Stamp with embossing ink the foliage from the Large Mushroom Cottage Stamp Set, color in with Ranger Archival Leaf Green and Mowed Lawn Distress inks, using the Daubers, die cut with the matchings dies. Adhere the foliage across the page

Stamp with Lulu Lavender ink, five small Climbing Clematis flowers, onto Flower Shaping Paper, color the centers with a little pale-yellow ink. Lightly shape by hand using the Shaping Tool Kit. Pierce a hole in the centers, thread through a small Bridal Bouquet Stamen and glue in place. Adhere across the foliage with Hot Glue.
Using a small brush or sponge, add Dries Clear Glue everywhere you would like glitter, add Clear Glitter. Cut out a sentiment title, adhere.


PRODUCTS USED

Mushroom Cottage Paper CollectionHCDP1-2140
Large Mushroom Cottage Cling Stamp SetHCPC-3989
Large Mushroom Cottage DieHCD1-7407
Mini Mushroom Cottages Cling Stamp SetHCPC-3990
Mini Mushroom Cottages DieHCD1-7408
Mushroom Fairies Cling Stamp SetHCPC-3991
Mushroom Fairies DieHCD1-7409
Mushroom Cottage Accents Cling Stamp SetHCPC-3992
Mushroom Cottage Accents DieHCD1-7410
Classic Companion Border DieHCD2-7400
Clematis Cling Stamp SetHCPC-3954
Clematis DieHCD1-7355
Bridal Bouquet Stamens-SmallHCS1-460
Deluxe Flower Shaping KitHCST1-401
Stack and Store Daubers-Pack of 30HCDA2-450
Deluxe Flower Shaping Paper Pack of 50 - WhiteHCPP1-475
Ranger Archival Ink Pad - Leaf GreenRACP436
Memento Dye Ink Pad - Lulu LavenderTSMP504


OTHER PRODUCTS

Purple card, White card, Foam tape, Clear Glitter, Embossing Powder - Pewter, Heat-able Acetate, Water brush, Heat Gun, Hot Glue Gun, Ranger Distress Inks – Dusty Concord, Mowed Lawn, Victorian Velvet, Versamark -Watermark Stamp Pad, Pale Yellow ink pad, Water brush.

MAN Y THANKS FOR VISITING ME TODAY

BYE FOR NOW

xxx

Wednesday 1 June 2022

June 1st HEARTFELT CREATIONS WILD POPPY COLLECTION - PRECIOUS TIME


Morning lovely crafting friends, Here is my first post with 
HEARTFELT CREATIONS Design Team for 2022.
Its Inspiration Wednesday at Heartfelt Creations. 
If you would like to know how I made this please scroll down for instructions.

If you would like to save $20.00 off your first Heartfelt Creations purchase please CLICK HERE


Heartfelt Creations Wild Poppy Scrapbook page


         VIDEO HERE  


OTHER PRODUCTS

 Foam tape, Clear Glitter, Hot Glue Gun, Black card 12x12

INSTRUCTIONS

Cut sheet 5A from the Wild Poppy Paper Pad to 10 ½ inches square, adhere onto black card cut to 11 inches square, adhere this onto 12x12 inches sheet 7A. Adhere photo to Black 11B paper cut to 4 ½ inches square. Cut a 6 x 6-inch panel from sheet 10B, adhere matted photo to the center of the page.
 
Using the Palace Gateway Die set, cut four from sheet 11B, cut in half. Adhere these to the reverse of the 6 x 6-inch panel on all four sides. Using Foam tape, adhere to the center of the page.
 
Use Leaf Green ink, stamp the Wild Poppy Corner Accents die piece onto Deluxe Flower Making paper, five times. Use Olive green ink to highlight the pieces, add a little Rose Madder ink to the blooms. Stamp, color and die cut with the matching dies the other two Wild Poppy Accents four times and die cut out.
 
Stamp in Rose Madder ink, onto Deluxe Flower Shaping paper, all four Wild Poppy flowers, stamp with Rose Madder ink and highlight with Pink Peony ink, you will need two extra-large, four large, four medium and eighteen small petals, to make one extra-large, two large, two medium and eighteen small flowers. Place in Wild Poppy or Basic Flower Shaping Mold, lightly spritz with water and run through a die cutting machine. Tap out and when dry, lightly shape with the stylus from the flower shaping tool kit. Ink the edges with Rose Madder ink. Pierce holes in the centers, add two layers at a time of the same sizes, offset the petals and add glue as you go. Thread stamens through the hole using a small piece of wire.

Stamp in black ink onto sheet 11B from the paper pad,  lots of small Wild Asters to use as the Poppy centers. Die cut with the matching die. Use the stylus from the tool kit to shape the Asters on the reverse, turn over and shape again in the centers, glue two layers of each size together, offset the petals as you go. You will need four large and six medium petals. Pierce hole in centers, thread Dark Pink Stamens through using a small piece of wire, cut off the ends and glue in place.
 
To shape all the Wild Poppy Accents, lightly spritz with water, take the foam mat from the Flower Shaping Tool set and the flower shaping tool, lightly shape by hand on the reverse. Using hot glue, adhere the four corner pieces to the corners of the frame.
 
Take four of the Flower Making EZ Stem Floral Wires, adhere onto the Wild Poppy Accents pieces with hot glue, adhere Wild Poppies to all four EZ Stem Floral Wires, using hot glue. Using one large, one medium and one small Wild Poppy on EZ Stem Floral Wires, arrange together, add flower making tape at the ends and adhere with hot glue. Adhere to the page using hot glue. Adhere the single Wild Poppy with the EZ Stem Floral Wire on the opposite side of the page. Cut the extra corner piece in half, glue at the base of the EZ Stem Floral Wire arrangement to hide the end.
 
 Finish by adhering the small Wild Poppies around the page. Using a sponge and Dries Clear Glue, add glue wherever you would like glitter. Add glitter. Stamp the Time Precious Time Title from the Moments in Time Collection in Jet Black ink, die cut with the matching circle die from the Moments in Time Clock Face Die Outline die, size 2.25 inches, onto paper from the paper pad. Adhere with foam tape.
All done.


Many thanks for visiting me today, come back soon for lots more  inspiration 
Bye for now
xxx