Tuesday 30 December 2014

CARDABILITES #114


 Hi everyone and welcome to my blog.
I hope you all had a brilliant Christmas and are now looking forward to New Years Eve!
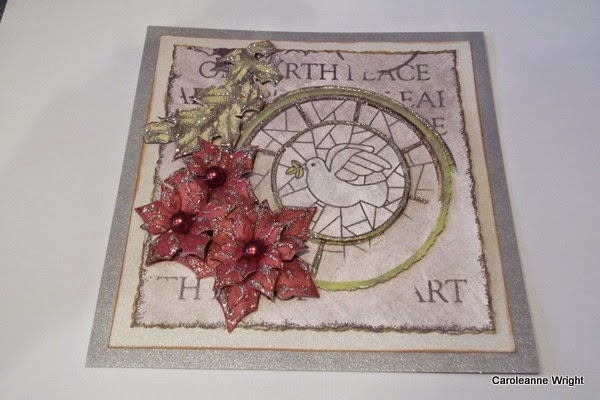
Here is my latest card for CARDABILITIES sketch  #114.
Do have a go with this fabulous sketch by Karan,  maybe a
 Happy New Year card?
 
 
HERES HOW
Take a 6x6 inch card, adhere a pretty paper to the front
Die cut a 4 inch circle and attach
Die cut a smaller 3 inch circle and attach
Cut out a sentiment, matt onto cardstock, adhere with foam pads
Die cut some hand made flowers, add pearl centres
Adhere using hot glue or glue dots
Die cut a branch with leaves, add as per the sketch
Finish off with a few large swirly leaves
Add a small part of a clock face.
xxx
STASH
6x6 inch card blank
Pretty paper from Heartfelt Creations - Once Upon A Time
Green, white and light green cardstock
Sentiment from the above collection
Foam pads
Flower die - Heartfelt Creations Majestic Blooms
Swirly leaf die - Heartfelt Creations Arianna Lace
Small half pearls
Spellbinders circle die - Stately Circles
Clock face - H. Creations collection as above
xxx
LINKS
How to make the flowers here
xxx
THATS ALL FOR NOW
HAPPY NEW YEAR
BYE FOR NOW
XXX


Saturday 20 December 2014

STUCK ON U SKETCHES DESIGN TEAM REVEAL - Dec 16th sketch


Hi everyone and Welcome to my blog and the first
STUCK ON SKETCHES DESIGN TEAM REVEAL for 2015.
 
 
HERES HOW
Using a circle cutter, cut out three circular photos, matt these onto brown cardstock
Cut out four rectangles in co-ordinating papers (3.5 inches wide),
various lengths to fit page, ink the edges
Adhere rectangles to the page as per the sketch
Add a white doily as per the sketch
Add the matted photos
Decorate with flowers, swirls, butterflies and pearls
Add the title.
SCRAPPY STASH
Background paper - 12x12
Pretty papers
Brown and white cardstock
White doily
Brown ink
Assorted flowers
Hand made flowers -  Heartfelt Creations Dies
Mini butterflies
Sticky back pearls
Title stickers
Assorted flourishes
Tim Holtz Pinecone die for the white branches
Swirl die - Tim Holtz swirls
Hidden tag.
 
MANY THANKS FOR VISITING ME TODAY
BYE FOR NOW
xxx


Monday 15 December 2014

CARDABILITIES DESIGN TEAM REVEAL SKETCH #113


http://cardabilities.blogspot.co.uk/

Hi everyone and welcome to my blog and the Cardabilities sketch #113.
This is a brilliant sketch which I decided to use large and fill up all the space!
HERES HOW
Take a 6 x 6 inch card blank
Adhere a 6 x 6 inch silver piece of card to the front of the card
To this adhere a 5.5 x 5.5 inch piece of card, ink edges
To this add a 5.2 x 5.2 inch piece of pretty paper, ink edges
Next,  punch out a border and adhere aprox 2 inch from top
To this, add a strip of cream lace
Add a gold strip of scalloped cardstock
Add a sentiment strip
Cut out three layers of cardstock aprox 3 x 3 inches, ink edges Adhere as per the sketch
Add a large poinsettia, add a pearl centre
Add leaves and branches
Attach large bauble with foam pads, add pearls
Glue three mini roses and fuzzy fibres into the corner
Add two pearly pins
Add mini poinsettia flowers, add pearl centres
Attach the sentiment with foam pads and adhere.
STASH
Card blank 6x6 inches
Shimmer gold and silver cardstock
White cardstock
Pretty Christmas script paper - my stash
Cream lace - my stash
Martha Stewart Punch
Scalloped edge scissors
Poinsettia stamp and die - Heartfelt Creations
Tattered Pinecone branch die - Sizzix
Fuzzy Fibres - my stash
Mini pearl pins
Mini roses
Assorted sticky back pearls
Bauble and sentiments from H. Creations Christmas Collection.
LINKS
Pearl pins  http://theprettypaperpatisserie.blogspot.co.uk/2012/06/hand-made-stick-pins.html
Mini Roses
http://theprettypaperpatisserie.blogspot.co.uk/2013/03/hand-made-flowers-tutorial.html
Christmas Script papers
http://www.pinterest.com/caroleanne345/christmas/
Christmas baubles/ornaments
http://www.pinterest.com/caroleanne345/christmas/

I HOPE YOU HAVE FUN WITH THIS SKETCH


MANY THANKS FOR VISITING ME TODAY
BYE FOR NOW
XXX


Saturday 13 December 2014

CHERISH THIS DESIGN TEAM REVEAL - CHRISTMAS CHEERS MOOD BOARD No. 4 - Dec 13th


http://cherishchallenge.blogspot.co.uk/
Hi everyone and welcome to my blog and
CHERISH THIS DESIGN TEAM REVEAL
CHRISTMAS CHEERS MOOD BOARD No.4
For this challenge I chose to do an off the page project and chose this re-purposed tin and turned it into a sweet tin to give as a gift.
I chose the first picture from the mood board as my inspiration.
 
We´re having a "Christmas Cheers challenge" for both November and December
This picture will be the "Picture collage" inspiration for all 4 challenges in addition to the actual challenge
There will be 1 prize for each challenge - in addition, there will be another prize for one of those who participate IN all 4 challenges
THE PRIZE

xxx
HERES HOW
Cover an old tin with pretty paper and ribbon
Cover the lid the same
Add a layer of pretty lace and cover the join with  silver ribbon
Start adding flowers using a hot glue gun
Finish with a silver bow
Decorate the top of the lid in the same way.
xxx

Now all I have to do is make the sweets!!!
Happy Christmas Crafting
Bye for now.
xxx


Wednesday 10 December 2014

BUILD A PAGE - Falmouth University


Hi everyone and welcome to my blog and my
 BUILD A PAGE
I used the sketch from STUCK ON U SKETCHES from last week

STUCK ON U SKETCHES
 
 http://stuckonusketches.blogspot.co.uk/

BUILD A PAGE

Step 1
Start with a 12x12 sheet of pretty paper
 
Step 2
Cut another paper to 11x6.5 inches, ink the edges and matt onto brown paper or cardstock,
adhere to page
 
Step 3
Make two more layers in the same way
Adhere to page
Step 4
Add doilies 
 
Step 5
Add two matted photos and
embellish as per the sketch.


SCRAPPY STASH
Pretty papers - Heartfelt Creations
White doily
Doily cutter - Martha Stewart
Hanging sign die cut - Tim Holtz
Branch die cuts - Tim Holtz Pine Cone die
Assorted flowers
Swirls - Sizzix die
Brown chalk ink pad
White cardstock
Brown cardstock
Prima lampstand/chandelier

I HOPE YOU HAVE FUN WITH THIS SKETCH
AND YOU ENJOYED THE STEP BY STEP
HAPPY SCRAPPING
BYE FOR NOW.
 

Saturday 6 December 2014

STUCK ON U SKETCHES DESIGN TEAM REVEAL Dec 6th with BUILD A PAGE The Best is yet to be


Hi everyone and welcome to my blog and the
STUCK ON U SKETCHES
DESIGN TEAM REVEAL
with a BUILD A PAGE

 
We recently made a visit to Falmouth in Cornwall to have a look at the University for Jessie for next September, hence the title,
The Best is yet to be. I hope you like my layout and please follow along if you would like to make a similar page.
 
BUILD A PAGE
Step 1
Choose a pretty 12x12 paper for your background
Then cut a pretty paper 9x5 inches, matt and ink the edges 

 Step 2
Cut out two more papers, matt, ink the edges and adhere as per the sketch

 
Step 3
Add a doily

Step 4
Matt two photos and adhere


Step 5
Add the title and corner piece

 
Step 6
Decorate with flowers, swirls, butterflies etc.


Here are some close ups


SCRAPPY STASH
Pretty papers - Heartfelt Creations
Plain blue cardstock
White doily
Assorted flowers
Mini Butterflies
Title - Heartfelt creations papers
Clock faces - Heartfelt creations papers
Swirls - Tim Holts Sizzix die
Mini white paper swirl, branch and frame - my stash
Metal trinket - my stash
Pearls
If you would like some tips on how to put a layout together please go here http://theprettypaperpatisserie.blogspot.co.uk/2014/10/stuck-on-u-sketches-design-team-reveal_24.html

I HOPE YOU HAVE FUN WITH THIS SKETCH
AND YOU ENJOYED THE STEP BY STEP
HAPPY SCRAPPING
BYE FOR NOW
 

Thursday 4 December 2014

CHRISTMAS TAG

 
Hi everyone, Christmas is on its way, its time to make some Christmas cards and tags.
Here is one for my collection.
 
HERES HOW
Cut out a tag shape in pretty paper, ink the edges
Matt onto gold cardstock
Layer up with different paper and card
Add poinsetias and pearls
Add die cut branches
Add leaves and mini roses
Add fuzzy fibres and a snowflake brad 
Add sentiment and a ribbon bow.
STASH USED
Pretty papers - Heartfelt Creations
Poinsettia die - H.Creations
Tim Holtz pine cone die branches
Black, white and gold cardstock
Mini roses and green leaves
Sentiment - H.Creations Christmas Collection
Snowflake brad - my stash
Bow - my stash
White fuzzy fibres
Gold coloured pearls.
THATS ALL FOR TODAY
DO COME BACK ON SATURDAY FOR MORE INSPIRATION
THANK YOU FOR VISITING
 BYE FOR NOW
xxx


Monday 1 December 2014

BERRY71BLEU DESIGN TEAM ANNOUNCEMENT


Hi everyone and welcome to my blog and my brilliant news.
I am so excited to announce that I am included in the new BERRY71BLEU Design Team for 2015!!!
 
Berry71Bleu have amazing challenges every month, with brilliant prizes up for grabs.
 
Click on the link for this months challenge  here http://berry71bleu.blogspot.co.uk
 
where you will also see all the prizes on offer.
 
You will love these challenges and find tons of inspiration from all the designers here.
 
Berry71Bleu is owned by the talented Marivic Clifton, who specializes in custom and premade embellishments, scrapbook pages and altered gift items.
 
I hope that you will visit them and have a go at their challenges.
 
Many thanks for coming by today, I will be back soon with more inspiration and tutorials.
 
BYE FOR NOW.


Sunday 30 November 2014

CHERISH THIS DESIGN TEAM REVEAL - CHRISMAS CHEERS MOOD BOARD - No 3

 
Hi everyone and welcome to my blog and the

CHERISH THIS MOOD BOARD CHALLENGE no. 3 
 
 
We´re having a "Christmas Cheers challenge" for both November and December
This picture will be the "Picture collage" inspiration for all 4 challenges in addition to the actual challenge
There will be 1 prize for each challenge - in addition, there will be another prize for one of those who participate IN all 4 challenges
THE PRIZE
 
So for this challenge I chose to make a Christmas Card.
I used the Christmas bauble picture for my inspiration.
HERES HOW
Take a 6x6 inch card blank and adhere a pretty Christmas script paper to the front
Punch around a 5x5 inch square of gold card, adhere
Using a die cut out a 4x4 inch white square and matt onto some deep red cardstock, adhere
Make a large poinsettia flower with leaves, add glitter and a flower centre and glue to the left hand side
Cut out three baubles, add glitter and hang from the top
Die cut some flourishes, tuck these around the flower
Cut out a matt 4 x 3/4 inch and add glitter letters for your sentiment.
STASH
Card blank - 6x6 inch
Christmas script paper
Gold cardstock
Red dotty cardstock
Deep red cardstock
Patterned Christmas paper
Gold glitter
Spellbinders square die
Martha Stewart Punch
Poinsettia die and leaf by Heartfelt Creations
Glitter Stickers - Merry Christmas
Flourish die - Sizzix
Red flat back pearl
Gold strip peel offs.


I hope you have a go at this challenge and have a look around all the other design team blogs.
Happy Crafting
Bye for now
xxx


CARDABILITIES #112 DESIGN TEAM REVEAL - 30th November


 Hi everyone and welcome to my blog and the
CARDABILITIES DESIGN TEAM REVEAL #112
CARDABILITIES
This sketch is fabulous, I hope you give it a go.
As you can see I have reversed it.

HERES HOW
Take a sheet of pretty paper 5 x 7 inches, ink the edges and add some stamped stitches around the edges
Matt onto some peach cardstock
Matt again onto darker peach cardstock
Add a strip of lace down one side
Start decorating with assorted flowers
Add some die cut leaves
Add three mini butterflies
Add pearls
Add a pearl stick pin
Add the sentiment
Attach to a card front 7.5 x 5.5 inches.
STASH
Oddment of pretty paper from my stash
Plain Bazzill cardstock
Strip of lace
Leaf die Sizzix
Stickpin - handmade by me
Mini butterflies
Mini roses
Hand made flowers using Heartfelt Creations stamp and die
Brown chalk ink
Prima In Stitches stamp
Sticky back pearls
Sentiment - my stash

LINKS

Butterflies 
 http://www.pinterest.com/caroleanne345/butterflies/
Stickpins  http://theprettypaperpatisserie.blogspot.co.uk/2012/06/hand-made-stick-pins.html
Mini flowers  http://theprettypaperpatisserie.blogspot.co.uk/2013/03/hand-made-flowers-tutorial.html

I HOPE YOU HAVE ENJOYED MY HOW TO
HAVE FUN WITH YOUR SKETCH
BYE FOR NOW.


Friday 21 November 2014

STUCK ON U SKETCHES DESIGN TEAM REVEAL - HAPPINESS


Hi everyone and welcome to the
STUCK ON U SKETCHES DESIGN TEAM REVEAL
 
Today is another sketch challenge for you all!
Another reason to be happy it's Friday!
 
STUCK ON U SKETCHES

This is a fabulous sketch by our lovely Leah, I do hope you follow along and give this a go.
HERES HOW
Choose photo, papers and embellishments
Matt photo in pretty paper and ink the edges
Matt again on a scalloped edge or pretty edge matt
Adhere lightly to the background paper
Start adding layers as per the sketch, inking the edges as you go
Decorate with lots of flowers, butterflies and clock faces
Add the title.
SCRAPPY STASH
Pretty papers by Blue Fern Studios
Pink chalk ink
Assorted flowers - Prima, Pettaloo
Butterflies http://www.pinterest.com/caroleanne345/butterflies/
Clock faces  http://www.pinterest.com/caroleanne345/clocks/
Beaded pin http://theprettypaperpatisserie.blogspot.co.uk/2012/06/hand-made-stick-pins.html
Title from Blue Fern Studios
Painted with Pink chalk ink.

That's it for today, I hope you like my layout and have a look at all the designers for more scrappy inspiration.
BYE FOR NOW.

Saturday 15 November 2014

CARDABILITIES DESIGN TEAM REVEAL SKETCH # 111- BUILD A CARD

 
Hi everyone and welcome to my blog and the CARDABILITIES design team reveal.
 
 
SPONSERED BY PICKLED - POTPOURRI
 
Pickled Potpourri Digitals
website:    http://www.pickled-potpourri.com/
store:        http://www.pickled-potpourri.com/digital-stamps
Facebook:  https://www.facebook.com/PickledPotpourri

HERE IS A BUILD A CARD TUTORIAL

 Step 1
Enlarge the digi stamp and print three times onto cardstock
Sponge on silver metallic paint to all stamped images, allow to dry,  then cut out the background of the first stamp using deckle edged scissors


Step 2
Take the second digi stamp, cut out the large circle, colour in, ink the edges and attach with foam pads.
Do the same with the smaller circle with the bird, cut out and attach with foam pads and colour in


Step 3
Matt onto cream cardstock, ink the edges
Matt onto dark silver cardstock, ink the edges 


Step 4

Cut out the holly from the digi stamp, colour in and adhere  


Step 5
Make three poinsettias, add glitter, pearls and adhere with hot glue
Step 6
Finish by adding glitter glue to the holly and circles, add some pearls and colour- in where desired, add a sentiment with foam pads
Attach to the front of a 6x6 inch card blank.

P.S I took off the cream cardstock at the end as it really didn't need it.
STASH
One 6x6 inch card blank
Plain cardstock - white, to print onto 
Other cardstock, light silver, dark silver, red
Silver metallic paint and small make-up sponge
Chalk ink
Sticky back pearls
Silver Stickles glitter glue
Small black bead for birds eye
Marvey colouring-in pens
Sentiment - Heartfelt Creations Christmas Collection Pad
Foam Pads
Hot glue gun
Poinsettia stamp and dies - Heartfelt Creations/Spellbinders
 
MANY THANKS FOR VISITING MY BLOG TODAY,
I HOPE YOU HAVE FOUND SOME INSPIRATION.
DO VISIT ALL THE DESIGN TEAM FOR LOTS MORE FAB CARDS.
BYE FOR NOW
 

CHERISH THIS DESIGN TEAM REVEAL - CHRISTMAS CHEERS MOOD BOARD, No. 2 - Nov 15th

 
Hi everyone and welcome to my blog and the
CHERISH THIS CHRISTMAS CHALLENGE #2
Its challenge number 2 from this fabulous mood board 


THIS IS THE BEAUTIFUL PRIZE YOU COULD WIN
 
For this challenge I chose to make a tag using the second picture on the board. I used the red, green and gold and kept my tag quite traditional in colour and feel.
HERES HOW
Cut out a fancy rectangle in soft gold cardstock
Matt onto Christmas paper/distress the edges
Matt onto another Christmas paper/distress the edges
Cut out three baubles, add glitter and adhere 
Stamp and cut out poinsettia flowers, add glitter and a gem, adhere
Stamp and cut out three leaves, add glitter, adhere
Make another mini poinsettia as above, adhere
Stamp out the greeting, matt onto red cardstock, adhere
Die cut some swirls in red cardstock, adhere
Attach this to a tag shaped card
Tuck in a couple of Christmas Greetings.
STASH
Hobbycraft Christmas paper collection
Red, gold, green cardstock
Glitter glue
Swirl die - Sizzix
Poinsettia flower and leaves - Heartfelt Creations
Greeting stamp - my stash
MANY THANKS FOR VISITING ME TODAY
DO JOIN IN THE FUN AT CHERISH THIS
BYE FOR NOW