Wednesday 28 September 2022

September 28th HEARTFELT CREATIONS DESIGN TEAM RECTANGLE FILIGREE FRAME DIE DEBUT - Get Well Wishes


Morning lovely crafting friends,
Its Inspiration Wednesday here at Heartfelt Creations and I have made a card using the

HOLLYHOCKS AND RECTANGLE FILIGREE FRAME DIE
SEPTEMBER SIDE RELEASE


If you would like to save $20.00 off your first Heartfelt Creations purchase please CLICK HERE


INSTRUCTIONS

Cut the dark pink paper, Sheet 12B, from the Hollyhock Paper Collection Pad, to 4 3/4" x 6 3/4". Adhere to front of a 5"x7" card blank. Take the largest die from the Rectangle Filigree Frame Die Set, die cut in white card. Adhere to card front. Die cut again in Sheet 4A from the Paper Collection and adhere the middle part to the card front so that it fits perfectly within the Filigree Frame. Die cut the next size down of Rectangle Filigree Frame in white card, adhere the Filigree Frame to the card front. Die cut the center piece in pink paper, Sheet 6B, adhere so that if fits inside the frame.

Stamp onto Deluxe Flower Shaping Paper with Ranger Archival Magenta Hue ink, lots of Hollyhock Petals, from the Hollyhock Petals and Leaves Stamp Set. Stamp an assortment of leaves from the same die set, in Ranger Archival Viridian ink.  Color with the same inks and die cut with the matching dies. Ink the edges of the petals with the same ink. Ink the edges of the leaves lightly in Magenta Hue ink. Place in the Hollyhocks Shaping Mold and run through a die cutting machine. Tap out and lightly shape with the stylus from the Deluxe Flower Shaping Kit. Pierce a hole in the middle of the petals, place two of each of the same size of petals together and add a white Pastel Medium Bead Stamen.  Offset the petals and add Dries Clear Glue as you go. 

Stamp the floral Stem from the Hollyhock Stem & Blooms Stamp set in Viridian ink. Die cut with the matching die. Color in the edges with Magenta Hue ink. Lightly shape with the stylus from the Deluxe Flower Shaping Kit and adhere to center of the card. Adhere Hollyhocks and Leaves to the Stem using hot glue.

Stamp a sentiment from the Cheerful Notes Sentiments Stamp Set in Magenta Hue ink. Die cut with a tag from the Album Tags & Accents Die Set. Adhere to side of card with foam tape. Add dries clear glue to the Hollyhocks and Leaves with a small sponge and sprinkle on lots of clear glitter. All done.


PRODUCTS USED


OTHER PRODUCTS USED

5 x 7 inch card blank, white card, foam tape, hot glue, paper piercer, clear glitter.


VIDEO

https://www.youtube.com/watch?v=PDoDE427NOk


Many thanks for visiting me today, come back soon for lots more  inspiration 
Bye for now
xxx

Wednesday 21 September 2022

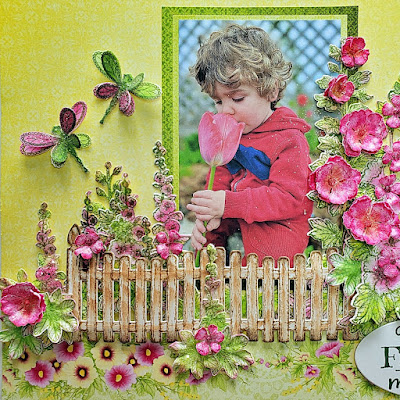
September 21st HEARTFELT CREATIONS HOLLYHOCK GARDEN COLLECTION SCRAPBOOK PAGE - Todays Favorite Moments


Morning lovely crafting friends, 

Its Inspiration Wednesday here at Heartfelt Creations. 
It' s the fabulous new Hollyhock Garden Collection.
If you would like to know how I made this please scroll down for instructions.


If you would like to save $20.00 off your first Heartfelt Creations purchase, please CLICK HERE


INSTRUCTIONS

Take a 3 3/4" x 5 3/4" photo and matt onto a 6" x 4" piece of light green paper, sheet 7B, from the Hollyhock Garden Collection Paper Pad. Cut a piece of dark green paper, sheet 8B, from the Hollyhock Garden Paper Pad, to 6 1/2" x 4 1/2", adhere to center of the yellow paper, sheet 11B, 12 "x 12"page.

Stamp two Fences from the Hollyhock Fence Stamp Set, in Ranger Archival Potting Soil ink, onto Flower Shaping Paper.  Color with Ranger Distress ink, Tea Dye, using the Daubers. Die cut with the matching die. Lightly shape with the stylus from the Deluxe Flower Shaping Kit. Put to one side.

Stamp three small Hollyhock Stems, from the Hollyhock Fence Stamp Set, in Ranger Archival Leaf Green ink, three times.  Color with Ranger Archival Vivid Chartreuse and Vibrant Fuschia, using the Daubers. Die cut with the matching dies. Lightly spritz with water and shape with the stylus from the Deluxe Flower Shaping Kit.

Stamp four Hollyhock Stems from the Hollyhock Stems & Blooms Stamp Set, two of each, in Leaf Green ink. Color with Ranger Archival Vivid Chartreuse ink and Vibrant Fuschia ink using the Daubers. Die cut with the matching dies. Lightly spritz with water and shape with the stylus from the Deluxe Flower Shaping Kit.

Stamp nine small Hollyhocks from the Hollyhock Petals & Leaves Stamp Set, in Ranger Archival Vibrant Fuchsia. Color in with Vibrant Fuschia ink using the Daubers. Die cut with the matching dies. Stamp eight medium Hollyhocks in the same way. Pierce a hole in the middle of each one. Color in with a touch of Ranger Archival Sunflower ink in the centers then add Vibrant Fuschia using the Daubers. Add Nuvo Drops in Rhubarb Crumble to the small flower centers. Thread Medium Bead Stamens in pink through the medium petals. Add two layers of petals at a time, offset and glue the petals as you go.

Stamp seven small leaves from the same Stamp Set in Leaf Green ink, color in with Vivid Chartreuse ink, add a little Vibrant Fuschia ink to the edges, using the Daubers. Die cut with the matching die. Place petals and leaves in the Hollyhock Shaping Mold, lightly spritz with water and run through a die cutting machine. Tap out and lightly shape with the stylus from the Deluxe Flower Shaping Kit.

Stamp three Dragonflies from the Decorative Dragonfly Collection, in Leaf Green ink, die cut with the matching dies. Color with Vibrant Fuschia and Vivid Chartreuse inks. Make two sets of each and glue one on top of the other, along the bodies only, making sure to leave the wings free.

Cut a border from sheet 3B, from the Paper Collection. Adhere 1 1/2"from the base of the page. Adhere the matted photo to the center of the page, an inch from the top of the border. Adhere the Large Hollyhock Stems and smaller Hollyhock stems to either side of the photo as per the layout. Adhere a few leaves cut from a large Hollyhock stem, beneath the photo, where the Fences will be placed.  Cut off two end posts from the Fences so that you only have posts on either end of the Fence. Adhere the Fences together. Adhere the Fence below the photo, leaving them to gape a little. Adhere a small Hollyhock stem to the join of the Fence and add two small leaves and a small Hollyhock flower.

Adhere small green leaves to either ends of the page. Adhere the small Hollyhocks around the page. Adhere the Dragonflies and medium Hollyhocks to the page.  Stamp a sentiment from the Todays Quotes Sentiment Stamp Set, in Ranger Archival Olive Green Ink. Die cut with the 1.75” x 3.25” oval from the Eyelet Ovals & Basics Large Stamp Set.  Adhere with foam tape to the side of the page. Using Dries Clear Glue and a small sponge, sponge glue over the Hollyhocks, leaves, Dragonflies and Hollyhock stems. Apply Clear Glitter. All done.


 PRODUCTS USED 


                                                    OTHER PRODUCTS USED

Distress ink pad - Tea Dye, Ranger Archival ink pad - Potting Soil, Hot glue gun, Piercing Tool, Clear Glitter, Foam tape.


VIDEO


CLOSE UP


Many thanks for visiting me today, come back soon for lots more inspiration 
Bye for now
xx

September 21st HEARTFELT CREATIONS HOLLYHOCK GARDEN COLLECTION SCRAPBOOK PAGE - Todays Favorite Moments


Morning lovely crafting friends, 

Its Inspiration Wednesday here at Heartfelt Creations. 
It' s the fabulous new Hollyhock Garden Collection.
If you would like to know how I made this please scroll down for instructions.


If you would like to save $20.00 off your first Heartfelt Creations purchase, please CLICK HERE


INSTRUCTIONS

Take a 3 3/4" x 5 3/4" photo and matt onto a 6" x 4" piece of light green paper, sheet 7B, from the Hollyhock Garden Collection Paper Pad. Cut a piece of dark green paper, sheet 8B, from the Hollyhock Garden Paper Pad, to 6 1/2" x 4 1/2", adhere to center of the yellow paper, sheet 11B, 12 "x 12"page.

Stamp two Fences from the Hollyhock Fence Stamp Set, in Ranger Archival Potting Soil ink, onto Flower Shaping Paper.  Color with Ranger Distress ink, Tea Dye, using the Daubers. Die cut with the matching die. Lightly shape with the stylus from the Deluxe Flower Shaping Kit. Put to one side.

Stamp three small Hollyhock Stems, from the Hollyhock Fence Stamp Set, in Ranger Archival Leaf Green ink, three times.  Color with Ranger Archival Vivid Chartreuse and Vibrant Fuschia, using the Daubers. Die cut with the matching dies. Lightly spritz with water and shape with the stylus from the Deluxe Flower Shaping Kit.

Stamp four Hollyhock Stems from the Hollyhock Stems & Blooms Stamp Set, two of each, in Leaf Green ink. Color with Ranger Archival Vivid Chartreuse ink and Vibrant Fuschia ink using the Daubers. Die cut with the matching dies. Lightly spritz with water and shape with the stylus from the Deluxe Flower Shaping Kit.

Stamp nine small Hollyhocks from the Hollyhock Petals & Leaves Stamp Set, in Ranger Archival Vibrant Fuchsia. Color in with Vibrant Fuschia ink using the Daubers. Die cut with the matching dies. Stamp eight medium Hollyhocks in the same way. Pierce a hole in the middle of each one. Color in with a touch of Ranger Archival Sunflower ink in the centers then add Vibrant Fuschia using the Daubers. Add Nuvo Drops in Rhubarb Crumble to the small flower centers. Thread Medium Bead Stamens in pink through the medium petals. Add two layers of petals at a time, offset and glue the petals as you go.

Stamp seven small leaves from the same Stamp Set in Leaf Green ink, color in with Vivid Chartreuse ink, add a little Vibrant Fuschia ink to the edges, using the Daubers. Die cut with the matching die. Place petals and leaves in the Hollyhock Shaping Mold, lightly spritz with water and run through a die cutting machine. Tap out and lightly shape with the stylus from the Deluxe Flower Shaping Kit.

Stamp three Dragonflies from the Decorative Dragonfly Collection, in Leaf Green ink, die cut with the matching dies. Color with Vibrant Fuschia and Vivid Chartreuse inks. Make two sets of each and glue one on top of the other, along the bodies only, making sure to leave the wings free.

Cut a border from sheet 3B, from the Paper Collection. Adhere 1 1/2"from the base of the page. Adhere the matted photo to the center of the page, an inch from the top of the border. Adhere the Large Hollyhock Stems and smaller Hollyhock stems to either side of the photo as per the layout. Adhere a few leaves cut from a large Hollyhock stem, beneath the photo, where the Fences will be placed.  Cut off two end posts from the Fences so that you only have posts on either end of the Fence. Adhere the Fences together. Adhere the Fence below the photo, leaving them to gape a little. Adhere a small Hollyhock stem to the join of the Fence and add two small leaves and a small Hollyhock flower.

Adhere small green leaves to either ends of the page. Adhere the small Hollyhocks around the page. Adhere the Dragonflies and medium Hollyhocks to the page.  Stamp a sentiment from the Todays Quotes Sentiment Stamp Set, in Ranger Archival Olive Green Ink. Die cut with the 1.75” x 3.25” oval from the Eyelet Ovals & Basics Large Stamp Set.  Adhere with foam tape to the side of the page. Using Dries Clear Glue and a small sponge, sponge glue over the Hollyhocks, leaves, Dragonflies and Hollyhock stems. Apply Clear Glitter. All done.


 PRODUCTS USED 


                                                    OTHER PRODUCTS USED
Distress ink pad - Tea Dye, Ranger Archival ink pad - Potting Soil, Hot glue gun, Piercing Tool, Clear Glitter, Foam tape.


VIDEO


CLOSE UP


Many thanks for visiting me today, come back soon for lots more inspiration 
Bye for now
xxx

Wednesday 14 September 2022

September 14th HEARTFELT CREATIONS - Moments to Remember - Debuting the HOLLYHOCK GARDEN COLLECTION

Morning lovely crafting friends, 

Its Inspiration Wednesday here at Heartfelt Creations and the debut of the
HOLLYHOCK GARDEN COLLECTION
If you would like to know how I made this please scroll down for instructions.


If you would like to save $20.00 off your first Heartfelt Creations purchase please CLICK HERE


INSTRUCTIONS

Matt a 3 3/4" x 5 3/4" photo onto a 6"x4" piece of yellow paper, Sheet 11B from the Hollyhock Garden Collection paper pad. Adhere to center of  12"x12" pink paper, Sheet 6B. Cut two border strips from Sheet 3B, adhere across and down the page. 

Stamp onto Flower Shaping paper, in Ranger Archival ink - Vivid Chartreuse, two of each of the  Hollyhock Stems from the Hollyhock Stem and Blooms Stamp. Die cut with the matching dies. Color the flowers with Memento Dandelion ink and ink the edges in Ranger Archival Vibrant Fuschia ink, using the Daubers.  Stamp two more of the Stems with the flowers on, in Ranger Archival Olive ink. Color with Vibrant Fuschia ink using the Daubers. Die cut with the matching dies. Lightly shape all Stems with the stylus from the Deluxe Flower Shaping Tool Kit. Cut off the tops of the pink Hollyhock stems as they will be too long. Stamp the smaller Hollyhock Stems from the Hollyhock Fence die, twice, in Vivid Chartreuse ink, color in with Memento Dandelion ink. Die cut with the matching dies. Ink the edges in Vibrant Fuschia ink. Lightly shape with the stylus.

Stamp the Hollyhock Petals from the Hollyhock Petals and Leaves Die, in Dandelion ink. Stamp six large, fourteen medium and twelve small petals. Stamp four large petals in Vibrant Fuschia ink. Die cut with the matching dies. Color the edges with the same inks using a Dauber. Place in the Hollyhock Mold, lightly spritz with water and run through a die cutting machine. Tap out, lightly shape with the stylus from the Deluxe Flower Shaping Kit, so that the petals are cupped. Pierce a hole in each petal, thread Pastel Pollen Stamens Medium, in yellow, through the three large yellow flowers, offset the petals and add glue between each layer. Repeat with all the Hollyhock petals using Bright Bead Medium Stamens in yellow and pink.  Stamp the Leaves from the same set in Vivid Chartreuse ink.  Die cut with the matching dies. Color the edges in Vibrant Fuschia. Lightly spritz with water and place in the Mold. Run through a die cutting machine, tap out and lightly shape with the stylus.

Stamp in Vibrant Fuschia ink, five Dragonflies from the Decorative Dragonfly Stamp Set. Color in with Vibrant Fuschia and Dandelion inks. Die cut with the matching dies. Lightly lift the wings. Adhere the Hollyhock Stems as per the layout. Adhere the Hollyhock flowers to the Stems, adhere the rest of the Hollyhocks as per the layout. Adhere the Dragonflies. Stamp in Ranger Archival Olive ink, a Sentiment from the Todays Quotes Sentiment Stamp Set. Die cut with a tag from the Ornamental Tags Die Set. Adhere below the photo. Using a small sponge and Dries Clear Glue, apply glue to the Hollyhocks, leaves and Dragonflies. Sprinkle on clear glitter. 


PRODUCTS USED

Hollyhock Garden Paper Collection, HCDP1-2143
Hollyhock Petals & Leaves Cling Stamp Set, HCPC-3999
Hollyhock Petals & Leaves Die, HCD1-7417
3D Hollyhock Shaping Mold, HCFB1-5012
Hollyhock Stem & Blooms Cling Stamp Set, HCPC-31000
Hollyhock Stem & Blooms Die, HCD1-7418
Hollyhock Fence Cling Stamp Set, HCPC-31001
Hollyhock Fence Die, HCD1-7419
Decorative Dragonfly Cling Stamp Set, HCPC-3983
Decorative Dragonfly Die, HCD1-7394
Ornamental Tags Die, HCD1-7203
Today's Quotes Cling Stamp Set, HCPC-3813
Deluxe Flower Shaping Paper Pack of 50 - White, HCPP1-475
Deluxe Flower Shaping Kit, HCST1-401
Stack and Store Daubers-Pack of 6, HCDA1-449
Pastel Bead Stamens-Medium, HCS1-457-3
Pastel Pollen Stamens - Medium, HCS1-485
Designer Dries Clear Adhesive, 159723
Ranger Archival Ink Pad - Olive, RACP482
Ranger Archival Ink Pad - Vibrant Fuchsia, RACP524
Ranger Archival Ink Pad - Vivid Chartreuse, RACP531
Hydra Sponges, RLHS100


OTHER PRODUCTS USED

 Hot glue gun, Piercing Tool, Clear Glitter, Memento Ink Pad - Dandelion.


VIDEO


Many thanks for visiting me today, come back soon for lots more inspiration 
Bye for now
xxx

Wednesday 7 September 2022

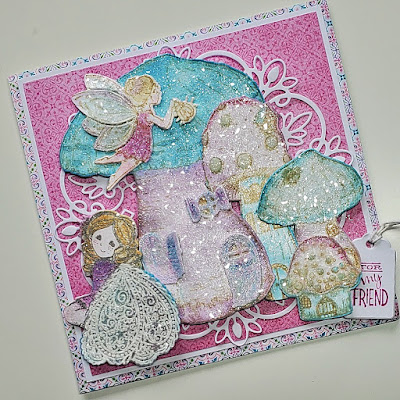
September 7th - Heartfelt Creations Inspiration Wednesday - Mushroom Fairy Card - Sparkle Village


Morning lovely crafting friends, its Inspiration Wednesday here at Heartfelt Creations. I have made a Mushroom Fairy card. I hope you like it,
If you would like to know how I made this card please scroll down for instructions.


If you would like to save $20.00 off your first Heartfelt Creations purchase please CLICK HERE


INSTRUCTIONS

Cover a 6"x6"card blank with pretty paper from the Mushroom Cottage Collection Paper Pad. Cut a piece of white card to 5 ¾" square. Adhere. Cut a piece of pink paper from the Paper Pad to 5" square. Adhere. Die cut a Simply Elegant Centerpiece Die in white card, adhere to card front.

Stamp two Large Mushroom Cottages from the Large Mushroom Cottage Stamp set, onto Deluxe Flower Shaping Paper. Use Memento Ink in Desert Sand. Color the roof with Distress Oxide ink in Tumbled Glass with a water brush. Color the body in Memento ink in Lilac Posies with a water brush. Die cut with the matching die. Ink the edges in the same inks. Die cut the windows and doors from the second Large Mushroom. Color in with the same inks, plus a little Distress ink in Antique Linen for the window lights. Adhere to the Large Mushroom Cottage with Dries Clear Glue. Adhere Large Mushroom to the middle of the card using foam tape.

Stamp three Mini Mushrooms from the Mini Mushroom Cottages Stamp Set in Desert Sand ink. Color the same way using the same inks. Die cut with the matching dies. Ink the edges in the same inks.  Add Ranger Glossy Accents to the circles of the tall Mini Mushroom. Adhere to side of card with foam tape.

Stamp the Fairy from the Mushroom Cottage Accents Stamp Set in the same way. Color in with the same colors plus a little Distress ink in Antique Linen for the hair. Die cut with the matching dies. Adhere to the Large Mushroom roof using Dries Clear Glue.

Stamp a Fairy from the Mushroom Fairies Stamp Set in Memento ink in London Fog. Color in the same way. Die cut with the matching die.  Stamp again in White ink onto a piece of Vellum. Die cut with the matching die. Cut off the wings and adhere to the Fairy leaving half the wings free. Adhere Fairy to side of Large Mushroom using Foam Tape. 

Stamp a sentiment from the Just for You Sentiment Stamp Set in Lilac Posies ink. Die cut with a tag from the Ornamental Tags Die Set. Add a piece of twine to the tag, adhere to side of card. Cover Mushrooms and Fairies with Dries Clear Glue using a small brush. Sprinkle lots of clear glitter on top.


PRODUCTS USED

Mushroom Cottage Paper CollectionHCDP1-2140
Large Mushroom Cottage Cling Stamp SetHCPC-3989
Large Mushroom Cottage DieHCD1-7407
Mini Mushroom Cottages Cling Stamp SetHCPC-3990
Mini Mushroom Cottages DieHCD1-7408
Mushroom Fairies Cling Stamp SetHCPC-3991
Mushroom Fairies DieHCD1-7409
Mushroom Cottage Accents Cling Stamp SetHCPC-3992
Mushroom Cottage Accents DieHCD1-7410
Simply Elegant Centerpiece DieHCD1-7370
Ornamental Tags DieHCD1-7203
Just For You Sentiments Cling Stamp SetHCPC-3845
Deluxe Flower Shaping KitHCST1-401
Deluxe Flower Shaping Paper Pack of 50 - WhiteHCPP1-475
Vellum Paper - 10 Sheets3-GN2911-F
Designer Dries Clear Adhesive159723
Color In Watercolor Brush - Fine409311
Memento Dye Ink Pad - Lilac PosiesTSMP501


OTHER PRODUCTS USED

6 x 6 inch card blank, white card, Distress Oxide ink – Tumbled Glass, Distress ink – Antique Linen, Color Box Ink – Frost White, Memento Ink Pad - London Fog, hot glue gun, clear glitter, small brush, foam tape, Ranger Glossy Accents


VIDEO


MANY THANKS FOR VISITING ME TODAY

BYE FOR NOW

XXX