Wednesday 26 October 2022

October 26th HEARTFELT CREATIONS Decorative Dragonflies - On Your Special Day


Morning lovely Heartfelt Crafters welcome to my blog and my second card for Inspiration Wednesday here at Heartfelt Creations


If you would like to save $20.00 off your first Heartfelt Creations purchase please


INSTRUCTIONS
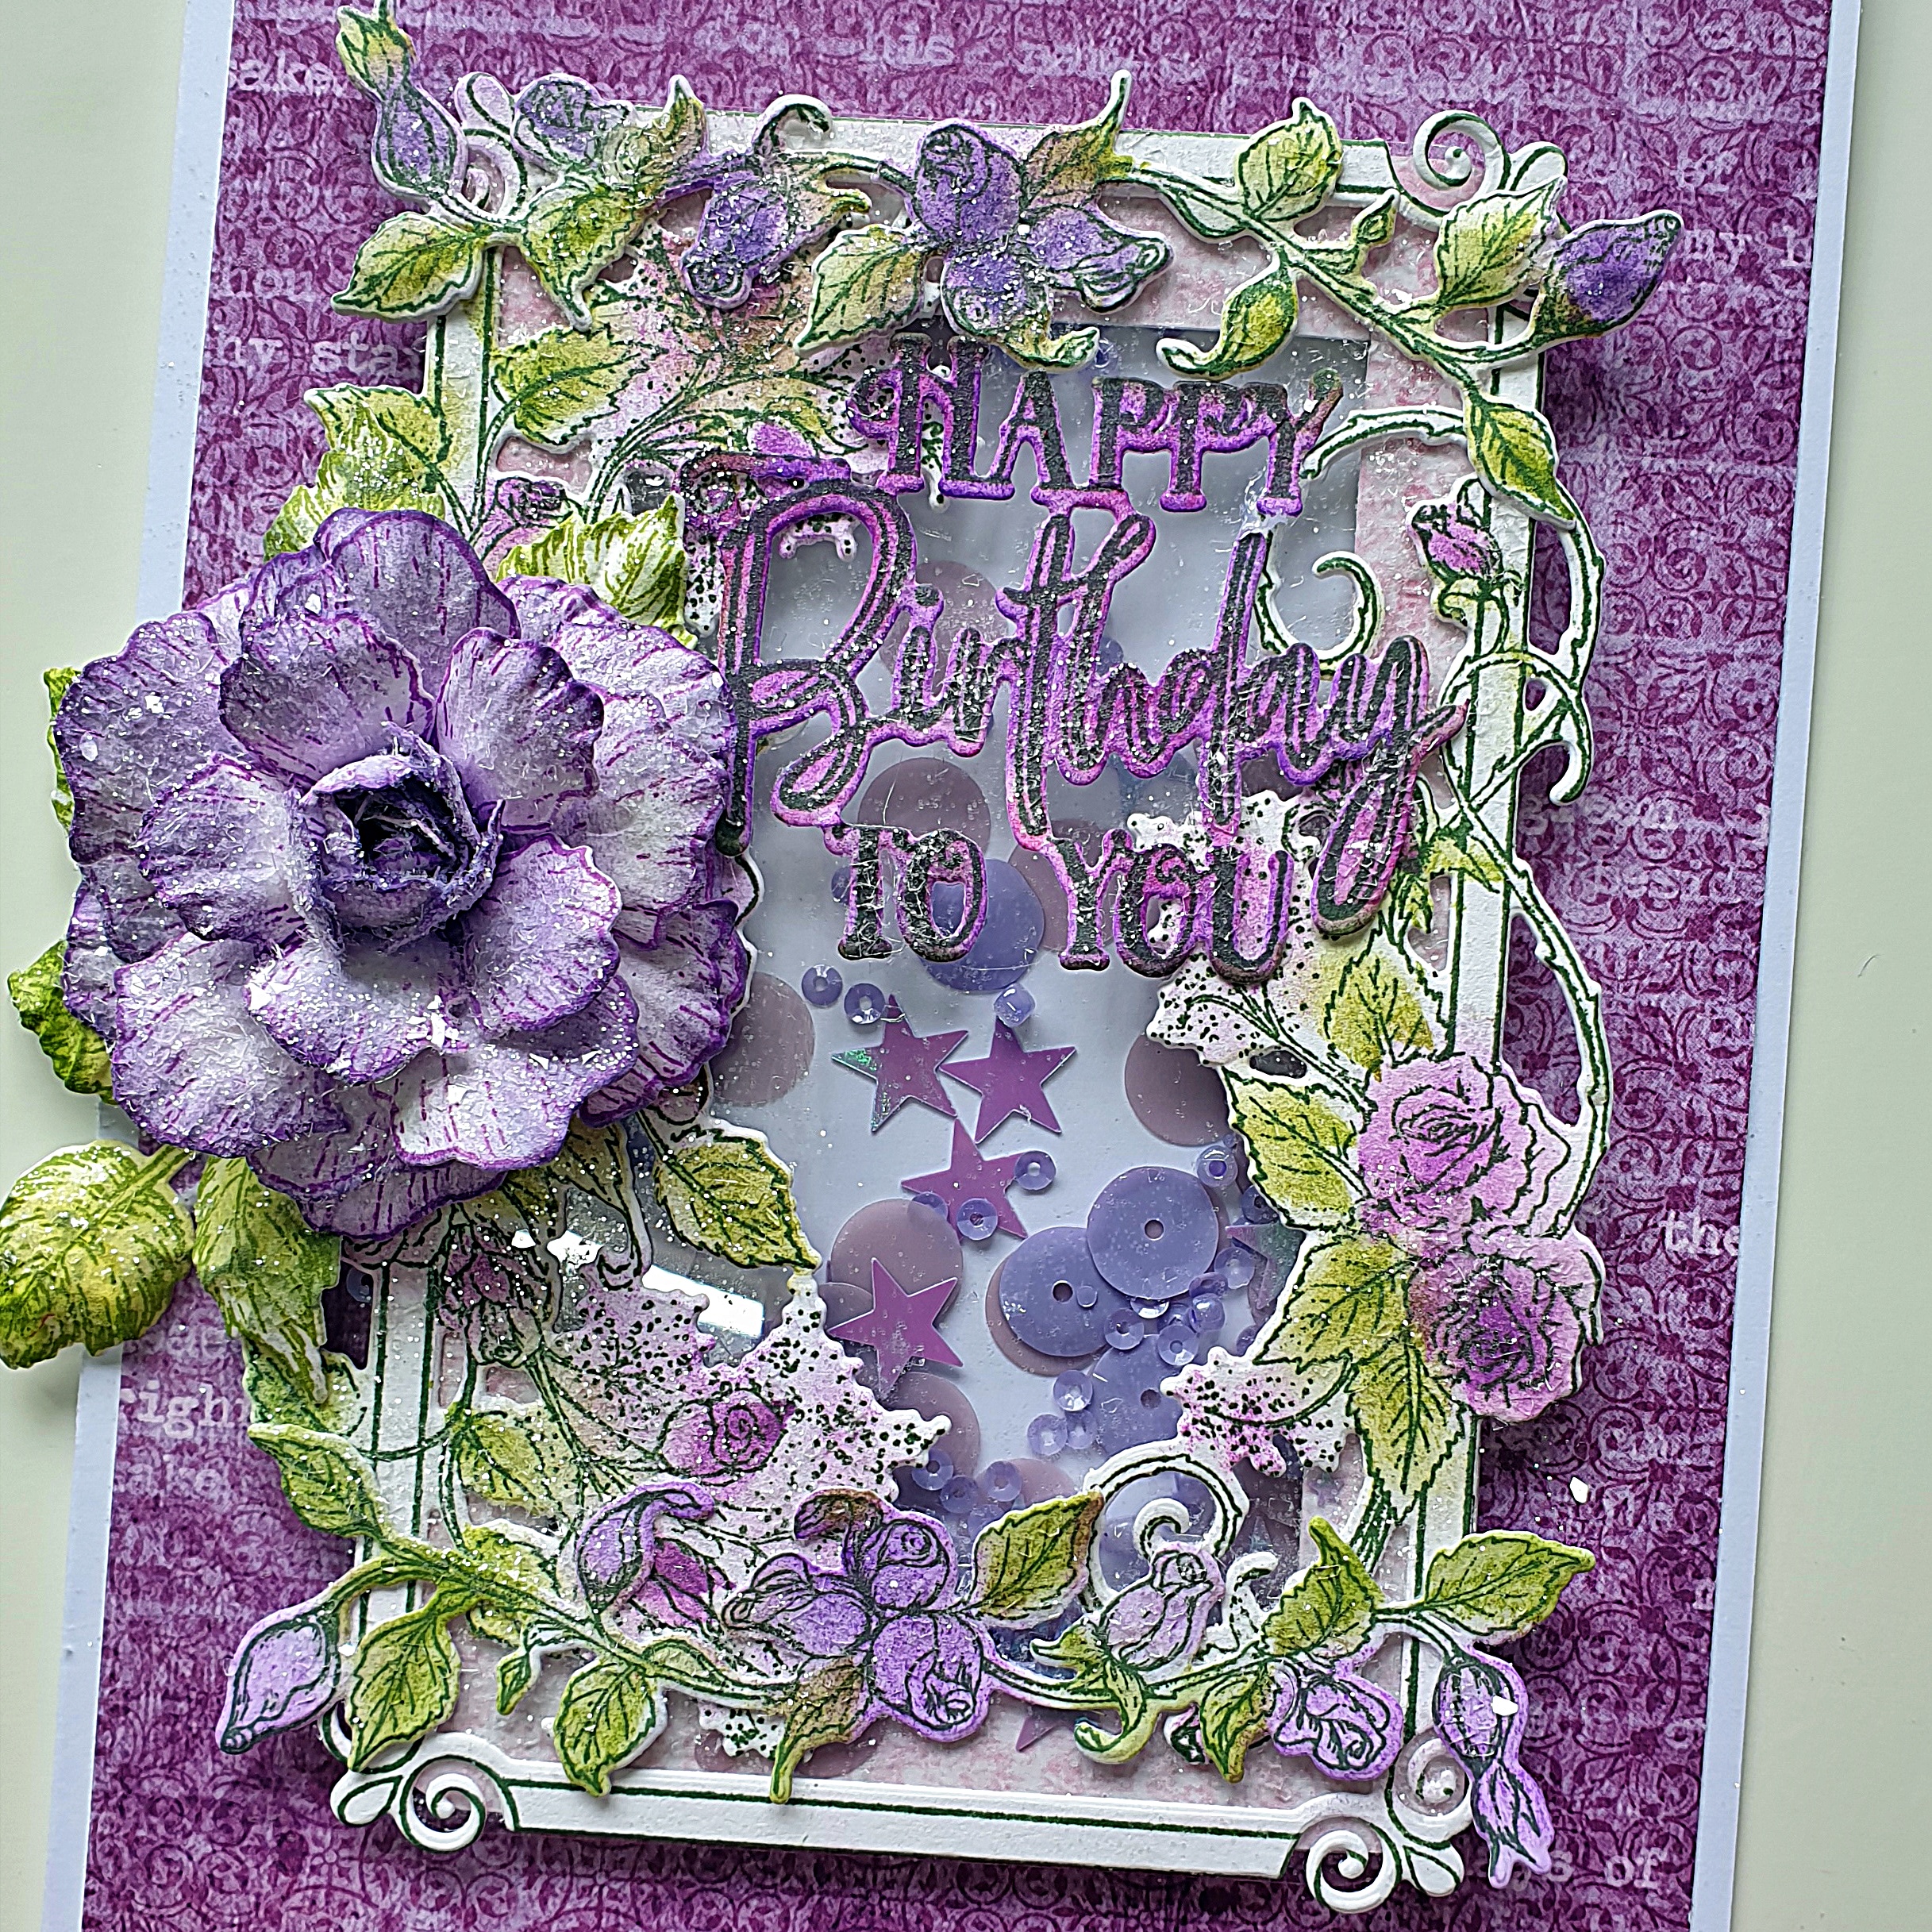
To make the shaped 5" x 7"card, take a 5"x 7"-inch card blank and the Eyelet Frame Gateway Die. Lightly tape the die to the card front, leaving the folded side edge free. Run through a die cutting machine. Die cut Sheet 5B, aqua paper, from the Decorative Dragonfly Paper Collection, using the plain edge die, adhere to card front. Die cut the 4"x 6" Eyelet die, in white card, adhere. Die cut Sheet 5B using the plain edge die, adhere. Die cut the 3"x 5.5" Eyelet die in Sheet 11B, pink paper, adhere. Die cut the center lattice piece die, from the Regal Lattice Gateway Die, 3"x 5" in white card, adhere.
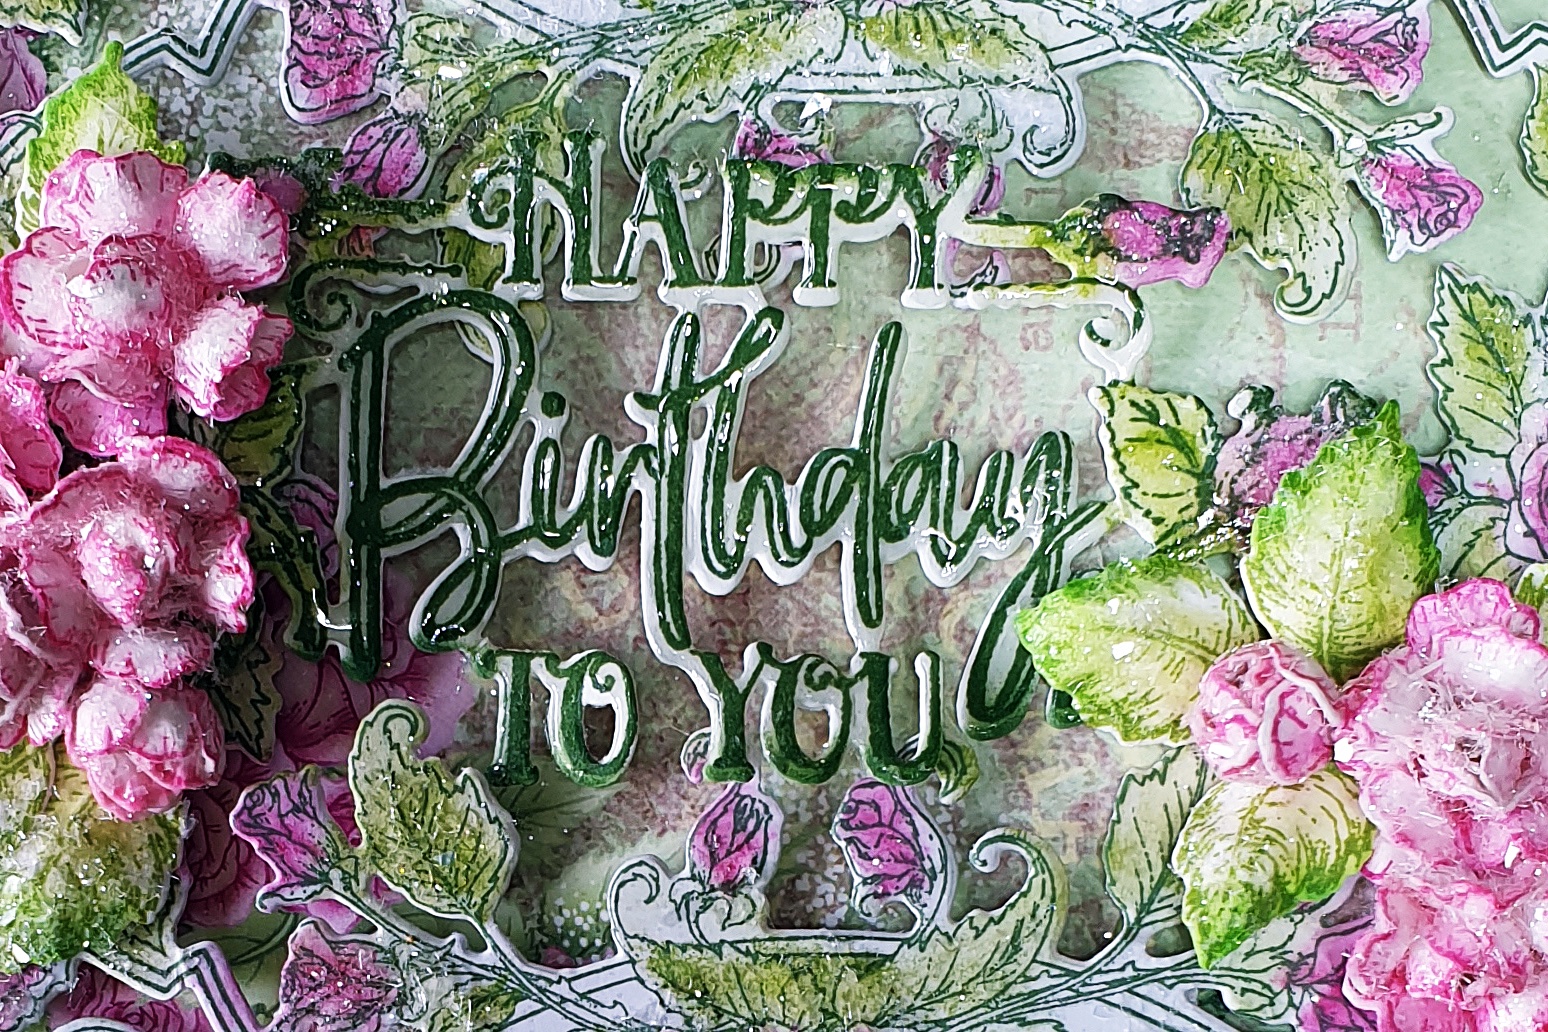
Stamp the large Dragonfly and one each of the Flower Stems, from the Dragonfly Floral Stems Cling Stamp Set, in Speckled Egg Distress Ink, onto Deluxe Flower Shaping Paper, die cut with the matching dies. Color in with Memento Angel Pink and Speckled Egg inks using Daubers. Lightly shape with the Deluxe Flower Shaping Kit Stylus and mat. Adhere the Flower Stems down the left side of the card with Hot Glue.  Adhere the large Dragonfly, body only, leaving the wings free. Cover all the Flower Stems and the Dragonfly body with Dries Clear Glue using a small brush, add Tu Tu Pink Prills. Apply Ranger Glossy Accents to the leaves of the Flower Stems and Dragonfly wings, add Clear Glitter.
Stamp a Sentiment in Ranger Archival Peacock Feathers ink onto Deluxe Flower Shaping Paper, die cut with a tag from the Album Tags and Accents dies set, ink the edges, adhere to side of card and slightly beneath the Flower Stems, add a clear gem.
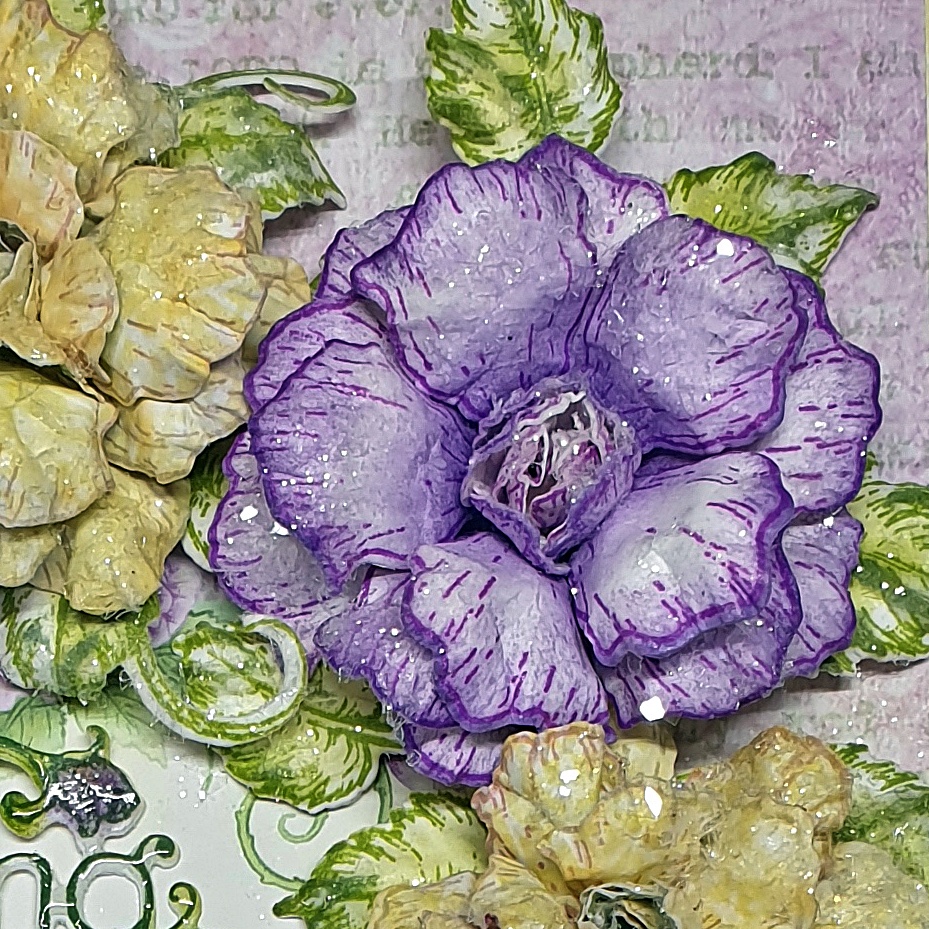
Stamp in Ranger Archival Pink Peony ink, lots of small Wild Roses. (I used nineteen). Add a little Ranger Sunflower ink to the centers using a Dauber. Place in the Wild Rose Flower Shaping Mold or shape by hand with the stylus. Pierce a hole in the centers and thread Bridal Stamens through the middle. Add Dries Clear Glue to the backs and cut off the stems.  Stamp Leafy Accents onto Flower Shaping Paper in Ranger Archival Olive ink, lightly color in with Speckled Egg ink and die cut with the matching dies. Place in the Leafy Accents Shaping Mold, lightly spritz with water and run through a die cutting machine. Tap out and lightly shape with the stylus. Cut into twos and threes. Adhere the small Wild Roses and Leafy Accents to the card with hot glue. Add Dries Clear Glue to the flowers and leaves with a small brush or sponge, add Clear Glitter.
All done.

OTHER PRODUCTS
5x7 inch card blank, white card, adhesive clear gem, clear glitter, Ranger Distress Oxide ink - Speckled Egg, Ranger Distress ink - Peacock Feathers, Memento Ink Pad - Angel Pink, Ranger Glossy Accents, Paper piercer, small brush, low tack tape, hot glue.


Many thanks for visiting me today, come back soon for lots more inspiration.

Bye for now
xxx

OCTOBER 26th Heartfelt Creations Elegant Rose Frames Collection Debut Card - Happy Birthday to You


Morning lovely crafting friends 

Its Inspiration Wednesday here at Heartfelt Creations and the Debut of the
 
ELEGANT ROSE FRAMES COLLECTION

If you love Roses then this collection is for you.
If you would like to know how I made this, please scroll down for instructions.


If you would like to save $20.00 off your first Heartfelt Creations purchase, please CLICK HERE


INSTRUCTIONS

Cover a 6" x 4"card blank with Sheet 5A, from the Elegant Rose Frames Collection Paper Pad. Stamp onto white card, the Stylish Rose Frame Stamp, from the Stylish Rose Frame Cling Stamp Set, in Ranger Archival Olive ink. Color with Ranger Archival Vibrant Fuschia and Leaf Green inks, using the Daubers. Die cut with the matching die. Adhere to card front using foam pads. Using a small sponge, apply Dries Clear Glue to the Frame wherever you would like glitter.  Add clear glitter.

Stamp onto Deluxe Flower Shaping Paper in Ranger Archival Olive ink, the Happy Birthday Sentiment from the Elegant Rose Sentiments Cling Stamp Set. Color with Ranger Archival Vibrant Fuschia and Leaf Green inks, using the Daubers. Apply Ranger Glossy Accents Dimensional Glue. Set aside to dry. When dry, adhere to front of card at either end using hot glue.

Stamp onto Deluxe Flower Shaping Paper in Leaf Green ink the smaller set of Leafy Accent Leaves.  Color with Leaf Green ink, using a Dauber. Die cut with the matching die.  Place in the Leafy Accents Shaping Mold. Lightly spritz with water and run through a die cutting machine. Tap out and ink the edges with Leaf Green ink using the Dauber. Cut into small segments.

To make the Classic Roses, stamp onto Deluxe Flower Shaping Paper in Vibrant Fuchsia ink, the Classic Roses Cling Stamp Set, three times. Die cut with the matching dies. Lightly spritz with water and run through a die cutting machine. You will need nine small and nine extra small blooms. Tap out and lightly shape with the Stylus from the Deluxe Flower Shaping Kit. Shape on the reverse so that the petals cup inwards. To make a bud, take the extra small petals and add Dries Clear Glue to the reverse, gently bring each petal up towards the center and press together. Hold for a minute until dry. Make nine extra small buds. Adhere two small layers of petals together, offset the petals as you go then adhere the bud into the center. Make three in this way. Make three with one layer of small petals. Make two buds with two lots of extra small petals. Leave one bud.

 Adhere the Classic Roses, buds and Leafy Accents leaves to either side of the Sentiment with hot glue.  Using a small sponge and Dries Clear Glue, add glue over the Roses and leaves. Apply clear glitter. All done.


PRODUCTS USED


OTHER PRODUCTS

6"x4"card blank, white card, foam pads, clear glitter, Ranger Glossy Accents Dimensional Glue, water spritz bottle, die cutting machine, hot glue.


VIDEOS


Many thanks for visiting me today, come back soon for lots more inspiration 
Bye for now
xxx

Sunday 23 October 2022

OCTOBER 19th HEARTFELT CREATIONS INSPIRATION WEDNESDAY - Thinking of you Today

 Morning lovely crafting friends, 

Its Inspiration Wednesday here at Heartfelt Creations and I have a card for you using the 

ELEGANT FRAMES COLLECTION and CLASSIC ROSES

If you love Roses, then this collection is for you.
If you would like to know how I made this, please scroll down for instructions.


If you would like to save $20.00 off your first Heartfelt Creations purchase, please CLICK HERE

ON THE HEARTFELT BLOG - Heartfelt Creations Blog


INSTRUCTIONS

Take a 6"x6" card blank and cover with a panel cut to 6"x6", from Sheet 12B purple paper, from the Elegant Rose Frames Collection Paper Pad.  Cut another panel 5 3/4" x 5 3/4" from Sheet 5B yellow paper, from the Paper Pad. Adhere. Cut a pretty corner panel from the Paper Pad, Sheet 4A, to 5 1/2" x 5 1/2", adhere.

Stamp the Thinking of You sentiment, from the Elegant Rose Sentiments stamp, onto Deluxe Flower Shaping Paper, in Ranger Archival Olive ink. Color with Ranger Archival Majestic Violet and Ranger Archival ink - Leaf Green, using the Daubers. Die cut with the matching die. Cover with Ranger Glossy Accents clear dimensional glue. When dry, adhere to the card so that the Sentiment is slightly bowed across the middle.

To make the roses, stamp the roses from the Classic Roses Stamp set, in Distress ink - Bundled Sage, onto the pale-yellow paper from the Paper Pad. Die cut with the matching dies. Place in the Basic Flower Shaping Mold, lightly spritz with water and run through a die cutting machine. Tap out and lightly shape with the Stylus from the Deluxe Flower Shaping Kit. Repeat using Ranger Archival Majestic Violet ink onto Deluxe Flower Shaping paper. Stamp two sets of each. To make the Extra-Large roses, first make a bud with the Extra Small Classic Rose set of petals, by adding Dries Clear Glue to the reverse and lightly press the petals together to make a bud shape. Put to one side. Layer two Extra Large sets of petals together with Dries Clear Glue. Offset the petals as you go. Layer a Large set of petals and a Medium layer the same way. Adhere the bud into the middle. Repeat for the purple Extra-Large Rose. Make the Medium Rose and Small Rose in the same way. Make two Small roses with two layers and an Extra Small rose with two layers. Add Wisteria Purple Nuvo Drops to the center of the Small and Extra Small Roses.

Stamp in Ranger Archival Leaf Green ink onto Deluxe Flower Shaping Paper, two sets of each of the Leafy Accents from the Leafy Accents Cling Stamp Set.  Color using a Dauber and Leaf Green ink.  Die cut with the matching Dies. Ink the edges in Distress Ink – Bundled Sage. Place in the Leafy Accents Shaping Mold, lightly spritz with water and run through a die cutting machine. Tap out and lightly shape with the Stylus from the Deluxe Flower Shaping Kit. Adhere one of each large stems to either side of the Sentiment with Hot glue. Adhere the Roses around the Sentiment, on top of the Leafy Accents with hot glue. Adhere the small pieces of Leaves to either end of the Roses. To add Clear Glitter, take a small sponge and Dries Clear Glue, dab the glue onto the sponge and dab onto the Roses and leaves. Sprinkle on the Clear Glitter with a small spoon. All done.

PRODUCTS USED


OTHER PRODUCTS

6"x6" card blank, Distress ink - Bundled Sage, clear glitter, Ranger Glossy Accents, hot glue, die cutting machine, water spritzer bottle, small spoon.


VIDEO 

HOW TO CREATE CLASSIC ROSES 

ELEGANT ROSE FRAME COLLECTION VIDEO


Many thanks for visiting me today, come back soon for lots more inspiration 
Bye for now
xxx

Wednesday 19 October 2022

October 19th HEARTFELT CREATIONS ELEGANT ROSE FRAMES COLLECTION SHAKER CARD

 Morning lovely crafting friends, 

Its Inspiration Wednesday here at Heartfelt Creations and I have made a Shaker card with the lovely Elegant Rose Frame Collection. Follow along with the instructions to see how I made this.


If you would like to save $20.00 off your first Heartfelt Creations purchase, please CLICK HERE


PRODUCTS USED


OTHER PRODUCTS
5" x 7" card blank, white card, 1/4"foam tape, paper trimmer, Sizzix sequins and beads - purple, water bottle spritzer, die cutting machine, hot glue, clear glitter, small spoon. 

INSTRUCTIONS

To make this 5"x7" shaker card, cut a piece of purple paper from the Elegant Rose Frames Collection Paper Pad to 4 3/4" x 6 3/4" and adhere to the front of the 5" x 7" card. Cut a 3 1/4" x 4 3/4" piece of white card. Adhere 1/4" inch foam tape all around the edges of the white card, without any gaps, adhere to front of the card, with the foam tape facing up. Cut a piece of Clear Cardstock to 3 1/4" x 4 3/4", put to one side. Cut a piece of pink paper from the paper pad to 3 1/4" x 4 3/4".  Using a paper trimmer cut out half an inch from all the way around the inside, making a frame. Adhere to the foam tape. Add sequins and beads into the center of the frame. Adhere the Clear Cardstock.

Stamp in Ranger Archival Olive ink, the Stylish Rose Frame Cling Stamp, onto Deluxe Flower Shaping paper. Color with Ranger Archival Leaf Green and Majestic Violet inks, using Daubers. Die cut with the matching die. Adhere to the Clear Cardstock. Stamp two small Stylish Rose Frames strips from the same stamp set, in Olive ink. Color with Leaf Green and Majestic Violet inks using Daubers. Die cut with the matching die. Adhere to top and bottom of the Stylish Rose Frame.

To make the Rose, stamp onto Flower Shaping paper, the roses from the Classic Rose Cling Stamp set, in Majestic Violet. You will need, three Extra Large, one large, two medium, two small and one extra small. Color with Majestic Violet using a Dauber. Die cut with the matching dies. Place in the Basic Flower Shaping Mold and spritz with water. Run through a die cutting machine and tap out. Lightly shape on the reverse side with the Stylus from the Deluxe Flower Shaping Kit. Lightly ink all the edges in Majestic Violet. To make the bud, apply Dries Clear Glue to the reverse of the Extra Small set of petals and gently bring together all the petals one by one. Hold for a minute to allow to dry. Add two Small sets of petals making sure to offset the petals as you go. Add two Medium layers, one Large layer and three Extra Large layers. Adhere to the side of the card with hot glue.

Stamp in Leaf Green ink the Leafy Accents from the Leafy Accents Cling Stamp Set. Color with Leaf Green ink, using a Dauber. Die cut with the matching die. Lightly ink the edges in Leaf Green ink using a Dauber. Cut into small segments. Adhere a few leaves around the Classic Rose using hot glue.

Stamp in Olive ink the ‘Happy Birthday to You’ Sentiment from the Elegant Rose Sentiments Cling Stamp set, onto Flower Shaping Paper. Color with Majestic Violet and a little Memento Lilac Posies ink using Daubers. Cut off the extra parts to leave just the Happy Birthday.  Die cut with the matching die. Adhere to card front with hot glue onto the Frame sides.  Using a small sponge and Designer Dries Clear Glue, apply glue everywhere you would like glitter. Add clear glitter with a small spoon. All done.


VIDEO - HOW TO MAKE A CLASSIC ROSE

HOW TO USE THE ELEGANT ROSE FRAMES


Many thanks for visiting me today, come back soon for lots more inspiration 
Bye for now
xxx

Thursday 13 October 2022

OCTOBER 12th Heartfelt Creations Elegant Frames Collection Debut Card - Have a Wonderful Day - Card


Morning lovely crafting friends, 

Its Inspiration Wednesday here at Heartfelt Creations and the Debut of the
 
ELEGANT FRAMES COLLECTION

If you love Roses, then this collection is for you.
If you would like to know how I made this, please scroll down for instructions.


If you would like to save $20.00 off your first Heartfelt Creations purchase, please CLICK HERE


INSTRUCTIONS
Cut a piece of purple paper, Sheet 12B from the Elegant Rose Frame Paper Collection to 5 3/4" x 3 3/4 ", adhere onto a 6" x 4" card blank.

Stamp with Ranger Archival Olive ink onto Deluxe Flower Shaping paper, the Stylish Rose Frame from the Stylish Rose Frame Cling Stamp set. Die cut with the matching die. Color with Ranger Archival Leaf Green and Majestic Violet inks, using the Daubers. Add Ranger Glossy Accents Clear Dimensional Glue to the flowers and leaves. Add clear glitter to the Babies Breathe using a sponge and Designer Dries Clear Glue. Allow to dry then adhere to center of card. 

Stamp with Olive ink onto Deluxe Flower Shaping paper a sentiment from the Elegant Rose Sentiments Cling Stamp set. Die cut with the matching die. Color with Ranger Archival Leaf Green and Majestic Violet inks using the Daubers.  Apply Ranger Glossy Accents. Put aside to dry. Die cut the co ordinating background piece with the background die from the Elegant Rose Sentiments Die set, in white card. When dry, adhere the Sentiment to the white background piece. Adhere to center of card with foam tape.

To make five co ordinating roses, take the Classic Rose Cling Stamp set and stamp onto Deluxe Flower Shaping paper with Majestic Violet ink. Stamp five Extra Small Roses and ten Small Roses. Die cut with the matching dies. Place in the Basic Flower Shaping Mold, lightly spritz with water and run through a die cutting machine. Tap out and lightly shape with the Stylus from the Deluxe Flower Shaping Kit. Make five mini buds using five Extra Small roses. Add Designer Dries Clear Glue to the reverse of each Extra Small Rose and gently press each petal in on itself one at a time and press together. Hold for a few minutes for the glue to dry. Add two layers of Small Roses to each bud, use Dries Clear Glue and offset the petals as you go. Put aside to dry.

Stamp onto Deluxe Flower Shaping paper the smaller Leafy Accents leaves set from the Leafy Accents Cling Stamp set, using Olive ink. Color with Leaf Green ink using a Dauber.  Die cut with the matching die. Place in the Leafy Accents Shaping Mold and lightly spritz with water. Run through a die cutting machine. Tap out and cut the leaves apart into smaller segments. Ink the edges in Olive ink using a Dauber. Use hot glue to adhere the five Small Roses and the Leaves to either side of the Sentiment. Take a small sponge and Dries Clear Glue, add glue to the Roses and leaves with the sponge.  Sprinkle on clear glitter. All done.


PRODUCTS USED


OTHER PRODUCTS
 6"x4" card blank, Ranger Glossy Accents Dimensional Glue, white card, foam tape, water spritzer bottle, die cutting machine, hot glue, clear glitter.


VIDEO ON HOW TO MAKE CLASSIC ROSES


ELEGANT FRAMES VIDEO


Many thanks for visiting me today, come back soon for lots more inspiration 
Bye for now
xxx