Wednesday 27 July 2022

July 27th HEARTFELT CREATIONS HOLIDAY STAR - HAPPY HOLIDAYS


Morning lovely crafting friends, its Inspiration Wednesday here at Heartfelt Creations and its CHRISTMAS IN JULY! Today we are show-casing the new 
HOLIDAY STARS COLLECTION 
HAPPY HOLIDAYS
If you would like to know how I made this scrapbook layout please scroll down for instructions.


If you would like to save $20.00 off your first Heartfelt Creations purchase please CLICK HERE


INSTRUCTIONS

12X12 INCH SCRAPBOOK PAGE

Take sheet 10B from the Holiday Star Paper Collection, cut to 11x11 inches, Matt onto 12x12 inch Sheet 11B. Take a 4 ¾ x 4-inch photo, matt onto Gold Luxe Cardstock cut to 5 ¼ x 4 ¼ inches. Cut another piece of 11B paper from the paper pad to 6x7 inches, ink edges in Memento Danube Blue ink. Adhere onto Sheet 6B cut to 7 ¼ x 6 ¼, adhere to center of the page. Adhere the matted photo.

Die cut the Happy Holidays Greeting from the Starry Holiday Greetings Die Set in Gold Luxe Card, put to one side. Stamp the greeting in Danube Blue ink onto Deluxe Flower Shaping Paper, die cut with the matching die, adhere the blue sentiment to the gold sentiment, making sure to leave a small shadow of gold. Adhere to bottom right of the framed photo.

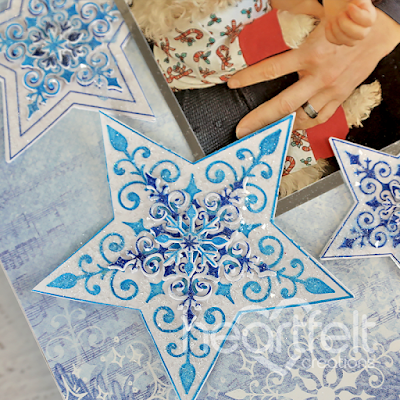
Stamp in Danube Blue ink the Large Holiday Star, three times. Whilst still wet, add embossing powder and dry with a heat tool. Die cut with the matching dies one outside edge star and two inner stars

Stamp in Danube Blue ink the set of four stars from the Large Holiday Star Stamp set, three times. Emboss as before.  Die cut with the matching die. Stamp the small snowflakes from the Large Holiday Star Die Set, three times. Emboss as before. Die cut with the matching die

Layer one inner star onto the Large Holiday Star. Adhere to top right of the page. Add a small snowflake and a blue gem.

Adhere the Large Holiday Star inner snowflake onto one of the smaller stars. Adhere to bottom left of page. Adhere a gold snowflake then a blue snowflake onto the Star, so that you have a small gold shadow. Adhere a blue gem.

Adhere the other two smaller stars to the page.  Adhere small stars onto Luxe Gold Card stars, so that you can see a small gold shadow, adhere to the two smaller stars.

Adhere a few stars and snowflakes around the page.

Adhere a small greeting cut from the paper collection to the side of the page. All done.


PRODUCTS USED 


OTHER PRODUCTS

 Clear Glitter,  Blue Gems


Many thanks for visiting me today
Bye for now
xxx

Wednesday 20 July 2022

July 20th HEARTFELT CREATIONS SEASONS GREETINGS SCRAPBOOK PAGE with the Holiday Star Collection


Morning lovely crafting friends, its Inspiration Wednesday here at Heartfelt Creations. 

If you would like to know how I made this please scroll down for instructions.

If you would like to save $20.00 off your first Heartfelt Creations purchase please


INSTRUCTIONS

Seasons Greetings – 12 x 12-inch Scrapbook Page

Matt a 5 x 3 1/4 -inch photo onto 5 ¼ x 3 ½ piece of Sheet 11A from the Holiday Star Collection Paper Pad. Die cut the outside edge of the Filigree Companion Frame Die in Sheet 12B from the paper pad, adhere matted photo

Die cut the fancy frame from the Filigree Companion Frame Die, 4.75 x 6.75 inches in white card, adhere to frame. Adhere the framed photo onto the center of Sheet 5B using foam tape. Leave the edges clear to tuck in the border panels

Die cut four border panels in white card from the Classic Companion Border Die Set, cut apart into four pieces. Cut the curvy frame pieces in half. Adhere to either side of framed photo. Adhere pearl trim to either side of framed photo on the join.

Stamp the Seasons Greetings Sentiment from the Starry Holiday Greetings Cling Stamp Set, in Ranger Archival Grape Jelly ink, onto Deluxe Flower Shaping Paper.  Color in the leaves with a Zig Water-color Brush in Olive Green. Die cut  with the matching die. Die cut the background frame from the Starry Holiday Greetings Die Set twice, once in Sheet 12B and twice in Deluxe Flower Shaping Card. Cut the two white ones in half lengthways, layer these together starting with the Greeting. Set aside.

Take the other two Classic Companion die cut pieces and adhere as a border across the page below the photo frame. Adhere the layered Greeting with foam tape.

Stamp the smaller stars and the small snowflakes from the Large Holiday Star Stamp set, onto Deluxe Flower Shaping paper in Grape Jelly ink, four times.  Die cut out with the matching dies.

Die cut the two inner stars from the Holiday Star and one larger star with the matching dies. Die cut the smaller stars and snowflakes with the matching dies. You should have one large inner star, two smaller inner stars, four stars from the Large Holiday Star set, seven small snowflakes and two small stars.  Adhere around the photo frame with Dries Clear Glue. Adhere snowflakes onto all the stars. Add small clear gems onto the center of the snowflakes.

Stamp in Peeled Paint Distress Ink six sets of small Holly Leaves from the  Small Festive Poinsettia Stamp set.  Die cut with the matching die. Spritz with water and shape with the stylus from the Deluxe Flower Shaping Kit. Adhere around the page with Dries Clear Glue. 

Cover all the stars and leaves in Dries Clear Glue and sprinkle with Clear Glitter. 

All Done.

PRODUCTS USED

Holiday Star Paper Collection, HCDP1-2141

Holiday Star Cling Stamp Set, HCPC-3993

Designer Dries Clear Adhesive, 159723


OTHER PRODUCTS

White Card,  Clear Embossing Powder, Clear Glitter, Heat Tool, Zig Water Color Brush - Light Green, Foam Tape, Pearl Trim, Distress Ink - Peeled Paint


VIDEO CHRISTMAS CARD


Many thanks for visiting me today, come back soon for lots more inspiration.

Bye for now

xxx

Tuesday 19 July 2022

NOVEMBER 9th HEARTFELT CREATIONS SHAKER CARD FRIENDSHIP ROSE COLLECTION DEBUT - Sending You a Hug

 Morning lovely crafting friends, 

Its Inspiration Wednesday here at Heartfelt Creations and the Debut of the 

FRIENDSHIP ROSE COLLECTION

If you love Roses, then this collection is for you.
If you would like to know how I made this, please scroll down for instructions.


If you would like to save $20.00 off your first Heartfelt Creations purchase, please CLICK HERE


INSTRUCTIONS

For this 5" x 7" card, cut Sheet 9B from the Friendship Rose Collection Paper Pad to 5" x 7", adhere to a 5" x 7" card blank, with Designer Dries Clear Glue. Cut a piece of Sheet 5B from the Paper Pad to 4 1/2" x 6 1/2", adhere to card front. Die cut the Decorative Heart Die in white card using the large outside edge, adhere to card front with Dries Clear Glue. 

Take the Friendship Rose Heart Cling Stamp Set and the Budding Rose Heart Cling Stamp Set and stamp onto Deluxe Flower Shaping paper with Ranger Archival Leaf Green ink. Color with Ranger Archival Rose Madder and Leaf Green inks using the Daubers. Die cut with the matching dies. Die cut the center from the Friendship Rose Heart only. Put the Rose Stems aside for later. 

To make the shaker element for the card, die cut a Scalloped Heart from the Decorative Heart Die Set in Clear Cardstock. Adhere this to the back of the smaller Friendship Rose Heart Die cut, with Dries Clear Glue. Apply thin foam tape around the reverse edge of the Friendship Rose Heart, taking care to keep inside the frame. Make sure there are no gaps. Adhere the larger Budding Rose Heart Die cut to the Decorative Heart Die cut on the front of the card. Place sequins and beads into the center of the Budding Rose Heart Die cut. Adhere the smaller Friendship Rose Heart onto the larger Budding Rose Heart, firmly pressing the foam tape down. 

To make the Roses, stamp onto Deluxe Flower Shaping Paper, lots of Roses from the Classic Rose Stamp Set with Rose Madder ink. Color with Rose Madder ink using a Dauber. Die cut with the matching dies. Place in the 3D Floral Basics Shaping Mold, lightly spray with water and run through a die cutting machine. Tap out and lightly shape on the reverse with the stylus from the Deluxe Flower Shaping Kit. Make five Extra Small buds by adding Designer Dries Clear Glue to the reverse of the petals and slowly bring each petal up together and hold for a few minutes for the glue to dry. For the three smallest Roses, adhere two layers of small petals to a bud, offset the petals as you go. To make the Medium Roses add one small layer and two medium layers to a bud. You will need three small and two medium Roses.  Adhere one Medium and three small Roses around the frame with hot glue.

For the leaves, stamp Leafy Accents onto Flower Shaping paper in Leaf Green ink. Color with Leaf Green ink using a Dauber. Die cut with the matching dies. Place in the Leafy Accents Shaping Mold, lightly spray with water and run through a die cutting machine. Tap out and cut into small segments. Ink the edges in Ranger Archival Olive ink using a Dauber.  Adhere around the Roses using hot glue.

Take the Rose Stems and lightly shape with the Stylus from the Deluxe Flower Shaping Kit. Cut the stems a little to make them shorter. Adhere them across the base of the heart at a slight angle. Place in two sets of three, one large, medium and small stem. Make sure to leave a gap in the middle for the Sentiment and Rose.

Stamp onto Deluxe Flower Shaping paper a sentiment from the Friendship Rose Sentiments Cling Stamp Set in Leaf Green ink. Die cut with the 2" x 1 1/4 " tag from the Ticket and Tags Craft Die Set. Ink the edges with Leaf Green ink using a Dauber. Apply foam tape to the reverse. Adhere into the middle of the Rose Stems at an angle with foam tape. Add a medium Rose using hot glue.  Take a small sponge and Dries Clear Glue, apply glue wherever you would like glitter. Add clear glitter. All done.


PRODUCTS USED


OTHER PRODUCTS

5" x 7" card blank, white card, Sizzix Sequins & Beads in Ballet Slipper, 1/4" foam tape, water spray bottle, die cutting machine, hot glue, clear glitter. 


VIDEO 


Many thanks for visiting me today, come back soon for lots more inspiration 
Bye for now
xxx

Wednesday 13 July 2022

July 13th HEARTFELT CREATIONS MERRY CHRISTMAS SCRAPBOOK PAGE with the Holiday Stars Collection


Morning lovely crafting friends, its Inspiration Wednesday here at Heartfelt Creations and its CHRISTMAS IN JULY! 
Today we are show - casing the new 
HOLIDAY STARS COLLECTION 

How are you this beautiful Wednesday! Exciting news, the Holiday Star Collection just launched for everyone! Creating Christmas cards is made EZ  with the Holiday Star Collection! Keep it simple, for those quick and easy cards, or create layered iconic star studded cards for those one of a kind handcrafted projects. Whether you’re wanting to create an iconic frosty star studded card, or feature heartwarming messages with exquisite detail and design, you can create this and so much more!

Special Savings: The Holiday Star I Want It All has a 10% discount, only available until July 16th, 2022 or while supplies last! Your new collection will arrive packaged in a transparent zipper bag with hot pink trim, great for keeping organized!

If you would like to know how I made this scrapbook layout please scroll down for instructions.


If you would like to save $20.00 off your first Heartfelt Creations purchase please CLICK HERE


INSTRUCTIONS

Matt a 5 x 7-inch photo onto Luxe Silver card cut to 5 ¼ x 7 ¼, adhere to sheet 5A from the Holiday Star Collection Paper Pad.

Die cut the Starry Holiday Greetings die - Merry Christmas, in Silver Luxe card, twice. Glue together. Stamp  Merry Christmas in  Memento Danube Blue ink onto Flower Shaping paper,  die cut with the Merry Christmas die, adhere with Dries Clear Glue onto the silver greetings die cuts. 

To make the stars, use white card or Deluxe Flower Making Card.  

Star 1 - Stamp the Holiday Star in Paradise Teal ink. Die cut the outside edge with the matching die. Stamp again in  Danube Blue ink. Die cut the inner snowflake.  Stamp in Paradise Teal ink the small snowflakes and the small stars from the Large Holiday Star Cling Stamp set.  Stamp again in  Danube Blue ink. Die cut with the matching dies. Adhere the blue snowflake to the Holiday Star followed by the small teal snowflake followed by a tiny blue snowflake. Adhere slightly underneath the photo.


Star 2 - Stamp the Holiday Star in Memento Danube Blue ink.  Die cut the inner star with the matching die. Stamp again in Paradise Teal ink. Die cut the snowflake with the snowflake die and adhere to the blue star. Stamp the mini snowflakes in  Danube Blue ink. Die cut with the matching die. Adhere the teal snowflake followed by the mini blue snowflake, followed by a tiny teal snowflake onto the Blue star. Adhere slightly underneath the photo.

Star 3 - From the Large Holiday Star Stamp Set, stamp the Large Holiday Star, the smaller stars and the mini snowflakes in Paradise Teal ink. Die cut the Large Holiday Star outside edge with the matching die. Cut off all the fancy outside edges so that you have a star shape.  Stamp the Holiday Star in  Danube Blue ink, die cut the snowflake with the matching snowflake die.  Adhere the center blue snowflake to the teal star. Adhere a small teal snowflake. Adhere a tiny blue snowflake.

Star 4 - Stamp the Holiday Star in Danube Blue ink. Die cut the inner star with the snowflake with the matching star die. Adhere a blue snowflake to the center. Adhere a small snowflake and a tiny blue snowflake. Adhere to page.

Star 5 - Stamp in  Danube Blue ink the Holiday Star. Repeat in Paradise Teal ink. Die cut the blue center star with the matching die. Die cut  the inner snowflake from the Teal Holiday Star.  Adhere the teal snowflake to the blue star. Adhere a small blue snowflake then a tiny teal snowflake and a tiny blue snowflake. Adhere to page.

Star 6 - Stamp the star set from the Large Holiday Set, in  Danube Blue ink. Die cut with the matching die. Adhere a small teal snowflake followed by a mini blue snowflake. Adhere to page.

Star 7- Repeat as for Star 6 using Paradise Teal ink. Adhere a small blue snowflake followed by a tiny teal snowflake

Adhere a few small stars and snowflakes in the gaps. Using Dries Clear Glue and a small sponge, add glue all over the stars. Add clear glitter.  So the same with the Merry Christmas Greeting. All done.


PRODUCTS USED 


OTHER PRODUCTS

Clear Glitter,  Die Cutting Machine


VIDEO


Many thanks for visiting me today
Bye for now
xxx

Wednesday 6 July 2022

July 6th HEARTFELT CREATIONS WILD POPPY CARD -- Feel Better Soon


Morning lovely crafting friends
Its Inspiration Wednesday here at Heartfelt Creations. 
If you would like to know how I made this card please scroll down for instructions.


If you would like to save $20.00 off your first Heartfelt Creations purchase please CLICK HERE


OTHER PRODUCTS

 Clear Glitter, Hot Glue Gun, Floral Tape, White card, 6x6inch card blank, 1 1/4 inch circle die.


INSTRUCTIONS

Take a 6x6 inch card blank, cover with pink paper, sheet 7B, from the Wild Poppies Paper Pad. Adhere with Dries Clear Glue. Die cut in white card, the Rounded Window 5 inch circle frame die, adhere to card. Die cut a 4inch Eyelet Circle Basics die in Green paper, sheet 5B, adhere to card.

Stamp in Ranger Archival Rose Madder ink, onto Flower Making Paper, two large, four small and 10 mini Wild Poppies. Die cut with the matching dies. Lightly spritz with water, take the stylus from the Deluxe Flower Shaping Kit and shape on a foam mat. Stamp in Jet Black ink onto black sheet 11B paper, six Wild Asters (two large and four small). Die cut with the matching dies. Lightly shape with the stylus. Glue two layers of poppies together, offset the petals as you go. You should have one large, two medium and five small poppies. Adhere two layers of the black Wild Asters to the middle of the three largest Poppies. When dry, pierce hole in the middle of all petals, thread Bright pink stamens through using a small piece of doubled over wire.

Stamp in Ranger Archival Olive ink all three Wild Poppy Accents pieces, die cut with the matching dies. Color in with Ranger Archival Leaf green ink, using the Daubers. Add a little Rose Madder Pink ink to the edges. Lightly shape with the stylus from the Flower Shaping Kit. Glue onto the center of the card.

Adhere four poppies onto the ends of four EZ Flower Stems with hot glue. Arrange as a floral bouquet, bind the ends together with Floral Tape, adhere to card. Adhere the rest of the poppies around the card.
Stamp a sentiment in Jet Black ink onto a  1 1/4" circle of Flower Shaping paper, adhere to card. Dab Dries Clear Glue onto Poppies and Poppy Accent Leaves with a small sponge. Sprinkle on clear glitter.
All done.

Many thanks for visiting today, bye for now

xxx