
Morning lovely crafting friends, Its Heartfelt Creations


To make this 8 1/2" x 3 3/4" slim line, tent fold, Easel card, take a piece of A4 white card, cut to 8 1/2" x 7 1/2", fold in half and score. Fold one side in half again and score. Put to one side.
To make the Slim Lattice panel, die cut the Slim Lattice Oval Die, including the fancy frame and small oval, in white card. Set the fancy oval and small oval to one side. Cut a rectangle of red paper from the Friendship Rose Paper Collection to 8" x 3 1/4". Adhere the white Slim Lattice Oval to the rectangle of red paper.
Cut a rectangle of red paper to 3 1/2" x 8 1/2". Die cut a Slim Eyelet Rectangle, second
size down, in white card. Adhere the white Slim Eyelet Rectangle to the red rectangle. Adhere the matted Slim Lattice Oval panel on top. Glue this panel to the half fold of
the card, making sure to add glue to the bottom half of the panel only. Cut a
panel, 1 3/4" x 8 1/2" in white card and glue to the back of the top half of the Lattice
panel, to neaten.
For the
other side of the card, die cut another rectangle of red paper with the Slim
Eyelet Rectangle die, second size down. Adhere. Take the fancy oval piece from
the Slim Lattice Oval Die cuts and adhere to the lower center of the red paper.
Stamp a sentiment from the Friendship Sentiments Cling Stamp Set, onto the
small oval, in Ranger Archival ink - Light House. Ink the edges using a Dauber in
Light House ink. Adhere to the middle of
the fancy oval with foam tape.
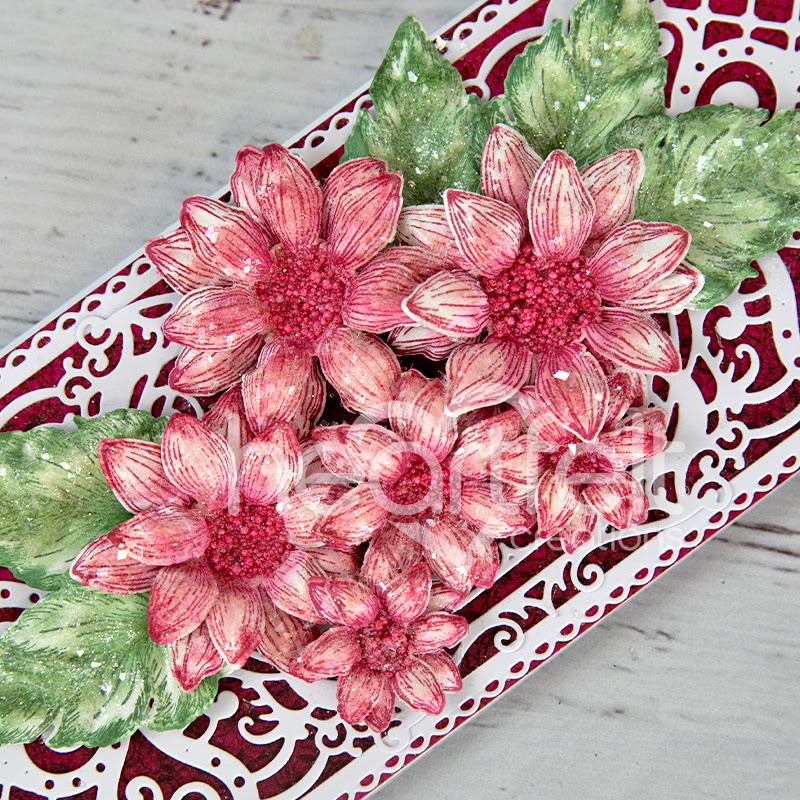
Stamp a
variety of Rustic Sunflowers in Light House ink, onto Deluxe Flower Shaping
Paper. Stamp the co ordinating leaves,
in Ranger Archival Olive ink. You will need five leaves and six large, two medium, and six small Sunflower layers. Color with the same inks. Die
cut with the matching dies. Ink the edges of the Sunflowers in Light House ink
using a Dauber. Ink the edges of the leaves in Olive ink. Place in the Rustic
Sunflower Shaping Mold, lightly spritz with water and run through a die cutting
machine. Tap out and lightly shape on the reverse with the stylus from the
Deluxe Flower Shaping Kit. Glue two of each size of petals together with Dries
Clear Glue, offset the petals as you go. Add a circle of Dries Clear Glue to
the middle of each Sunflower, then add lots of Stop Whining Prills. Adhere the
Sunflowers to the center of the card with hot glue. Adhere the leaves around
the Sunflowers with hot glue. Adhere a small Sunflower next to the sentiment. Apply
Dries Clear Glue to the flowers and leaves. Sprinkle on clear glitter. All done.
PRODUCTS USED
Slim Eyelet Rectangle Die, HCD3-7431
Friendship Rose Paper Collection, HCDP1-2145
Friendship Sentiments Cling Stamp Set, HCPC-31007
Rustic Sunflower Cling Stamp Set, HCPC-3962
Rustic Sunflower Die, HCD1-7364
3D Rustic Sunflower Shaping Mold, HCFB1-5009
Deluxe Flower Shaping Paper Pack of 50 - White, HCPP1-475
Deluxe Flower Shaping Kit, HCST1-401
Stack and Store Daubers-Pack of 6, HCDA1-449
Designer Dries Clear Adhesive, 159723
Stop Whining Prills, ANC824
Ranger Archival Ink Pad - Light House, RACP771
Ranger Archival Ink Pad - Olive, RACP482
Hydra Sponges, RLHS100


I love how you used these beautiful dies to create a gorgeous easel card my friend!
ReplyDelete