


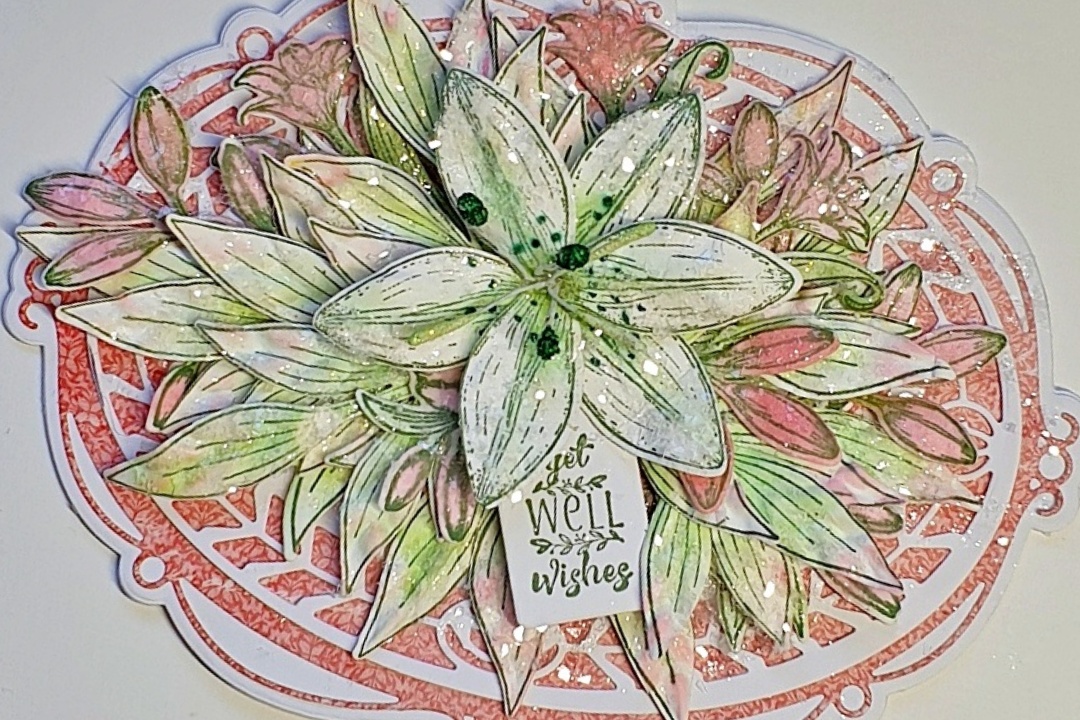
To make this
5" x 7" tent fold, oval shaped card, take a 5” x 7” card blank and
die cut using the Simply Classic Oval Frame Die Set, largest outside edge. Tape
the die down with low tack tape, so that the top edge of the die is set
slightly over the folded edge of the card. This way you preserve the fold. Die
cut another largest outside edge, in white card. Adhere to card front. Die cut
the next size down in peach paper from the Garden Lily Collection Paper Pad.
Adhere to card front. Die cut the next size down frame in white card, adhere to
card front. Die cut the smallest size dies in peach paper and adhere.
Stamp onto Deluxe Flower Shaping paper with Ranger Archival Olive ink, seven sets of the Leaves from the Garden Lily Cling Stamp Set. Color with Ranger Archival Vivid Chartreuse ink using a Dauber. Lightly color the ends of the leaves with Pink Peony ink using a Dauber.
Stamp the large Lilies from the Garden Lily Cling Stamp Set in Olive ink, lightly color with Vivid Chartreuse ink using a Dauber and add little dots of green in the middle using a Zig Clean Color Art Pen in Deep Green. Die cut with the matching dies.
Add Leaves and Lilies to the Garden Lily Shaping Mold, lightly mist with water and run through a die cutting machine. Tap out and lightly shape the Leaves and Lilies on the reverse with the stylus from the Deluxe Flower Shaping Kit. Pierce holes in the centers of the Lily and thread through Green Beaded Stamens and Pastel Pollen Stamens in green. Add Dries Clear Adhesive, off- set the petals and cut off the wires.
Stamp in
Olive ink Lily Buds from the Garden Lily Bouquet & Buds Cling Stamp
Set, and Lily Buds from the Garden Lily Spray & Fillers Cling Stamp
Set. Color with Pink Peony ink. Die cut with the matching dies.
Lightly shape on the reverse with the stylus from the Deluxe Flower Shaping
Kit.
Adhere the
Lily Leaves across the center of the card to form a leafy bed. Adhere the Lily in the middle with hot glue. Adhere the Garden Lily Buds
around the card.
Stamp onto
white card in Olive ink, a sentiment from the Cheerful Note Sentiments Cling
Stamp Set. Die cut with a tag from the Ornamental Tags Die Set. Adhere with hot
glue. Sponge Dries Clear Adhesive over the Lilies and Leaves, sprinkle on clear
glitter. All done.
PRODUCTS USED
Garden Lily Cling Stamp Set, HCPC-31011
Garden Lily Die, HCD1-7439
3D Garden Lily Shaping Mold, HCFB1-5013
Garden Lily Bouquet & Buds Cling Stamp Set, HCPC-31013
Garden Lily Bouquet & Buds Die, HCD1-7441
Garden Lily Spray & Fillers Cling Stamp Set, HCPC-31012
Garden Lily Spray & Fillers Die, HCD1-7440
Simply Classic Oval Frame Die, HCD2-7382
Ornamental Tags Die, HCD1-7203
Cheerful Note Sentiments Cling Stamp Set, HCPC-3848
Deluxe Flower Shaping Paper Pack of 50 - White, HCPP1-475
Deluxe Flower Shaping Kit, HCST1-401
Stack and Store Daubers-Pack of 30, HCDA2-450
Bright Bead Stamens-Medium, HCS1-458-3
Petite Pollen Stamens - Medium, HCS1-499
Zig Clean Color Real Brush Markers - 48 Pack, 478594
Ranger Archival Ink Pad - Olive, RACP482
Ranger Archival Ink Pad - Pink Peony, RACP649
Designer Dries Clear Adhesive, 159723
Hydra Sponges, RLHS100


No comments:
Post a Comment
Many thanks for stopping by my blog. I really appreciate and love reading all your comments. Have a great day, Bye For Now.