Wednesday, 23 August 2023
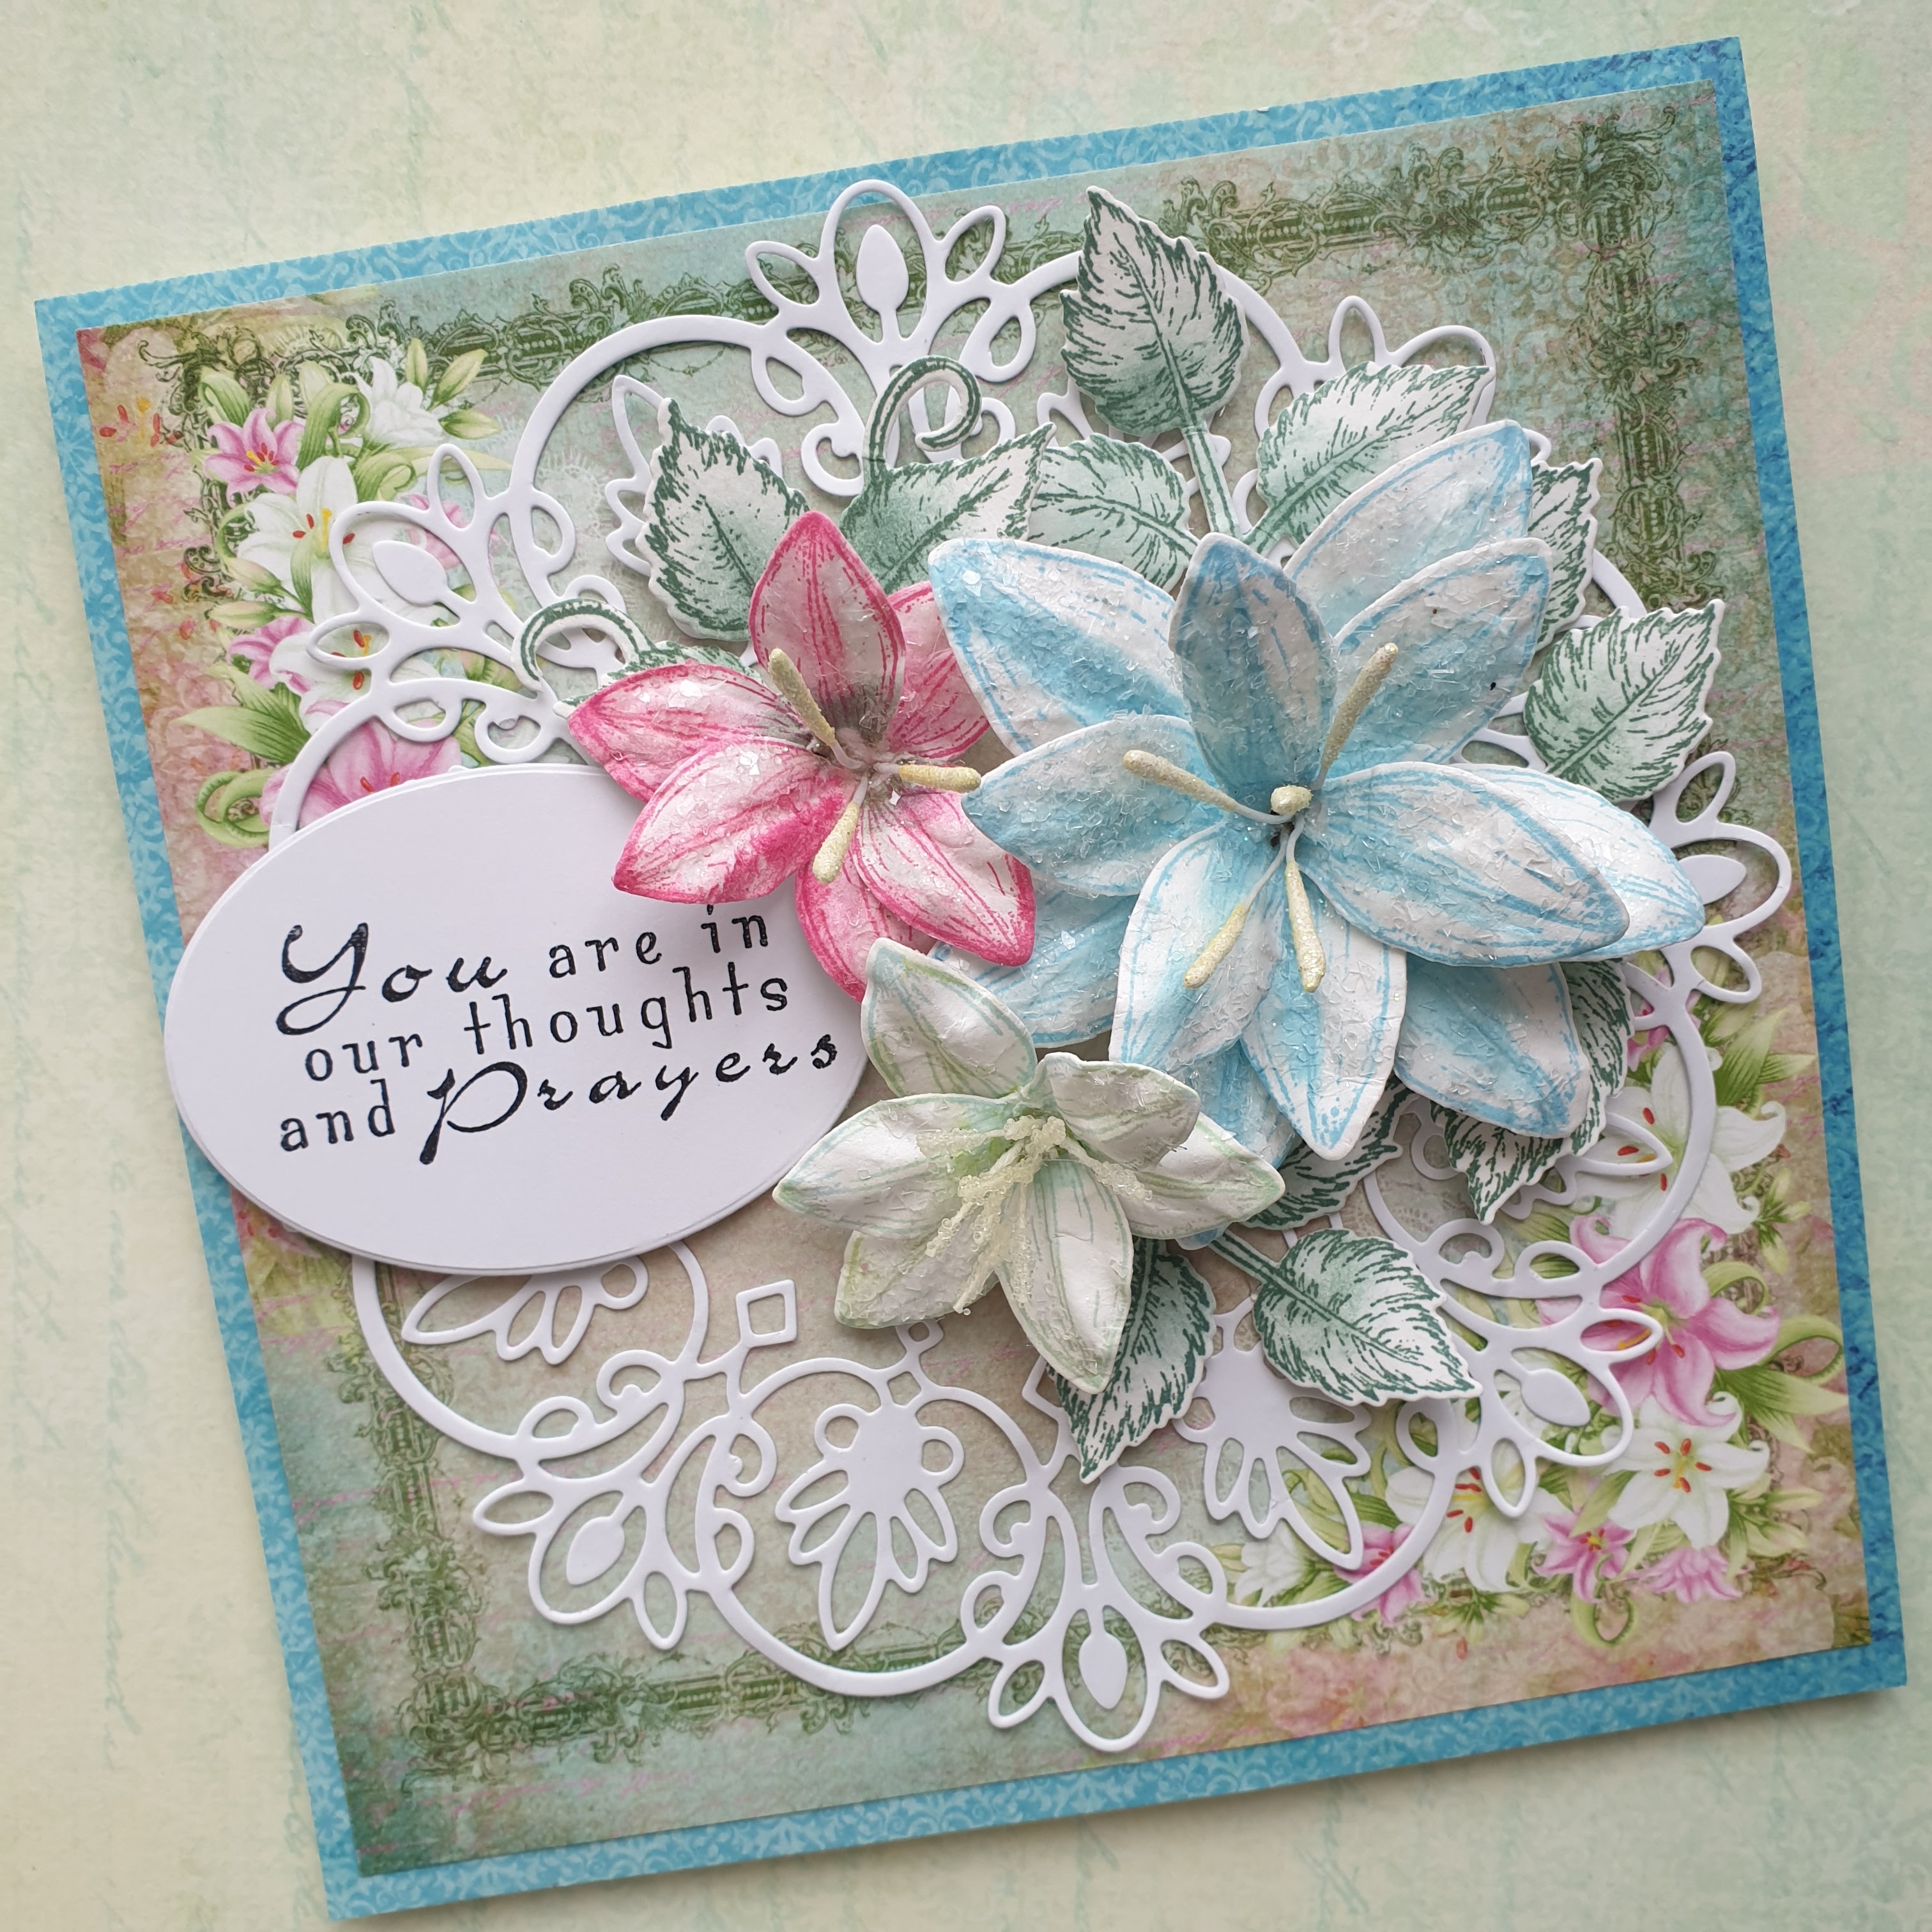
HEARTFELT CREATIONS SYMPATHY CARD with the GARDEN LILIES COLLECTION
Wednesday, 16 August 2023
HEARTFELT SYMPATHY CARD with HEARTFELT CREATIONS GARDEN LILIES COLLECTION
Morning everyone, today is inspiration Wednesday and I have another Sympathy card for you using the Heartfelt Creations Garden Lily Collection.If you have this collection, this is a fairly easy card to make. I made this in six easy steps.
YOU WILL NEED
Heartfelt Creations Garden Lily Paper Collection, Stamps, Dies and Shaping Mold. Flower Shaping Paper. Leafy Accents Stamps, Dies & Shaping Mold. Butterfly Kisses Deocrative Die set. Ticket & Tags Die set. Cheerful Notes Sentiments Stamp Set.
6x6 inch card blank, white card, assorted ink pads, clear glitter, stamens, foam pads or tape, clear glue, flower shaping tool, die cutting machine, hot glue gun.
HERES HOW
Cover a 6x6 inch card blank with yellow paper. Cut a 51/2 inch square panel, adhere.Cut a 4 inch panel. Cut a 4 1/4 inch panel of yellow paper. Adhere the 4 inch panel to the 4 1/4 inch panel. Adhere this to card front with foam tape.
Die cut a square doily using white card. Adhere. Stamp a sentiment onto white card. Cut out using a fancy edge die from the Tickets and Tags die set. Adhere with foam tape.
Stamp, colour and die cut an assortment of Garden Lilies and Leafy Accents Leaves. Place in the corresponding mold, lightly spray with water and run through a die cutting machine. Tap out and lightly shape with a flower shaping tool.
Place two layers of Lilies of the same size together to make two Lilies, one large and one small. Thread through a few matching stamens, add glue and cut off the stems, Adhere to card with glue. I used hot glue.
Adhere the leaves around the flowers. Add glitter using clear glue. All done.
I hope you like my card and followed along. More to come next week.
Bye for now.
xxx
Wednesday, 9 August 2023
BIRTHDAY CARD - SWEET PEONY - Susans Garden Peony and Heartfelt Creations Dies
Sweet Peony - Susans Garden Club and Heartfelt Creations Hi everyone and welcome to my blog and another card for your inspiration. Today I have a Sweet Peony Birthday Card for you, I hope you like it. I have made a partly closed Peony with a couple of buds. I love the leaves that come with this. And of course I love pink.
Wednesday, 2 August 2023
HEARTFELT CREATIONS SYMPATHY CARD with the GARDEN LILLY COLLECTION
![]() |
| Garden Lilly Collection |
Many thanks for visiting today. I will post another sympathy card next week. Bye for now.
xxx
Wednesday, 26 July 2023
JULY 26th HEARTFELT CREATIONS HOLIDAY ORNAMENT CHRISTMAS CARD - Peace on Earth
Morning lovely crafting friends,
PRODUCTS USED
Noel Holiday Ornaments Cling Stamp Set, HCPC-31031
Noel Holiday Ornaments Die, HCD1-7467
Courtyard Elegance Die, HCD1-7283
Eyelet Circle & Basics Small Die, HCD1-7154
Circle Basics Large Die, HCD1-7155
Deluxe Flower Shaping Paper Pack of 50 - White, HCPP1-475
Luxe Silver Cardstock, HCGP1-493
Designer Dries Clear Adhesive, 159723
Ranger Archival Ink Pad - Jet Black, RACP468
Wednesday, 19 July 2023
JULY 19th HEARTFELT CREATIONS - HOLIDAY ORNAMENT COLLECTION Christmas Card
Morning lovely crafting friends,
Take a 5" x 7" card blank and cover with tartan paper from the Holiday Ornament Collection Paper Pad, cut to 4 3/4" x 6 3/4", adhere to card front with Designer Dries Clear Adhesive. Cut a red piece of paper from the same paper pad to 4 1/2" x 6 1/2", adhere. Die cut a large Majestic Swirl Frames Die from the Majestic Swirl Frames Die Set, in white card, adhere. Cut a piece of tartan paper to 4" x 6", adhere. Die cut the inner die from the same die set in white card. Adhere.
Take the
Sparkling Holiday Ornaments Cling Stamp, from the Sparkling Holiday Ornaments
Cling Stamp Set, stamp onto Deluxe Flower Shaping Paper with Ranger Archival
Jet Black ink. Stamp another one using a Versamark Embossing ink pad. Apply
black Embossing Powder and heat with a heat tool. Die cut both with the
matching die. Color the embossed piece with No. 024 Wine Red Zig Clean Color
Real Brush pen and gold glitter glue. Attach one to the other with foam tape.
Attach to card front with foam tape.
Stamp onto white card, the Sentiment from the Christmas Lantern Cling Stamp Set, from the Festive Christmas Collection. Die cut with the matching die. Adhere to card front. All done.
Sparkling Holiday Ornaments Cling Stamp Set, HCPC-31030
Sparkling Holiday Ornaments Die, HCD1-7466
Christmas Lantern Cling Stamp Set, HCPC-31026
Christmas Lantern Die, HCD1-7462
Majestic Swirl Frames Die, HCD2-7308
Deluxe Flower Shaping Paper Pack of 50 - White, HCPP1-475
Zig Clean Color Real Brush Markers - 48 Pack, 478594
Designer Dries Clear Adhesive, 159723
Ranger Archival Ink Pad - Jet Black, RACP468
Wednesday, 12 July 2023
JULY 12th HEARTFELT CREATIONS DEBUT OF THE HOLIDAY ORNAMENT COLLECTION - Christmas in July card
Morning lovely crafting friends,
Take a 5" x 7" card blank and cover with red paper from the Holiday Ornament Collection Paper Pad, cut to 4 3/4" x 6 3/4", using Designer Dries Clear Adhesive. Die cut the Royal Elegance Frame Die, fancy edge, in white card. Adhere to card front.
Stamp the Large Holiday Ornament from the Large Holiday Ornament Cling Stamp Set, onto white card with Versamark Embossing Ink Pad. Add gold Embossing Powder and dry with a heat tool. Die cut with the matching die. Color the top and bottom pieces with No.024 Wine Red Zig Clean Color Real Brush pen. Cut off these two pieces and put to one side. Die cut another Large Holiday Ornament in Deluxe Gold card. Adhere to card front with foam tape. Adhere the white Large Holiday Ornament top and bottom pieces to the gold Large Holiday Ornament with foam tape.
Die cut the patterned centre piece from the same die set, in Deluxe Gold card. Place the gold centre piece onto red paper from the paper collection and cut around the outside edge. Adhere the gold die-cut to the red paper. Adhere this to the front of the card with foam tape. Die cut two gold stars in the same gold card. Adhere the gold star. Adhere the second gold star with foam tape.
Stamp onto white card an assortment of Poinsettias from the Large Festive and Small Festive Poinsettia Cling Stamp Sets. Stamp four small and two medium Poinsettias in Memento Love Letter ink. Color with the same ink into the middles and tips. Stamp three sets of holly from the Small Poinsettia Stamp Set in Ranger Archival Leaf Green ink. Die cut with the matching dies. Place in the Poinsettia Flower Shaping Molds and run through a die cutting machine. Adhere two of the same sizes of flowers together. Add small polystyrene balls to the flower centres. Adhere flowers and leaves to card with hot glue.
Stamp onto white card with Ranger Archival Jet Black ink, the Merry Christmas Sentiment from the Festive Christmas Collection, Christmas Lantern Cling Stamp Set. Die cut with the matching die. Adhere to side of card. Apply dries clear glue to the flowers and leaves with a small piece of sponge. Add clear glitter. All done.
PRODUCTS USED
Large Holiday Ornament Cling Stamp Set, HCPC-31029
Large Holiday Ornament Die, HCD1-7465
Christmas Lantern Cling Stamp Set, HCPC-31026
Christmas Lantern Die, HCD1-7462
Royal Elegance Frames Die, HCD2-7307
Large Festive Poinsettia Cling Stamp Set, HCPC-3957
Large Festive Poinsettia Die, HCD1-7358
Small Festive Poinsettia Cling Stamp Set, HCPC-3958
Large 3D Festive Poinsettia Shaping Mold, HCFB1-5007
Small Festive Poinsettia Die, HCD1-7359
Small 3D Festive Poinsettia Shaping Mold, HCFB1-5008
Luxe Gold Cardstock, HCGP1-488
Zig Clean Color Real Brush Markers - 48 Pack, 478594
Designer Dries Clear Adhesive, 159723
Embossing Powder - Gold, 359760
Ranger Archival Ink Pad - Jet Black, RACP468
Ranger Archival Ink Pad - Leaf Green, RACP436
Wednesday, 5 July 2023
JULY 5th HEARTFELT CREATIONS Christmas in July Christmas Card - Merry Christmas
Morning lovely crafting friends,
Take a 9" x 4" card blank - tent fold, die cut with the outside edge of the Slim Ornate Rectangle Die. Make sure to leave the top edge free of the die so that the card can be opened. Die cut another one in green paper from the Festive Christmas Collection Paper Pad. Adhere to card front with Designer Dries Clear Adhesive. Die cut the next size down in white card, and the next size down again, in white card. Adhere to card front. Adhere the rectangle piece with foam tape.
Stamp onto white card with Ranger Archival Jet Black ink, all the stamps from the Festive Berry and Birdies Cling Stamp Set, twice. Stamp an extra single Birdie with holly berries. Color with Zig Clean Color Real Brush Pens in 050 Yellow, 041 Light Green, 045 Pale Green, 025 Pink and 066 Dark Oatmeal, using a Water brush. Die cut with the matching dies. Adhere first set to card front. Adhere second set to the first set with foam tape. Cut the Birdie off the extra piece, adhere the flower and berries piece to card corner. Adhere the Sentiment to the white rectangle. Sponge Dries Clear Adhesive over the Birdies, Berries and Holly, apply clear glitter. All done.
Festive Berry & Birdies Die, HCD1-7463
Festive Berry & Birdies Cling Stamp Set, HCPC-31027
Slim Ornate Rectangle Die, HCD3-7448
Zig Clean Color Real Brush Markers - 48 Pack, 478594
Color In Watercolor Brush - Fine, 409311
Designer Dries Clear Adhesive, 159723
Ranger Archival Ink Pad - Jet Black, RACP468
Hydra Sponges, RLHS100