Friday, 29 October 2021

29th October HEARTFELT CREATIONS ALUMNI DESIGN TEAM OCTOBER BLOG HOP


Morning Heartfelt Crafters, its the Heartfelt Creations Alumni Design Team OCTOBER Blog Hop, come and hop along with us to be in with a two chances to win $25.00 to spend in the Heartfelt shop.


Did you know every last Friday of each month we have a blog hop filled with beautiful inspiration from the Alumni Design team? Are you looking to jumpstart your creativity? If you feel stuck and want some ideas to get you started, you are in the perfect spot!

Join in this months hop for a chance to win a $25 gift certificate before 11:59pm EST Monday November 1st 2021, It's easy to join in on the fun! See how below. 

P.s There are two chances to win! One chance with the Designers Blogs and another with the Heartfelt Creations Blog!


At that time a randomly chosen comment from a mystery blog will be chosen to win a $25 Heartfelt Creations Gift Card.
The winner will be announced on the Heartfelt Creations blog and Facebook page on Wednesday 3rd November 2021 (Don't forget to check!)
The winner has 72 hours to claim the prize by emailing socialmedia@heartfeltcreations.com. Please write “Winner of the OCTOBER 2021 Alumni Hop” in the subject line of your email.
 Please comment on my blog post and each of the other participating ladies in the blog hop for a chance to win.
Good luck everyone.


BLOG HOP LINE UP

Heartfelt Creations 2021 OCTOBER Alumni Blog Hop List

Kathy 

 Vicki 

 Carole  YOU ARE HERE

 Alissa

 Amarilys

 Lisa

♥ Candy  

 Oksana

 Monica

 Heartfelt Creations


Ranger Archival Inks - Vivid Chartreuse,  

Prills - Hot Mama, Gilt Trip, Go Mango


OTHER PRODUCTS USED

White card, 2 x A4 sheets of white card for the box,  9x4inch card blank, clear glitter, Black Micro Beads with the Prills, Ranger distress ink in Walnut Stain, Foam tape, Hot Glue. 

INSTRUCTIONS

Take the 9 x 4 inch card blank and cover with orange paper from the paper pad
Cut a piece of blue paper from the paper pad to 8 3/4 x 3 3/4 inches
Die cut an Elaborate Oval Frame (second size down), in white card, adhere in the center of the card
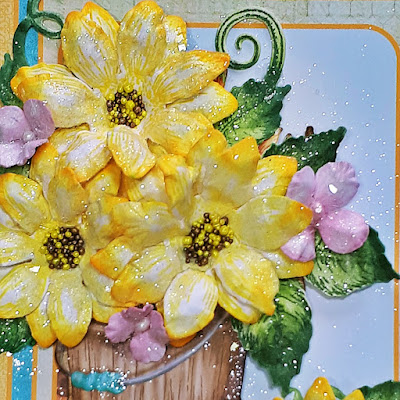
Stamp, colour and Die cut the Rustic Can, Freezer and Bucket, adhere using Foam Tape
Stamp, colour and die cut an assortment of sunflowers and leaves
Place in Sunflower mold, lightly spritz with water and run through a die cutting machine
Tap out and lightly shape with the flower shaping tool
Die cut a Ladybird from the paper pad, adhere
Glue two layers of each bloom (same size) together, adhere around the card with hot glue
Using Dries Clear Glue and a small brush or sponge, add clear glitter 
When dry, add Dries Clear Glue to the flower centers and add Prills
(I mixed the Prill colours together to get mixed colour centers)

All done. 


HOW TO MAKE THE BOX

The card measures 9 x 4 inches
The box measures 9 3/4 x 5 1/4  inches            
The box is slightly larger to accomodate the card 
You will need two A4 sheets of white cardstock and paper from the paper pad
Cut the lid to 7 1/4 x 11 3/4 inches
Cut the base to 7 x 11 1/2inches
Score at 1 inch on all four sides on both pieces, fold and burnish all sides
Cut tabs on opposite sides of the box on both pieces
Nip out a tiny edge on each section of each tab with scissors
Add glue to the front of the tabs, bring base up and glue together
Glue all four tabs down and hold the corners together with clips until dry
Line the base of the box with pretty paper
Adhere another paper to the lid,leaving a small gap around edges
Decorate lid with a flower and leaves
All done.
VIDEO HERE

Many thanks for visiting me today, come back soon for lots more inspiration.
GOOD LUCK EVERYONE
Bye for now
xxx

Wednesday, 27 October 2021

27th October HEARTFELT CREATIONS SWEET MAGNOLIA COLLECTION CARD


Good morning lovely crafters, today I have another 

Heartfelt Creations Card for you with the Rustic Sunflower Collection and Sweet Magnolias.

This is a quick and EZ 6x6inch card

Please see Instructions below


Leafy Accents

Sweet Magnolia Collection

Ranger Archival Inks - Vibrant Fuschia, Viridian

Silver Luxe Cardstock

OTHER PRODUCTS USED

White card,6x6inch card blank, clear glitter, Memento London Fog ink, Foam tape, Hot Glue, Pearl Stamens, Aqua blue card. 


INSTRUCTIONS

Cover a 6x6inch card blank (tent fold) with pink paper from the paper pad, leave a small gap around the edges

Die cut the large outline Simply Elegant Centerpiece Die in aqua blue card, adhere

Die cut the fancy edge large die in white card and silver card, adhere the silver and then the white die cuts 

Stamp, colour and Die cut an assortment of Sweet Magnolia blooms

Place the flowers in the Shaping Mold, lightly spritz with water and run through a die cutting machine

Tap out and when dry lightly shape with a shaping tool, make hole in the centers and add stamens - I made two medium blooms, one small bloom and one bud

Stamp, colour and die cut a few Leafy Accents leaves

Place in the shaping mold, lightly spritz with water and run through a die cutting machine

Die cut two cans and one bucket, ink edges in London Fog ink, adhere using foam tape

Adhere the blooms and leaves with hot glue

Add dries clear glue to the flowers, leaves and cans and bucket and add glitter

Stamp out a sentiment, adhere

All done.


VIDEO HERE for SWEET MAGNOLIAS


Many thanks for visiting me today, come back soon for lots more inspiration.
Bye for now
xxx

Wednesday, 20 October 2021

20th September HEARTFELT CREATIONS RUSTIC SUNFLOWERS AND ZINNIAS 5x7 inch card

Good morning lovely crafters, today I have another 

Heartfelt Creations Rustic Sunflower Collection card for you.

This is a 5x7inch card - Look out for a 5x7inch box coming soon

Please see Instructions below


PRODUCTS USED


Sentiments Stamps Just for You

Prills -  Go Man Go, I Cannot Tell a Lilac

Memento Inks - Tangelo

Ranger Archival Inks -  Leaf Green 

OTHER PRODUCTS USED

White card, 5x7inch card blank, clear glitter, Hot Glue, Foam Tape, Ranger Archival inks - Grape Jelly, Dusty Concord


INSTRUCTIONS

Cover a 5x7inch card blank with purple paper from the paper pad, leave a small gap around the edges

Die cut the large Intricate Swirl Frames Die in white card, adhere

Cut out a 5 3/4 x 3 3/4 inch piece of purple paper, adhere with foam tape

Die cut the next size down Intricate Swirl Frame in white card and one in pretty paper

Adhere the white frame to the center of the card, adhere the middle part of the paper die cut to the middle of the frame

Stamp, colour and Die cut an assortment of Rustic Sunflowers

Stamp, colour and Die cut three small Zinnias

Place the flowers in the Shaping Mold, lightly spritz with water and run through a die cutting machine

Stamp, colour and die cut a few Leafy Accents leaves

Place in the shaping mold, lightly spritz with water and run through a die cutting machine

Adhere the flowers and leaves with Hot Glue

Adhere the Lady Bird

Stamp out a sentiment, adhere

Add dries clear glue to the sunflower centers and sprinkle  Prills

When dry add clear glitter with Dries Clear Glue and a small brush or sponge

All done.

VIDEO HERE


Many thanks for visiting me today, come back soon for lots more inspiration.
Bye for now
xxx

Wednesday, 13 October 2021

13th October HEARTFELT CREATIONS RUSTIC SUNFLOWER COLLECTION QUICK AND EZ CARD


Good morning lovely crafters, today I have another 

Heartfelt Creations Rustic Sunflower Collection card for you.

This is a quick and EZ 6x6inch card

Please see Instructions below


PRODUCTS USED

Leafy Accents

Prills -  Gilt Trip, Go Man Go

Memento Inks - Tangelo

Ranger Archival Inks -  Leaf Green 

OTHER PRODUCTS USED

White card, 6x6inch card blank, clear glitter, Foam tape, Hot Glue, Distress Ink - Wild Honey 


INSTRUCTIONS

Cover a 6x6inch card blank with green paper from the paper pad, leave a small gap around the edges

Cut out a 5.5 inch square of blue paper from the paper pad, adhere

Die cut the large Simply Elegant Centerpiece Die in white card, adhere

Die cut the Sunflower Bucket and Freezer Can and a lady bird from the paper pad

Stamp, colour and Die cut an assortment of Rustic Sunflowers

Place the flowers in the Shaping Mold, lightly spritz with water and run through a die cutting machine

Stamp, colour and die cut a few Leafy Accents leaves

Place in the shaping mold, lightly spritz with water and run through a die cutting machine

Adhere the Can, Bucket, flowers and leaves with Foam Tape

Adhere the Lady Bird

Die cut the 2x2inch center piece in white card, cut in half and glue one half into the flowers

Add dries clear glue to the sunflower centers and sprinkle  Prills

(I mixed the two colours together)

When dry add clear glitter with Dries Clear Glue and a small brush or sponge

All done.

VIDEOS HERE


Simply Elegant Centerpiece Video


Many thanks for visiting me today, come back soon for lots more inspiration.
Bye for now
xxx

Wednesday, 6 October 2021

6th October HEARTFELT CREATIONS RUSTIC SUNFLOWER QUICK AND EZ CARD

Good morning lovely crafters, today I have another 

Heartfelt Creations Rustic Sunflower Collection card for you.

This is a quick and EZ 5x7inch card

Please see Instructions below


Leafy Accents

Prills -  Gilt Trip, You Had me at Yellow

Hydrangea stamp and die

Elaborate Birthday Stamp set


OTHER PRODUCTS USED

White card, 5x7inch card blank, clear glitter, Yellow ink, Pale Pink ink, Foam tape, Hot Glue. 

INSTRUCTIONS

Cover a 5x7inch card blank with paper from the paper pad, leave a small gap around the edges

Die cut the large Majestic Swirls Frames Die in white card, adhere 

Cut out a pretty panel from the paper pad, adhere

Die cut the Basket and a lady bird from the paper pad

Stamp, colour and Die cut an assortment of Rustic Sunflowers

Stamp, colour and die cut three small Hydrangeas

Place the flowers in the Shaping Mold, lightly spritz with water and run through a die cutting machine

Stamp, colour and die cut a few Leafy Accents leaves

Place in the shaping mold, lightly spritz with water and run through a die cutting machine

Adhere the basket, flowers, leaves and the lady bird

Add dries clear glue to the sunflower centers and sprinkle  Prills

(I mixed the two colours together)

When dry add clear glitter with Dries Clear Glue and a small brush or sponge

Stamp out a sentiment, adhere

All done.

VIDEO HERE


Many thanks for visiting me today, come back soon for lots more inspiration.
Bye for now
xxx