Wednesday, 31 August 2022

AUGUST 31st HEARTFELT CREATIONS - PINK MUSHROOM COTTAGE COLLECTION CARD


 Morning lovely crafting friends, its Inspiration Wednesday at Heartfelt Creations and I have a card for you made with the Mushroom Cottage Collection.

If you would like to know how I made this card please scroll down for instructions.


If you would like to save $20.00 off your first Heartfelt Creations purchase please CLICK HERE


PRODUCTS USED
                        

OTHER PRODUCTS

 White card, Foam tape, Clear Glitter, Embossing Powder - Copper,  Water brush, Heat Gun,  Hot Glue Gun, Versamark -Watermark Stamp Pad, Glossy Accents, Distress Ink - Antique Linen, Clear Glitter, Piercing Tool


INSTRUCTIONS

Take an A4 size of white cardstock, cut it to 11 1/2" x 8". Score and fold in half. You now have a  5 3/4" x 7 3/4" card. Cut a piece of yellow paper from the Mushroom Cottage Paper Pad to 7 3/4" x 5 1/2". Scruff up the edges with the side of a pair of scissors and adhere to card front. Cut a piece of pink paper from the paper collection to 5" x7", scruff up the edges, adhere to card front.

Die cut the outside and inner dies from the Regal Lattice Gateway Dies in white card. Die cut the inner 3" x 5 " panel in yellow paper.  Adhere the yellow panel to the reverse of the white Regal Lattice Gateway, adhere to card front.

Stamp the Large Mushroom Cottage twice, in Versamark ink, onto Deluxe Flower Shaping Paper. Whilst still wet, add copper embossing powder and dry with a heat tool. Color with Ranger Archival Vibrant Fuschia ink and Vivid Chartreuse ink using a Water Brush and a little water. Die cut with the matching die. Take the second Large Mushroom, color the doors and windows with the same inks. Add a little Distress ink in Antique Linen, for the window lights. Use a water brush. Emboss and die cut just the windows and door. Adhere these to the Mushroom Cottage with Designer Dries Clear Glue. Adhere the Mushroom Cottage to the center of the card using foam tape.

Stamp the two Fairies in Versamark ink, emboss as before and add color in the same way. Die cut with the matching dies. Add Glossy Accents to the Fairy wings. Adhere with foam tape to either side of Large Mushroom Cottage. 

Stamp three small Wild Roses onto Flower Shaping Paper, using Vibrant Fuschia ink.  Die cut with the matching dies. Use the stylus from the Deluxe Flower Shaping Kit to shape the flowers, pierce a hole in the centers, add a small white pearl stamen. Adhere to the card with hot glue. Stamp and emboss the leaves from the Large Mushroom Cottage Stamp set, color with Leaf Green ink and die cut with the matching die. Adhere to the base of the card. Dab Dries Clear Glue with a sponge everywhere you would like glitter. Sprinkle glitter. 


VIDEO


MANY THANKS FOR VISITING ME TODAY

BYE FOR NOW

xxx

Wednesday, 24 August 2022

August 24th HEARTFELT CREATIONS JOYOUS NOEL SCRAPBOOK PAGE - Angels we have Heard on High


Morning lovely crafting friends, Happy Wednesday, how is your week going? Have you started creating your one of a kind Christmas cards yet? If you haven't or you just need some inspiration to get you started on your next project, you are at the right place!

Its Inspiration Wednesday here at Heartfelt Creations and I am up 
with the
JOYOUS NOEL COLLECTION

If you would like to know how I made this please scroll down for instructions.


If you would like to save $20.00 off your first Heartfelt Creations purchase please CLICK HERE


INSTRUCTIONS

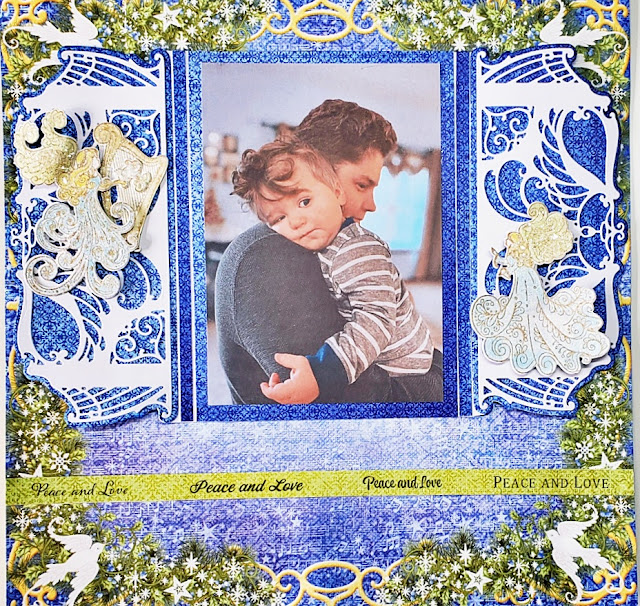
Take sheet 3B from the Joyous Noel Paper Pad for the background of the 12 x 12" scrapbook page. Cut a 2” x 12” strip from the plain green sheet 11B from the Paper Pad. Mat onto a 2 1/4” x 12“ strip of white card. Adhere down the center of the page. Mat a 3 3/4”x 5 3/4” photo onto a 4” x 6” piece of sheet 11B. Put to one side.

Die cut two Noel Decorative Dies, HCD1-7416, outside edges, in green sheet 11B. Die cut two inside pieces in white card. Adhere the white to the green die cuts and adhere to the sides of the green strip. Adhere the matted photo to the center using foam tape.

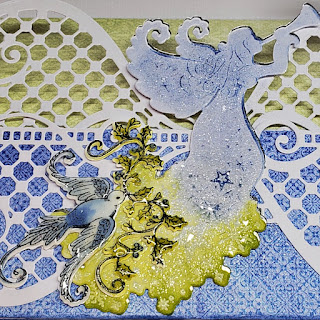
Stamp the Starry Angel from the Starry Noel Angel Stamp set, in Ranger Archival Leaf Green ink onto Deluxe Flower Shaping Paper. Die cut with the matching die. Cut off the top of the Angel  as you wont need this part. Color in the bottom starry part with Distress Oxide Peeled Paint and ink the edges using the Daubers and the same ink. Adhere to side of photo.

Stamp in Ranger Archival Jet Black Ink, onto Deluxe Flower Shaping Paper, five Doves, from the Starry Noel Angel Stamp Set. Die cut with the matching die. Color in with Zig Watercolor Markers in Olive Green and Blue. Apply Ranger Glossy Accents to the leaves. Cut off the leaves of two of the doves, put to one side, as you will only need the leaves. Adhere two doves with leaves to the page. Adhere one set of leaves to the top of the matted photo.  

Stamp in Ranger Archival Olive ink, the Joyous Noel Background stamp, twice. Cut one to 5”x 4”, mat onto green paper from the paper pad cut to 5 1/4” x 4 1/4”. Ink the edges in Olive ink using a Dauber. Cut the other Joyous Noel Background stamp to 4 3/4” x 3 3/4”. Ink the edges in Olive ink. Adhere on top of the previous stamped image. Adhere this to the side of the page, using foam tape and Dries Clear Glue. Adhere a Dove with leaves onto the stamped image and adhere one set of leaves slightly behind the background stamp.

Using Dries Clear Glue and a small sponge, dab glue onto the Doves, leaves, stars, and Background stamped image. Sprinkle on clear glitter.


PRODUCTS USED


OTHER PRODUCTS USED

 White card, clear glitter, foam tape, Ranger Glossy Accents, small sponge, Distress Oxide ink – Peeled Paint.

VIDEO


Many thanks for visiting me today, come back soon for lots more  inspiration 
Bye for now
xxx

Wednesday, 17 August 2022

August 17th HEARTFELT CREATIONS - DIAMOND FLEUR BIRTHDAY DIE - EASEL CARD

Morning lovely crafting friends, 

Its Inspiration Wednesday and a Special 25th Birthday here at Heartfelt Creations 
with the Birthday
Diamond Fleur Die


If you would like to know how I made this please scroll down for instructions.


If you would like to save $20.00 off your first Heartfelt Creations purchase please CLICK HERE

INSTRUCTIONS

Take a 5”x7” card blank, score the front side at 3 1/2” and fold on the score line to make an Easel card.  Cut two 7”x3 1/2” panels from  blue paper and one from  green paper, from the Joyous Noel Collection Paper Pad. Cut two pieces of white card to 7”x3 1/2". Die cut two Diamond Fleur pieces in white card from one die, and one piece from the opposite die. Adhere one die cut to the top of the white card panel cut to 7”x 3 1/2”. Adhere this panel to the front of the top half of the card when folded. This makes sure the card will be sturdy enough to carry the Starry Angel. Adhere the blue panel on top. Adhere the matching die cut, reverse side up. Make sure to match up with the top die cut, so that they are level. Take the other card panel and adhere this to the base of the card. This will make a nice step for the card. Adhere a blue panel. Adhere the other white die cut. Adhere the green panel to the front left side of the card. You now have a folded step for the Easel card.

Stamp onto Deluxe Flower Shaping paper the Starry Angel from the Starry Angel Stamp set, in Memento Danube Blue ink.  Stamp again with Clear Embossing powder using Versamark ink. Emboss with a Heat Tool. Color the skirt part with Distress ink, Peeled Paint, using a Dauber. Die cut with the matching die. Die cut a Starry Angel in De Luxe Silver card. Glue the Starry Angels together, making sure you can see a slight shadow of silver. Stamp and die cut the set of Stars in blue paper from the paper pad and De Luxe Silver card. Glue these together leaving a slight silver shadow. Adhere the Starry Angel to the center of the card. Adhere the Stars.

Stamp the Dove in Ranger Archival Jet Black ink. Color the leaves of the Dove with Zig Watercolor Marker in Olive. Color the berries in Zig Watercolor Marker in Blue. Color the rest of the Dove in Danube Blue ink using a Dauber. Add Ranger Glossy Accents to the Dove and leaves. Adhere to the skirt of the Angel.

Stamp the Noel Sentiment from the Starry Noel Die Set, in Memento Danube Blue ink. Die cut with the matching die. Die cut another one in De Luxe Silver card. Adhere together, making sure you can see the silver shadow. Die cut a 2” circle cut from the green paper from the paper pad. Ink the edges in Ranger Archival Leaf Green ink. Adhere the circle. Adhere the Noel Sentiment to the circle. Add Dries Clear Glue with a small sponge to the Starry Angel, the blue Stars and the Noel Sentiment and circle. Apply lots of Clear Glitter.


PRODUCTS USED


VIDEO


OTHER PRODUCTS USED

 Clear glitter, Distress Oxide - Peeled Paint, Versamark ink, Clear Embossing Powder, Heat tool, 5" x 7"card blank, White card, score board, Ranger Glossy Accents.


Many thanks for visiting me today, come back soon for lots more  inspiration 
Bye for now
xxx

Wednesday, 10 August 2022

August 10th HEARTFELT CREATIONS - Joyous Noel Collection Scrapbook Page - Peace and Love


Morning lovely crafting friends, 

Its Inspiration Wednesday and New Release Day here at Heartfelt Creations. 

JOYOUS NOEL CHRISTMAS COLLECTION

If you would like to know how I made this please scroll down for instructions.


If you would like to save $20.00 off your first Heartfelt Creations purchase please CLICK HERE


INSTRUCTIONS
Take 12”x12” sheet 2B from the Joyous Noel Collection Paper Pad for the background page of the layout. Cut a 5” x 7” panel from blue paper, sheet 8B, adhere a photo cut to 4 3/4” x 6 3/4”. Set to one side. Take the Noel Decorative Die, die cut the outside edges x 4 in blue sheet 8B. Die cut the inner die pieces x 4 in white card. Adhere the white die cut pieces to the blue shaped pieces to make the photo frame flaps.

Next, cut a piece of stiff white card to 7”x 7 3/4”.  Score at 1” and 1 1/4” from the outside edges on both sides, lengthwise. This is where you will attach the die cut photo frame flaps that we just made. Cut two 1/4” x 7” strips in blue paper which will fill in the gaps where you lift the flaps. Adhere the matted photo onto the center of the white card. Adhere the frame flaps to the front and back of the framed photo, on the 1” strip of white card that we just scored. Make sure the top and bottom pieces match. Fill in the white gaps with the 1/4” blue strips.

Stamp in Memento ink - Desert Sand, two Angels and a Harp from the Joyous Noel Angel Stamp set. Die cut with the matching dies. Color the Angels dresses with Memento ink - Summer Sky and a Dauber. Color the wings with a mix of yellow and Desert Sand ink. Color their hair in yellow ink.  Color the Harp with Desert Sand ink. Apply Ranger Glossy Accents to the Harps. Adhere these to page with foam tape and Dries Clear Glue. Apply Dries Clear Glue to the Angels and Harps, sprinkle on Clear Glitter.

Cut a border strip from sheet 4A from the Paper Pad, ‘Believe’, adhere across the page. Stamp a Dove, from the Starry Noel Angel Die, with Ranger Archival ink in Jet Black, color with Summer Sky ink, die cut with the matching die. Apply Ranger Glossy Accents, add glitter. Adhere to front of left flap.

All done


OTHER PRODUCTS USED

White card, Yellow ink, Foam tape, Ranger Glossy Accents, Clear glitter


If you would like to save $20.00 off your first Heartfelt Creations purchase please CLICK HERE


VIDEO


Many thanks for visiting me today, come back soon for lots more  inspiration 
Bye for now
xxx

Wednesday, 3 August 2022

August 3rd - HEARTFELT CREATIONS WILD POPPY COLLECTION SCRAPBOOK PAGE - It Must Be Love

Morning lovely crafting friends, 

Its Inspiration Wednesday here at Heartfelt Creations. 
If you would like to know how I made this please scroll down for instructions.


If you would like to save $20.00 off your first Heartfelt Creations purchase please CLICK HERE


INSTRUCTIONS

IT MUST BE LOVE WILD POPPY LAYOUT

To make this 12"x 12" Scrapbook layout, cut sheet 7B from the Wild Poppy Collection Paper Pad to 11"x 11", matt onto a sheet of black card cut to 11 1/4" x 11 1/4". Matt this onto the 12"x 12" sheet 2B, from the Wild Poppy Collection. Take a 5"x 7" photo, matt onto black card 5 1/4" x 7 1/4". Cut a piece of sheet 5A from the paper pad to 7 1/2" x 5 1/2", matt onto black card cut to 7 3/4"x 5 3/4". Cut a border strip 11" x 2" from sheet 6A, matt onto black card cut to 11"x 2 1/4", adhere to side of page. Cut the border strip from sheet 1A, matt onto a 1" strip of black card and adhere across the page. Adhere the matted sheet 5A at a slight angle on the page. Adhere the matted photo straight on.

To make the Poppies - stamp onto Deluxe Flower Shaping Paper with Distress Ink, in Worn Lipstick, the Wild Poppy Stamp Set HCPC-3986, three times. Color in with Ranger Archival  Pink Peony ink, using the Daubers, color both sides. Die cut with the coordinating dies. Place in the Basic Flower Shaping Mold, lightly spritz with water and run through a die cutting machine. Tap out and lightly shape with the stylus from the Deluxe Flower Shaping Kit. Pierce a hole in the centers. Glue the Poppies together in sets of three, off-set the petals as you go.  Add Pearl Black Stamens and dark green Medium Stamens to the middle of each Poppy. Glue in place on the reverse. Make one large, two medium and three small. The small Poppies only need two layers, I made one into a bud.

To make the Wild Poppy Accents - stamp the corner piece in Ranger Archival Leaf Green Ink, onto Deluxe Flower Shaping Paper, color in with Ranger Archival Leaf Green, Pink Peony and Coffee inks. Die cut with the co ordinating dies. Lightly shape with the stylus from the Deluxe Flower Shaping Kit.

Stamp out a Sentiment from the Todays Quotes Stamp Set, onto white card, in Ranger Archival Jet Black ink, die cut with the tag from the Ticket and Tag Die Set. Ink the edges in Rose Madder ink using a Dauber. Adhere to side of page. Add a small gem. Arrange the Wild Poppies and the Wild Poppy Accents on the page with hot glue. Take a sponge and Dries Clear Glue, apply over the Poppies and Wild Poppy Accents, sprinkle with Clear Glitter.


OTHER PRODUCTS

Black card, White card, Clear Glitter, Piercing Tool, Hot Glue Gun, Paper Trimmer, Ranger Distress Ink – Worn Lipstick.


VIDEO 


Many thanks for visiting me today, come back soon for lots more  inspiration 
Bye for now
xxx