Wednesday, 11 October 2017

OFF THE RAILS SCRAPBOOKING TUTORIAL - FOAMIRAN FLOWERS

Morning everyone and welcome to my blog and my
October Tutorial FOAMIRAN FLOWERS for
OFF THE RAILS SCRAPBOOKING

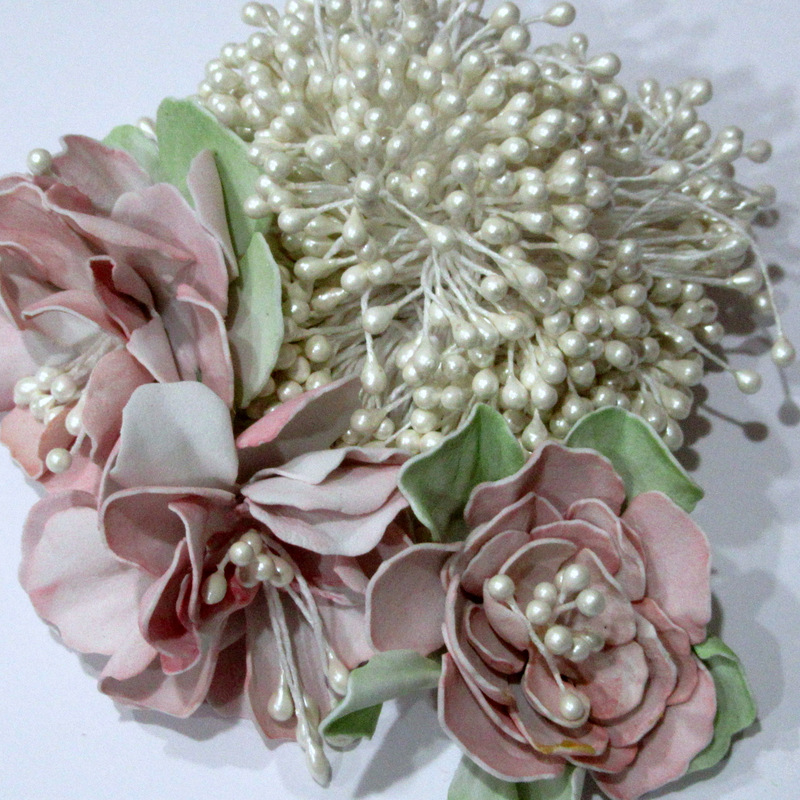
Today I have a tutorial for you on how to make a foamiran flower, similar to the ones on my layout for the 
October OFF THE RAILS Mood Board.


HERES HOW
STEP 1
Gather your supplies, you will need -
a sheet of white foamiran, flower dies, inks to colour, stamens, piece of thin wire, barbeque stick, iron or heat gun, pokey tool, hot glue gun, foam pad, ball tool.


Step 2
Cut out an assorted selection of flowers with your die
Step 3
Ink your flowers including one for the leaves
Step 4
Using an iron or heat gun tool, take the wooden stick and heat up the flower on medium heat, no steam, for a few seconds
Step 5

When warm, roll flowers between your fingers
Step 6
Roll and pinch as you go
Step 7
When cool, unwrap and roll out the flowers on the foam with your ball tool and stretch gently with your fingers
Step 8
Step 9
Now take a few stamens, fold in half, attach wire
Step 10
Start to thread the flower head onto the wire, this is where you need your pokey tool if your flowers do not have the holes in them
Step 11
Add small dabs of glue between the layers
Step 12
Cut off the excess string from the stamens, and there you have one pretty flower.


Many thanks for visiting today, I hope you followed along.
Bye for now
xxx

Friday, 6 October 2017

FABSCRAPS DREAM STEAM COLLECTION C100 TAG - ENJOY

FABSCRAPS DREAM STEAM COLLECTION C100
TAG - ENJOY


FOR THIS PROJECT YOU WILL NEED
  • Fabscraps Dream Steam Collection C100 12 x 12 paper pad
  • Fabscraps Dream Steam Collection MC100 001A Carders Pack
  • Brown chalk ink
  • Mini pearls
  • Fuzzy Fibres
INSTRUCTIONS
  1. Cut out a tag shape 8 x 4 inches
  2. Matt this with another tag shape, slightly smaller, ink edges
  3. Take one of the embellishments from the Carders pack, ink edges, add foam tape, adhere
  4. Cut out lots of cogs and circles, ink edges, adhere around the embellishment
  5. Add mini pearls in various places
  6. Cut a hole in the top of tag and add fuzzy fibers or ribbon
  7. Take a sentiment from the Carders Pack, ink edges, adhere.
  8. All done.


MANY THANKS FOR VISITING TODAY
BYE FOR NOW 
XXX

Sunday, 1 October 2017

GECKO GALZ DESIGN TEAM REVEAL CARD - OCTOBER CHALLENGE - BUMP IN THE NIGHT Best Wishes - 1st October

Morning everyone and welcome to my blog and the latest
GECKO GALZ DESIGN TEAM REVEAL
OCTOBER CHALLENGE - BUMP IN THE NIGHT


PRODUCTS USED

FROM MY STASH
Sentiment - Best Wishes, Pale pink card, dark pink card, white card, handmade foam flowers, stamens, pearl string, chalk inks to colour flowers.

Many thanks for visiting today, bye for now
xxx

OFF THE RAILS SCRAPBOOKING DESIGN TEAM REVEAL OCTOBER LAYOUT - Crazy Fun

Hi everyone and welcome to my blog and my first Design Team Project with

This layout is based on the Mood Board for October 
White, grey and 1 more colour of your choice.

As you can see I used all the colours, the painted face and the white rose for my inspiration.
Here is a step by step for you

Cut two 12 x 12, pink and grey, papers in half across the center, 
adhere to a white 12 x 12 card


Add a piece of washi tape down the middle

Matt two photos onto white card,
Adhere across the page


Add a white tag with white string 

Start to decorate, I used some chipboard and die cut dandelions 
Add embellishments; flowers, leaves, stamens and die cut clock
Cut out the white cardstock to 10.25 x 10.25 inches 
Adhere onto grey 12 x 12 card

Ink and emboss a wooden or chipboard title

And there you have one pretty white, pink and grey layout


SCRAPPY STASH
Cardstock - white, grey
Papers -  grey and pink patterned
Die cuts - dandelion, leafy branches and clock
Assorted flowers - pink white and grey
Chipboard dandelions
Embossing powder - pink and silver grey
White stamens
Pink dotty washi tape
White tag with white string.

We hope you'll play along this month. 
Link and share so we can view and comment on your project.
Thanks for visiting today.. and see you again soon.
Bye for now.
xxx

Saturday, 30 September 2017

YAY I MADE THE 14 CRAFTBAR INSPIRATION DESIGN TEAM 2017 - 2018

14 Craft Bar Design Team 2017-2018

hello everyone :)
14 Craft Bar is growing really fast, with new ideas, new products 
and many exciting things coming we have found few lovely ladies to 
join our Design Team and help us promoting our store.

Please welcome our ladies:


I hope we will be able to give you lots of inspiration & fun!
Thank you and see you soon :)
HUGS XX

Friday, 29 September 2017

FABSCRAPS CARD USING DREAM STEAM C100 COLLECTION - ENJOY

FABSCRAPS DREAM STEAM C100 COLLECTION
CARD - ENJOY


FOR THIS PROJECT YOU WILL NEED
  • Fabscraps Dream Steam collection Carders Kit MC100 001A
  • Fabscraps Dream Steam collection 12 x 12 paper pad
  • Fabscraps Dream Steam collection Chipboard DC100 008
  • Brown chalk ink
  • Clear embossing powder
  • Small resin rose
  • Blue cardstock
  • 6 x 6 inch card blank

INSTRUCTIONS

  1. Cover a 6 x 6 inch card blank with one of the 6 x 6 inch papers
  2. Cut out one of the icons from the Play Ground paper C100 005
  3. Ink the edges and add foam tape to reverse
  4. Cut out one of the papers to 5 x 5 inches
  5. Matt this onto a piece of card cut to 5.5 inch square
  6. Adhere these to the card front
  7. Ink and emboss the large cog, adhere to top right corner
  8. Adhere the icon, add a mini rose
  9. Ink edges of the title from the carders kit
  10. Matt onto card, adhere
  11. All done.


I have also entered this into the September challenge at
OFF THE RAILS SCRAPBOOKING
MANY THANKS FOR VISITING TODAY
BYE FOR NOW
XX

Friday, 22 September 2017

FABSCRAPS TAG USING THE DREAM STEAM C100 COLLECTION TAG - CELEBRATE YOUR DAY

FABSCRAPS DREAM STEAM COLLECTION C100
TAG - CELEBRATE YOUR DAY


FOR THIS PROJECT YOU WILL NEED

  • Fabscraps Dream Steam Collection C100 12x12 paper pad 
  • Steam Queen 12 x 12 paper C100 001
  • Victorian Futurism 12 x 12 paper C100 008
  • Fabscraps Stencil Cogs DS 080
  • Fabscrap Carders Pack MC100 001A
  • Brown chalk ink
  • Mini pearls
  • Texture Paste
  • Fuzzy Fibre
  • Blue card 
INSTRUCTIONS

  1. Cut out a tag shape in blue card - 8 x 4.25 inches
  2. Cut out another tag shape 7.75 x 4 inches, ink edges, adhere
  3. Take the cogs stencil and texture paste, stencil onto the back of the Fantasy 12 x 12 paper C100 003, allow to dry then cut into a tag shape 7.5 x 3.75 inches, ink edges, adhere
  4. Cut another icon from the 12 x 12 papers, ink the edges, adhere using foam pads
  5. Take one of the sentiments from the Carders Pack, ink edges, adhere across front of tag
  6. Cut out various cogs and circle shapes from the papers, ink edges, and adhere randomly around the tag
  7. Add mini pearls in various places
  8. Cut a whole in the top of tag, add fuzzy fibre or ribbon of choice.
  9. All done.


I have also entered this tag into the
Off The Rails September Challenge

MANY THANKS FOR VISITING TODAY
BYE FOR NOW
XXX


Friday, 15 September 2017

FABSCRAPS LAYOUT USING C100 DREAM STEAM COLLECTION - ON THE EDGE

FABSCRAPS DREAM STEAM COLLECTION
LAYOUT - ON THE EDGE

FOR THIS PROJECT YOU WILL NEED
  • Fabscraps C100 Dream Steam Collection 12 x 12 papers
  • Fabscraps C100 Carders Pack MC100 001A
  • Fabscraps C100 Stencil DS 080
  • Fabscraps Chipboard piece DC100 003
  • Pale blue card
  • Brown chalk ink
  • Texture Paste
  • Pale blue chalk ink
  • Clear embossing powder
  • Mini pearls.

INSTRUCTIONS

  1. Cut out a 2 inch border piece from one of the 12 x 12 papers
  2. Matt onto a 2.5 inch piece of blue card, adhere to side of layout
  3. Take a plain side of one of the papers, the stencil and texture paste, add paste, allow to dry, Cut out in a circle, ink edges and adhere
  4. Matt the photo onto a 6 x 6 inch paper from the Carders pack
  5. Matt again onto blue card, adhere to center of page
  6. Cut out lots of cogs and circles from the 12 x 12 papers, ink edges and adhere randomly around the page
  7. Ink and emboss the Chipboard title, adhere
  8. Add mini pearls and journaling.
  9. All done.

I have also entered this into the Off the Rails Scrabooking Challenge here September Steampunk.
MANY THANKS FOR VISITING TODAY
BYE FOR NOW
xxx

Tuesday, 12 September 2017

GECKO GALZ SEPTEMBER CARD CHALLENGE - HARVEST TIME - 12th Sep - WITH FREE STAMP

Morning everyone and welcome to my blog and my latest card for 
GECKO GALZ SEPTEMBER CHALLENGE
HARVEST TIME


For this challenge I have made a 5 x 7 inch card, see product list and step by step below.
GECKO GALZ PRODUCTS
PRODUCTS FROM MY STASH
5 x 7 card blank
Brown card stock
Tan card stock
Assorted flower, pearl, berry stems
Sisal and rafia
Mini cones I picked from the meadow near where I live.
HERES HOW
Cover the card with pretty paper
Cut out one of the panels from the collage set, matt onto card
Matt again onto tan card
Print out another pretty paper, cut to 5 x 4 inches
Matt this onto brown card and adhere to front of card
Now adhere the matted panel
Make a small bouquet from various flowers etc
Adhere with hot glue.
All done.

YOUR FREE STAMP


Many thanks for visiting today
Do come back again soon for lots more inspiration
Bye for now
xxx