Thursday, 25 June 2015

CARDABILITIES #125


Fab card sketch over at #125CARDABILITIES #125

HERES HOW
Take a 5 x 7 inch card blank and cover with pretty paper
Take a plain sheet of cardstock slightly smaller,
 ink the edges and adhere
Add another slightly smaller layer, ink the edges, adhere
Start to decorate with three banners, ink edges then adhere
Glue a piece of lace across the centre 
Add a scalloped piece of card above this
Start to add flowers, butterflies, leaves, pearls and clock faces
Add the sentiment.
CARD STASH
Pretty Papers
Plain card stock
Plain card blank 5 x 7 inches
Pink chalk ink
Piece of white lace
Two lace flowers
Mini roses
Hand made roses
Mini white acrylic rose
Scalloped border punch
Small clock faces
Leafy branch die
Mini butterflies
Small pearls
Sentiment.
LINKS
Butterflies
https://uk.pinterest.com/caroleanne345/butterflies/
Clock faces
https://uk.pinterest.com/caroleanne345/clocks/
Music papers
https://uk.pinterest.com/caroleanne345/music-papers/
Script papers
https://uk.pinterest.com/caroleanne345/script-images-free/
Mini flowers, hand made
http://theprettypaperpatisserie.blogspot.co.uk/2013/03/hand-made-flowers-tutorial.html
xxx
many thanks for visiting today, bye for now.

Saturday, 20 June 2015

LOVELY MEMORIES LAST SKETCH CHALLENGE AT STUCK ON U SKETCHES


Hi everyone and welcome to my blog and some sad news.
This will be the last  STUCK ON U SKETCHES design team work from me as they have decided to close their doors. I would like to thank Nanne and Leah for all their hard work and dedication.
 It has been a fab team to work with and I will really miss them all. Here is Nannes last sketch and it really is a great one, especially for those of you who love to work with more than one photo.
http://stuckonusketches.blogspot.co.uk/
HERES HOW
Choose card stock, papers and embellies
Matt photos in one long strip of card, ink the edges
Cut out a shaped piece of card stock, ink the edges and adhere to back ground card, adhere photo strip
Start adding layers as per the sketch, inking as you go
I have used five layers behind the scalloped border card
I then added three strips of inked card down the side
Die cut a pretty border and adhere
Die cut a circle doily and add this
Now start to decorate using lots of flowers, butterflies etc
I tucked a journaling card above the flowers and added a couple of swirly die cuts
Last but not least, add the title.
XXX
SCRAPPY STASH 
Card stock in blues and soft yellow
Pretty papers
Scallop shape template
Brown chalk ink
Assorted flowers
Sticky back pearls
Small stick pin
Mini butterflies
Lace leaf die
Shell punch - Woodware
Die cut swirls - Sizzix
Wooden title - The Works
Lacey border die
Circle die and lacy corner die
All other dies used are by Heartfelt Creations.
XXX
LINKS
Butterflies
 https://uk.pinterest.com/caroleanne345/butterflies/
Mini flowers 
http://theprettypaperpatisserie.blogspot.co.uk/2013/03/hand-made-flowers-tutorial.html
Stick pins
http://theprettypaperpatisserie.blogspot.co.uk/2012/06/hand-made-stick-pins.html
xxx
Come back on the 14th July when I will have a new Design Team Layout and Sketch Challenge with SCRAP OUR STASH

MANY THANKS FOR VISITING ME TODAY

BYE FOR NOW
HAVE A GREAT DAY.

Monday, 15 June 2015

SCRAP OUR STASH EXCITING NEWS


Hi everyone, I am so excited to announce that as from July 1st, I will be joining the fabulous SCRAP OUR STASH Design Team.
Be sure to check out the new challenge on their blog http://scrapourstash.blogspot.co.uk/ on the 1st of July.
My first layout will be up on the 14th of July.
This is a fabulous challenge site with two challenges every month.
The details
SCRAP OUR STASH challenge blog was created to inspire and challenge you to use up the products and supplies you have in your stash! We will post a STASH challenge on the 1st of each month and a sketch challenge with a STASH prompt on the 15th of each month. You will have until the 29th to link up your entry for both challenges to be entered into the monthly prize drawing.
XXX
PRIZES
Our prize winners are selected by Random.Org and our TOP 3 are selected by the Design Team. One of the TOP 3 winners will be offered a Guest Designer position. 
XXX
Remember the most important thing is to have FUN and work on getting as much of your stash scrapped as possible!

I CANT WAIT TO GET STARTED!
 
BYE FOR NOW
XXX
 
 
.

Friday, 12 June 2015

BERRY71BLEU JUNE CHALLENGE - STAMP IT UP - BORN TO BE WILD


 Hi lovely scrappers welcome to my blog and the
JUNE CHALLENGE
The challenge is to STAMP IT UP
We would like to see your projects using lots of stamping!
Digital, rubber, layouts, cards, art journals, tags, off the page etc.
 as long as they contain stamping.


xxx

For this challenge I have used VIVA LAS VEGAS STAMPS
xxx
HERES HOW
Matt photo three times
Lightly adhere to plain background card stock
Rip up some blue corrugated card and layer beneath the photo
Using a script stamp (Theres nothing wrong with me that a little rubber cant fix),
 stamp all over a plain white sheet of cardstock, tear, ink, adhere
Add another layer of ripped pretty paper
 Die cut some chipboard cogs and stamp all over with same stamp,
Cover the cogs with white cardstock and glue to the chipboard first
(I stamped on them using blue chalk ink)
Stamp out a motor bike on paper, colour in and add a frame, adhere
Stamp the script stamp onto pretty paper, adhere to corrugated card
Stamp up three mini winged signs, cut out and adhere
Stamp out a ticket, adhere
Using hot glue, attach a metal butterfly, dragonfly and key
Add vellum title, Born To Be Wild with a paper clip
Add blue chipboard flower.
xxx
SCRAPPY STASH
Plain cardstock in various blues and white
Pretty paper - Boxer by Basic Grey
Corrugated blue card from my stash
Metal embellies
Chipboard flower
Chipboard Cogs Die by Sizzix
Chalkboard Frame  - My Minds Eye
Black leather twine
Blue and black chalk ink
Ticket from my stash
Viva Las Vegas Stamps (Motorbike, Wings and script)
Vellum Title - BORN TO BE WILD.
XXX


PRIZES

Sponsors

VivaLasVegaStamps


"Viva Las VegaStamps! is a US based manufacturer of deeply etched pink rubber stamps. Super high quality makes for beautifully stamped images. Our near 20,000 image inventory ranges from steampunk to vintage, realistic to sayings, people to animals and more. Our stamps are great for scrapbooking, mixed media, art journaling, cards, jewelry, food, wax and more!" 
Connect with us!
 Visit us on FACEBOOK https://www.facebook.com/vlvstamps
 View our BLOG http://vivalas.blogspot.ie/
 We're on INSTAGRAM  https://instagram.com/vivalasvegastamps/
               PINTEREST  https://www.pinterest.com/vlvstamps/
 Our shop can be found https:/www.atvlvstamps.com 
Our prize is 1 plate o' rubber, the winners choice, shipped to them for free.


Denise's Giveaway


MANY THANKS FOR VISITING TODAY, DONT FORGET TO CHECK ALL THE OTHER DESIGNERS BLOGS FOR MORE INSPIRATION
YOU CAN LINK UP YOUR PROJECT ON MY SIDE BAR TO THE RIGHT 
BYE FOR NOW
xxx

Thursday, 11 June 2015

CARDABILITIES


Hi everyone and welcome to my blog and my latest project.
Here I have used  CARDABILITIES
sketch. #124. for my inspiration.


HERES HOW
Cover a 6x6 inch card blank with pretty paper
Add a white doily to the centre
Add two lengths of lace down the centre
Attach a cotton doily 
Die cut a sentiment
Die cut a tag for the sentiment and attach
Now start to decorate with die cut leaves and some butterflies.
xxx
CARD STASH
6 x 6 card blank
Pretty paper - Heartfelt Creations
White paper doily
Cotton doily
Mini butterflies
Sticky pearls
Sentiment - Tattered Lace
Tag die
Leafy branch die by Sizzix
Lacy leaf die by Heartfelt Creations
White leafy spray.
I forgot to add flowers!!!!!
XXX
LINKS 
Butterflies
 https://www.pinterest.com/caroleanne345/butterflies/
MANY THANKS FOR VISITING TODAY
BYE FOR NOW
SEE YOU TOMORROW FOR BERRY71BLEU
DESIGN TEAM PROJECT.

Saturday, 6 June 2015

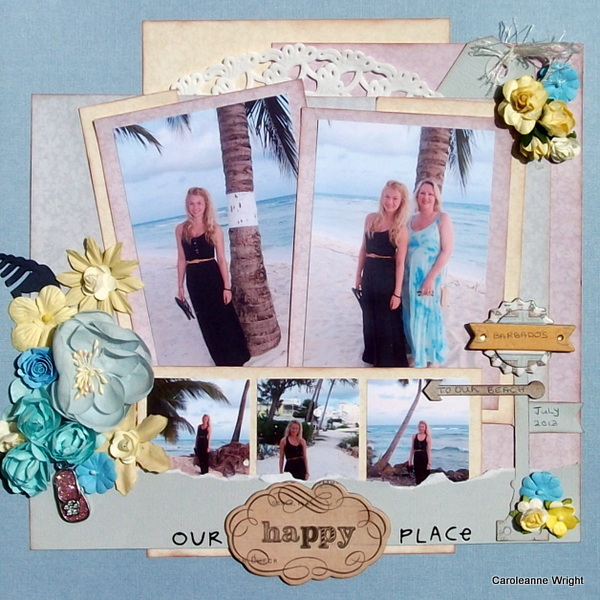
STUCK ON U SKETCHES DESIGN TEAM REVEAL - June 5th Our Happy Place


Hello everyone and welcome to my blog and the latest sketch from 

This is a fab sketch by our lovely Nanne, great if you love to use lots of photos.
XXX
HERES HOW
Choose pretty papers and card stock
Matt large photos in pretty paper, ink edges and lightly adhere to page
Start adding layers as per the sketch, inking as you go
 I started with the largest piece of pretty paper in lemon, then the pink then the doily
Now add the rest of the layers   
I used lemon, blue and pink papers
Matt three small photos, adhere to page
Tear a co-ordinating strip of card for a border and adhere 
Die cut a  post, ink edges, adhere as per sketch
Cut out a mini banner, attach to post
Add a chipboard arrow to post 
Add a chipboard piece to top of post
Start to decorate with embellishments, I used lots of flowers and a small glitter flip flop shoe
I also punched out a shell in navy card
Die cut a small tag add fuzzy fibre and slot under the doily.
XXX
SCRAPPY STASH
Pretty papers - Pion Design
White doily
Pale blue, blue and navy cardstock
Brown chalk ink
Fuzzy fibres in white
Shell punch, Woodware
Assorted flowers
Chipboard arrow
Chipboard sign post
Mini shoe embellie
Black letter stickers
Title chipboard piece.
XXX
I HOPE YOU LIKE THE SKETCH AND GIVE IT A GO,
YOU CAN LINK UP TO STUCK ON U SKETCHES ON THE SIDE BAR TO ENTER THE CHALLENGE,
AND DONT FORGET TO LOOK OUT FOR MORE INSPIRATION THIS WEEK FROM THE LOVELY SOUS DESIGN TEAM
MANY THANKS FOR VISITING TODAY
BYE FOR NOW
XXX

Friday, 29 May 2015

CARDABILITIES #123


Hi everyone and welcome to my blog and another CARDABILITIES #123 sketch that I have entered.
HERES HOW
So for this sketch I used a 6x6 inch card blank
Cover the front with pretty paper
Add another layer or two of pretty paper
Start to decorate as per the sketch, adding flowers, butterflies and pearls
Cut out some tags and add
Cut out a title, matt and adhere.
CRAFTY STASH
Pretty papers - Heartfelt Creations
Flower die - H.Creations
Butterfly die - H. Creations
Mini flowers
Pearls
Stick pins
Leafy branch die by Sizzix Sizzlitts
Mini Tag die by Sizzix
Purple chalk ink
LINKS
Butterflies 
https://www.pinterest.com/caroleanne345/butterflies/
To use my butterflies just click on the link to be taken to the page, click on the butterflies you like to be taken to a larger version, click save image, then print from there.
Flowers
  https://www.youtube.com/watch?v=rdsIOVMXjIQ
MANY THANKS FOR VISITING TODAY
BYE FOR NOW
XXX

Saturday, 23 May 2015

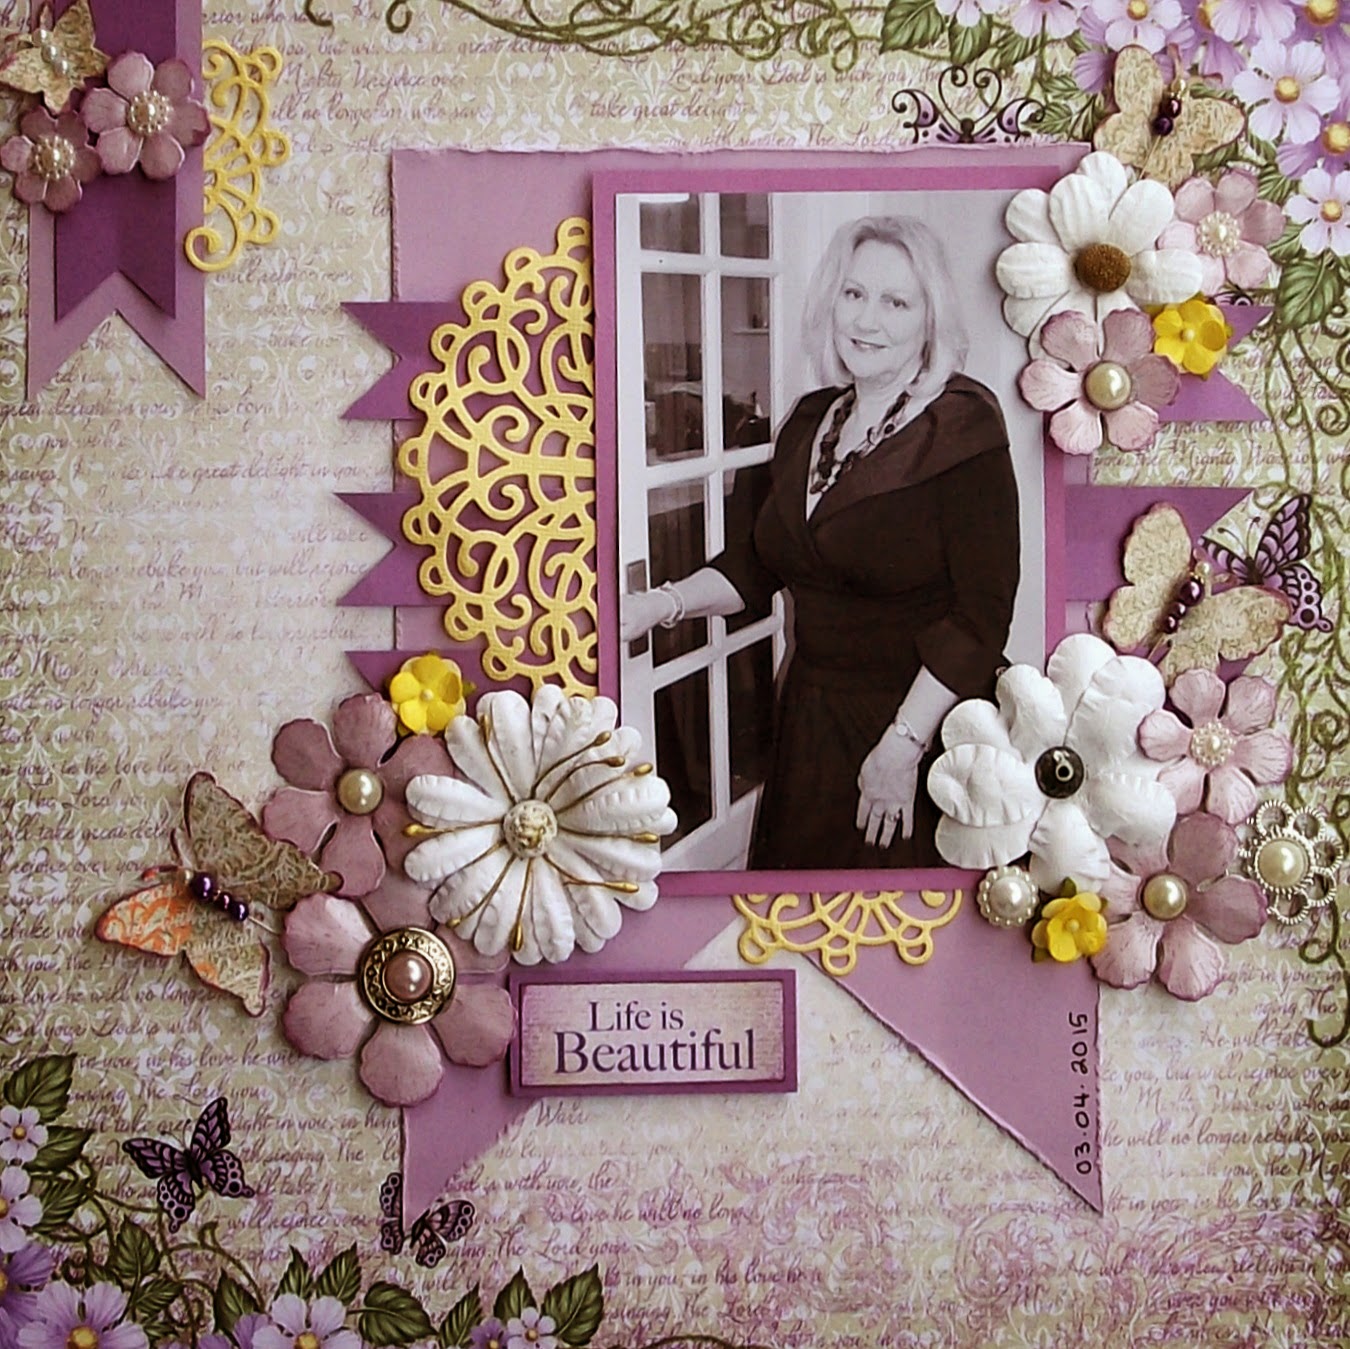
May 22nd Sketch - Life is Beautiful


Hi everyone and welcome to my blog and the latest
 STUCK ON U SKETCHES Sketch Challenge.
I Love this sketch, it is quick and easy for a beginner or you can make it more advanced if you wish.

xxx
HERES HOW
So, for this layout I chose purple as I was wearing a purple dress that I bought especially for my birthday. I love yellow and purple together, added a little white and there you have a fab colour scheme.
Steps 1 - 10
Choose all your papers, card stock and embellishments
Matt photo in plain card stock
Cut out a large banner in co-ordinating card, distress the edges a little and adhere to a pretty paper
Lightly adhere to page
Cut out three banners one inch wide, adhere as per the sketch
Die cut half a doily and adhere
Add another piece of doily under the base of the photo for balance
Now start to decorate with assorted flowers, butterflies, beaded pins, pearls etc
Add two smaller banners in the top left corner
Decorate with flowers butterflies and a swirl
Attach the title.
xxx
SCRAPPY STASH
Pretty paper - Heartfelt Creations Butterfly Medley Collection
Plain card stock, purple, lilac and yellow
Doily die - Heartfelt Creations - Layered Elegant Swirl HCD716
Hand made flowers - H.C. Botanical Wings Die HCD1-758
Butterfly Die - H.C.  Butterfly Medley Die HCD1-759
Assorted flowers
Assorted pearl buttons
Beaded stick pins
Title from the H.C Paper Collection.
xxx
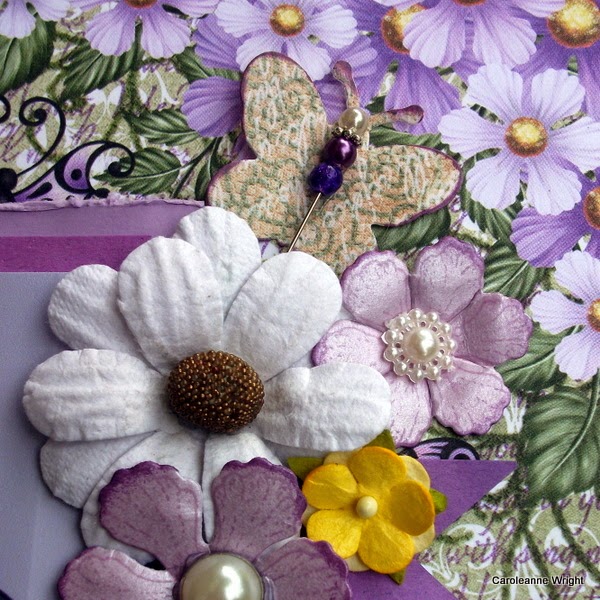
CLOSE UPS


xxx
LINKS
Beaded pins  http://theprettypaperpatisserie.blogspot.co.uk/2012/06/hand-made-stick-pins.html

Butterflies 
 https://www.pinterest.com/caroleanne345/butterflies/

Mini Flowers 
http://theprettypaperpatisserie.blogspot.co.uk/2013/03/hand-made-flowers-tutorial.html
xxx

MANY THANKS FOR VISITING TODAY
HAPPY SCRAPPING
BYE FOR NOW
xxx

Friday, 15 May 2015

BERRY71BLEU MOOD BOARD FOR MAY - Like Mother Like Daughter


xxx
Hi everyone and welcome to my blog and the latest BERRY71BLEU Challenge.
This one is all about Motherhood so I chose a photo of Jess and myself with the very apt title Like Mother Like Daughter.
xxx
Heres How
Matt photo in pale pink cardstock
Adhere to a pretty background paper
Cut out a few layers and add these
Using a border punch cut out a few more layer strips and add
Paint the chipboard peices with white paint 
Add assorted flowers with hot glue
Add two leafy branches
Adhere the chipboard peices 
Add title
Finish off with a tag with funky fibres and some flower pearls.
xxx
SCRAPPY STASH
Pretty papers by Heartfelt Creations
Plain card stock in pale pink, dark pink and green
White tag
White funky fibre
Doily border punch
Assorted flowers
Sticky back pearls
Flower pearl string
Leafy branch die by Sizzix
Title in vellum from my stash
White acrylic paint
Chipboard pieces by UM WOW STUDIOS - Layered Hexagons
xxx
Layered Hexagons

SOME CLOSE UPS


NOW FOR THE PRIZES
Our sponsors provided prizes with international shipping included! Yay!!

1st Prize:
25 USD Gift Certificate from UmWowStudio

Random Prize:


Set of products from 7 Dots Studio


UmWowStudio is a US based manufacturer of chipboard, stencils/masks, and flair for the general artsy community. Our products make great additions to cards and scrapbooking as well as mixed media pieces, altered art, tags, canvases, art journaling and more. Our chipboard is extra heavy duty to stand up to any mediums you can manage to throw at it. Our stencils and masks come in a super thick durable plastic to give your pieces extra dimension, and our flair is flat backed for easy use.

Connect with us! Visit us on FACEBOOK, view our BLOG, we're on INSTAGRAM, PINTEREST and our shop can be found at UmWowStudio.com

Website: http://umwowstudio.com/
Blog: http://umwowstudio.blogspot.com/

We are a team of creative women who cannot image their world without paper, glue and the creative process. Scrapbooking is our passion and we love to share our passion with other scrapbookers. For this reason, 7 Dots Studio exists. The quality of our products is our top priority. Our lines consist of papers, stickers, die-cut elements, clear stamps, stencils and chipboard pieces. You can find our products in scrapbooking stores around the world.


Thank you and we hope to see your beautiful creations!

We appreciate each and every challenge entry and share the designs that catch our eye on our facebook pageand Pinterest Boards. Look for your work there!


MANY THANKS FOR VISITING TODAY
DO LINK UP YOUR PROJECT ON THE SIDE BAR
HOPE EVERYONE HAD A GREAT MOTHERS DAY
BYE FOR NOW.
xxx

Saturday, 9 May 2015

STUCK ON U SKETCHES DESIGN TEAM REVEAL FOR MAY 8TH - CHERISH EVERY MOMENT


Hi everyone and welcome to my blog and the latest sketch from STUCK ON U SKETCHES
Love this sketch, great if you prefer two photos per layout.
I haven't added the photos yet as I am still waiting for Jessie to take some goods ones of my husband.
Because its a masculine page I haven't added too many flowers. I hope you have a go.
Instructions below.

HERES HOW
Take a sheet of pretty paper and cut it down to 11 x 11 inches, distress the edges.
Double matt two photos, distress all the edges and adhere as per the sketch
Add two layers behind the photos as per the sketch, distress the edges
Die cut a frame and attach a title/journalling block and add as per the sketch
I then covered the photo matts with paper and sprayed mists all around the page
Dry with a hot glue gun
Adhere to a 12x12 piece of card stock
Now start to decorate with flowers, a heart, clock faces and journalling.
SCRAPPY STASH 
Grey and peach cardstock
Pretty papers by 7DotsStudio - Thoughts Keeper
Frame die cut by Heartfelt Creations
Assorted flowers by Prima
Titles by Heartfelt Creations
Clock faces by Heartfelt Creations
Black heart from The Works
Spray mists from Prima
Die cuts behind photos, by Heartfelt Creations.
LINKS
More Clock faces https://www.pinterest.com/caroleanne345/clocks/


I am also entering this into a challenge over at 7DOTS STUDIO 


MANY THANKS FOR VISITING TODAY
BYE FOR NOW

Thursday, 7 May 2015

CARDABILITIES #122


Hi lovely crafters, here is my latest card using the latest sketch from CARDABILITIES #122.


HERES HOW
Cover a card blank with pink cardstock
Cut out some pretty paper slightly smaller than the card and ink the edges then adhere
Die cut a circle for the centre and adhere
Attach a sentiment
Add a flower and a sparkly button for the centre
Attach two leafy branch die cuts
Add a twine bow
I also inked some stitch lines up and down the card, barely seen.

XXX

STASH
Card blank
Pink, green and pale pink card stock
Pink flower
Sparkly button
White twine
Leafy branch die by sizzix sizzletts
Circle die by Heartfelt Creations - Raindrops on Roses

XXX

MANY THANKS BYE FOR NOW 

Wednesday, 29 April 2015

BERRY71BLEU DESIGN TEAM REVEAL - APRIL - AWESOME AND FOUR CARDS


Hi lovely scrappers and welcome to my blog and the latest challenge at BERRY71BLEU entitled SPRING FLING.

This month the challenge is anything to do with Nature/Spring.
I know my layout may look a bit mad but it is covered in flowers which reminds me of spring and I used the violet colour from the mood board! It is a scrap lift from a video I saw on Youtube inspired by Finnibair. https://www.youtube.com/user/ByFinnabair
I have also made a more spring-like card  below.
I hope you like them.
HERES HOW I MADE THIS LADY LAYOUT
I first cut out the ladies image from the digi files and glued it onto my background paper.
Then using hot glue I went crazy with adding lots of flowers, metal bits, chipboard pieces, pearls and buttons.
When everything was glued on I covered the whole thing in white Gesso. Then I dried it with my heat tool. I then started spraying like crazy with my mists! (Cover the ladies face first though). Then just added the lace, title and the cameo. Done.
I hope you like it.
SCRAPPY STASH
Digi files compliments of Marivic
Pretty background paper by 7 Dots Studio - Thoughts Keeper
Assorted flowers
Assorted metal bits
Assorted chippies from dies by Sizzix
Lace ribbon
Cameo
Stick pins handmade
Pearls
Assorted buttons
Pieces of old jewelry
Hessian/burlap flowers
Wooden word from The Works
White Gesso
Prima spray mists in assorted colours.

 BUNNY CARD


HERES HOW
Take a 5x7 inch card blank and cover the front
Matt the digi file bunny onto pink card 
Die cut a lacy rectangle, add matted photo
Adhere to the card front
Die cut another lacy piece, adhere to the corner
Start decorating with lots of assorted flowers
Die cut some lacy leaves, attach
Add butterflies, twine bow, fuzzy fibres and  stick pins etc.
CARD STASH
Bunny digi file compliments of Marivic Clifton 
Lacy die cuts - Heartfelt Creations Dies
Lacy Rectangle die - Spellbinders

Digi file by Marivic Clifton 

Gingham check paper - 7Dots Studio
Pink cardstock
Assorted flowers
Stick pins
Butterflies
Pink twine
Mini Key Chippy painted with a white dauber.
Fuzzy Fibres
XXX

THREE MORE CARDS FOR YOU USING THE DIGI FILES


AND DONT FORGET THERE ARE PRIZES TO BE WON

                   This months sponsor is ZEUS AND ZOEY

AND THE PRIZE IS......


Random Prize
$15 Gift Certificate 

Links:

Etsy: https://www.etsy.com/shop/ZeusandZoe/
Instagram: https://instagram.com/zeusnzoe/
Facebook: https://www.facebook.com/zeusandzoe/

We appreciate each and every challenge entry and share the designs that catch our eye on our facebook page and Pinterest Boards. Look for your work there!


We're looking forward to seeing all of your beautiful "Spring" inspired creations!  Don't be afraid to think outside the box!  Please feel free to create layouts, cards, mini albums, mixed media, altered projects, canvas work and more!!!!


LINKS 
Digi file by Marivic Clifton https://www.etsy.com/shop/ZeusandZoe/
Butterflies https://www.pinterest.com/caroleanne345/butterflies/
7Dots Studio http://7dotsstudio.com/
Stick pins http://theprettypaperpatisserie.blogspot.co.uk/2012/06/hand-made-stick-pins.html
Mini flowers http://theprettypaperpatisserie.blogspot.co.uk/2013/03/hand-made-flowers-tutorial.html


MANY THANKS FOR VISITING TODAY
I REALLY APPRECIATE YOUR COMMENTS
BYE FOR NOW
XXX