Hi Heartfelt crafters, Happy Christmas Day.
I hope you are all having a wonderful Christmas.
Its Inspiration Wednesday today and I have a new card up for you.
I hope you are all having a wonderful Christmas.
Its Inspiration Wednesday today and I have a new card up for you.
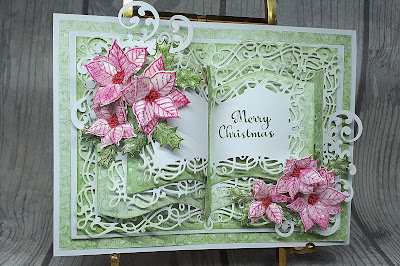
I have used the gorgeous Booklet Frames Dies Collection.
For full instructions please go to the Heartfelt Blog, or see below.
PRODUCTS USED
HCD1 7260 Booklet Basics Die Set
HCD1 7261 Booklet Frames Die Set
HCD1 7263 Swirly Accent Spray Die Set
85 Crystal Ultrafine Transparent Glitter
159723 Designer Dries Clear Adhesive
HCDA1 449 Stack
and Store Daubers - Pack of 6
HCFB1 463 3D Poinsettia Flower Shaping Mold
ANC 821 Hot Mama Prills
HCST1 401 Deluxe Flower Shaping Tool Kit
HCPP1-475 Deluxe Flower Shaping Paper
HCD1-7249 Christmas Poinsettia & Holly Die
HCPC 3881 Christmas Poinsettia & Holly Cling Stamp Set
HCDP1 2105 Candy Cane Cottage Collection Paper Pad
RACP 482 Ranger Archival Ink Pad - Olive
TSMP 400 Memento Dye Ink Pad - Rose Bud
OTHER PRODUCTS
White card blank, white card, hot glue gun, green chalk ink.
INSTRUCTIONS
Cover a 7 3/4 x 5 3/4 inch card blank with pretty green paper from the Candy Cane Cottage Paper Collection. Cut another piece of green paper to 6 3/4 x 4 3/4 inches. Matt onto white card that measures 7 x 5inches. Adhere onto front of card. Take the Booklet Frames Die Set, cut one frame of each size in white card. Lightly ink all the edges in green chalk ink. Fold in half and lightly crease down all the centers. Adhere the largest frame onto the front of the card, add glue down the center first, then add foam strips to either side and gently curve the frame as you adhere it down. Take the Booklet Basics Die Set, cut one each in green card, lightly ink all the edges in green ink. Fold in half and lightly crease the centers. Adhere the largest green frame to the white frame using Dries Clear Glue down the center. Adhere either side with the glue, curving slightly as you go. Adhere the middle size white frame onto the green frame the same way as you did the first frame. Adhere the middle size green frame to the white frame the same way as before. Take the smallest white frame and stamp a sentiment onto the front. Adhere this to the front of the card using Dries Clear Glue down the center. Add foam strips to the sides and adhere these down slightly curving the frame as you go. Take the bookmark, ink the edges and adhere down the center of the card. Take the Poinsettia and Holly stamp and die set, stamp lots of poinsettias onto Deluxe Flower Shaping paper using Memento Rose Bud ink. Stamp lots of holly leaves using Olive Green ink. Take the co ordinating dies and die cut out. Colour in with the same inks using the Daubers. Place the flowers and leaves into the Poinsettia Flower Shaping Mold, lightly spritz with water, run through a die cutting machine, tap out. When dry use the Flower Shaping Tool Set if needed. Adhere the poinsettias and holly leaves using hot glue, offsetting the petals as you go. Die cut two swirly Accent Spray Dies in white card, adhere to the flower clusters. Using Dries Clear Glue and a sponge, brush the poinsettias and holly leaves with glue. Sprinkle lots of Ultrafine Glitter on top. When dry, add Dries Clear Glue to the poinsettia centers and add the Prills. All done.
Don't forget to pop along to the Heartfelt Blog to see all the other Designers fabulous inspiration.
Have a fabulous day.
Many thanks for visiting today.
Bye for now
xxx
|


No comments:
Post a Comment
Many thanks for stopping by my blog. I really appreciate and love reading all your comments. Have a great day, Bye For Now.