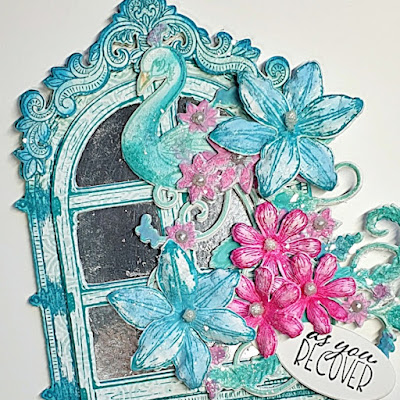
To make this 5 1/2" x 4" tent fold Ornate Window card, take the outside edge of the Ornate Window from the Ornate Window Die Set, place onto Deluxe Flower Shaping Paper, tape slightly off the edge of the top of the card and run through a die cutting machine. Die cut another Ornate Window outside edge in Flower Shaping Paper to glue to the back of the finished card.
Take the Ornate Window Stamp from the Ornate Window Cling Stamp Set, stamp twice onto blue paper from the Ornate Peacocks Paper Collection, with Distress ink in Peacock Feathers. Lightly color the edges and hinges with the same ink, using a Dauber. Die cut with the matching die. Adhere to card front with foam tape.
Die cut the centre window piece and top frame piece from the second Ornate Window Die-cut. Die cut the window inside edge in Luxe Silver Card stock. Adhere the window frame to the silver card. Adhere to card front using foam tape. Adhere frame piece with foam pads to the window.
Stamp the large peacock from the Ornate Peacock Cling Stamp Set in Peacock Feathers ink, color with the same ink using a Dauber. Color the flowers on the Peacock in Distress ink - Picked Raspberry using a Dauber. Color the beak with light yellow ink. Die cut with the matching die. Adhere to window with foam tape.
Stamp the Posies from the Peacock and Posies Cling Stamp Set in Distress ink in Picked Raspberry ink, color with the same ink using a Dauber. Die cut with the matching die. Cut off the flower section and adhere to body of the Peacock with Designer Dries Clear Adhesive.
To make the Lilies, Stamp two sets of Lilies from the Garden Lily Cling Stamp Set, in Peacock Feathers ink, color with the same ink using a Dauber. Die cut with the matching die. Place in the Lily Shaping Mold, lightly mist with water and run through a die cutting machine. Tap out, pierce a hole in the centres with the piercing tool from the Deluxe Flower Shaping Kit and thread white Beaded Stamens through. Off set the petals as you go and adhere with Designer Dries Clear Adhesive.
Stamp three small Zinnias from the Large Garden Zinnia Cling Stamp Set, in Picked Raspberry ink. Color using a Dauber. Die cut with the matching Die. Lightly shape with the stylus from the Deluxe Flower Shaping Kit. Pierce a hole in the center, thread a white Beaded Stamen and adhere with Dries Clear Adhesive. Adhere Lilies and Zinnias to the card front with hot glue.
Adhere a few small white pearls to the Peacock flowers. Sponge Dries Clear Adhesive onto Peacock and flowers, add clear glitter. Stamp a Sentiment from the Cheerful Note Sentiment Cling Stamp Set in Ranger Archival Jet Black ink, onto Flower Shaping Paper, die cut with a tag from the Ticket & Tags Die Set. Adhere to side of card. Glue the plain die cut Ornate Window to the back of the card. All done.
PRODUCTS USED
Ornate Peacock Paper Collection, HCDP1-2148
Ornate Peacock Cling Stamp Set, HCPC-31014
Ornate Peacock Die, HCD1-7450
Ornate Window Cling Stamp Set, HCPC-31016
Ornate Window Die, HCD1-7452
Peacock & Posies Cling Stamp Set, HCPC-31015
Peacock & Posies Die, HCD1-7451
Garden Lily Cling Stamp Set, HCPC-31011
Garden Lily Die, HCD1-7439
3D Garden Lily Shaping Mold, HCFB1-5013
Large Garden Zinnia Cling Stamp Set, HCPC-3923
Large Garden Zinnia Die, HCD1-7314
Small Garden Zinnia Cling Stamp Set, HCPC-3924
Small Garden Zinnia Die, HCD1-7315
Cheerful Note Sentiments Cling Stamp Set, HCPC-3848
Ticket and Tags Die, HCD1-7201
Assorted Bead Stamens-Medium, HCS1-459-3
Deluxe Flower Shaping Kit, HCST1-401
Luxe Silver Cardstock, HCGP1-493
Stack and Store Daubers-Pack of 30, HCDA2-450
Designer Dries Clear Adhesive, 159723
Ranger Archival Ink Pad - Jet Black, RACP468
Hydra Sponges, RLHS100


Absolutely beautiful my friend! I love the colors you used.
ReplyDelete