Friday, 31 May 2013

ORGANIC


Happy Friday everyone, I cant believe its the last day of May!!!


Here is a layout I have just finished. I have used a sketch from Cest Magnifique Kit club for my inspiration. I loved this sketch - you can find it here. http://cestmagnifiquekits.blogspot.co.uk/2013/05/our-may-sketch-challenge.html

 
For this layout I knew I had to use this tree bark paper for the backing as it mirrors the oak tree in the photo. I applied some gesso over it to soften it down a little. Anyway, here is what I did.
 
I cut down my bark paper to 10.5x10.5 inches and matted it onto some green cardstock, which I matted onto brown and then onto more green.
I matted my photo in blue to mirror Jessies blue eyes.
I adhered the photo to a circular doily and onto an oval doily.
I attached this to my background.
Then I die cut two decorative accents for the edges.
I gathered up all my matching embellies and started to decorate.
I added three butterflies and attached my beaded stick pins for the bodies.
I added a small banner in the top right corner with some mini roses.
I added the chippie title which I painted and inked.
That's it, a quick and simple layout which should only take you about an hour if you have all your stash together.
Why not give it a go.
 
SCRAPPY STASH
Plain cardstock
Bark background paper
Gesso
Doilies
Circle cutter
Assorted flowers
Sticky back pearls
Butterflies
Sizzix Decorative Accent Die #2
Chipboard title.


Thursday, 30 May 2013

SKETCHABILITIES DESIGN TEAM REVEAL SKETCH #92 FOREST - BUILD A PAGE


Good morning WELCOME TO THE SKETCHABILITIES DESIGN TEAM REVEAL #92

I love this sketch and I hope you do too. There is lots of inspiration to be had at all the designers blogs so don't forget to go visit them all.
This is how I put mine together in 10 easy steps.
(Scroll down to the end for a chance to win a prize).
 First choose your background cardstock.
 Next I chose a Prima pretty paper and cut it down to11.5x11.5 inches - ink the edges.
I then used some gesso and mists to the background to soften it up a bit.
 I matted my two photos and inked the edges.
 I made some banners and adhered these and added a doily that I cut in half.
 I added a small corner piece of plain matted cardstock.
 I chose all my embellies.
I added a scalloped border using my scallop ruler (then ink).
 I added the side border that I cut from some patterned paper.
I added a cardboard layer that I painted white and made lots of little banners using a stamp.
Then I started to embellish.
I added my butterflies, a little bird and the title.
And there you have it, once you have all your bits n pieces ready this shouldn't take too long at all.

SCRAPPY STASH
Plain card
Pretty paper by Prima
Ruler border from K&Co paper
Doily
Cardboard
Gesso and white paint
Green and brown chalk ink
Assorted flowers
Scallop scissors for some of the flowers
Scallop ruler
Butterflies
Stick pins
Banner stamp
Clay bird on a branch (Martha Stewart kit)
Sticky back pearls
Assorted flowers
Fuzzy felt stickers for the title
See spiral flower tutorial here http://theprettypaperpatisserie.blogspot.co.uk/2013/03/hand-made-flowers-tutorial.html
SCRAPPY PRIZE
To be in with a chance to win a pack of flowers, become a follower, leave a comment to say so, and I will pick a winner at the end of the challenge.
Have fun, thanks for visiting, bye for now.


Monday, 27 May 2013

THE LOST TOOTH


Morning everyone and happy Bank Holiday, its a bit chilly, so a great day for scrapping!
This layouts inspiration comes from a Scrap Lift Round Robin over at Scrap That. http://scrapthat.ning.com/forum/topics/may-round-robin-week-one
Do go check it out to see how it works.

I scrap lifted Buffys layout and this is what I came up with.
As soon as I saw these Prima Fairy Belle papers I thought they would be ideal for my tooth fairy layout. The letter Jessie wrote to the tooth fairy says, Dear Tooth Fairy I am so sorry I lost my tooth love from Jessie!!! We think she may have swallowed it! She was so afraid the tooth fairy wouldn't come visit as there was no tooth to take!! Fortunately we knew what to do!!!!

I kept this layout all pink and girly and cut out some of the fairies from the 6x6 paper pack I had.
I distressed the background paper and adhered it to my pink cardstock.
I cut the mat from the centre of the backing card so as not to waste any and distressed the edges.
I added a doily and started to layer up, distressing as I went.
I added some cardboard pieces and some hessian and started to decorate with my fairies.
I then added assorted flowers and pearl string, lace, ric rak and a beautiful Prima butterfly.
I used some stickers for the title and added a couple of pink wings to one of the fairies.
I added a piece of doily behind the torn page and slipped in a journaling block for my story.
Hope you like it. Have a happy scrappy day, Bye For Now.

SCRAPPY STASH
Pink plain cardstock
Prima Fairy Belle papers
Prima butterfly
Assorted flowers
Pearl string
Lace
Doily
White hessian/burlap
Cardboard

Friday, 24 May 2013

STUCK ON U SKETCHES DESIGN TEAM REVEAL - BABY FACE + BUILD A PAGE - May 24th

 
WELCOME TO MY BLOG AND THE STUCK ON U SKETCHES DESIGN TEAM SKETCH REVEAL
I loved this sketch by the lovely Leah and really enjoyed putting it together as I got to use all my favourites.
I have also put a Build a Page together for you to try. Enjoy.
 
 
http://stuckonusketches.blogspot.co.uk/
 
BUILD A PAGE


 First take a piece of pretty paper and cut down to 11.5x11.5 inches, distress the edges and adhere to your background cardstock.


Then take a piece of plain cardstock 11 x 5.5 inches and distress the edges and attach. 


Add a mat 10.75 x 4.5 inches, distress the edges and add your photos.


Add a doily and a distressed edge mat 8x7 inches.


Add another piece of cardstock behind this, 11 x 4 inches and distress the edges.


Add some burlap/hessian (silver) and another distressed piece of cardstock.


Attach some ric rak (pink) down the side and more hessian/burlap (cream).


Start to decorate with assorted flowers.


Attach some butterflies, stamens, string pearls.


Add more embellishments, leaves, bird, branch etc.


Add  the finishing touches, one more distressed layer to the vertical mat, a little tag for some journaling and add a title and two hearts - one with the date.
 
 
I hope you enjoyed my tutorial on how to put this page together.
Do go check out all the other designers blogs for lots of inspiration and I hope you give this a try.
 
PRIZE
To be in with a chance to win a pack of flowers, just become a follower, leave me a comment to say so, and I will pick a winner from a hat at the end of the challenge.
 
SCRAPPY STASH
Plain cardstock
Pretty paper
Rectangular white doily
Hessian/burlap in silver and cream
Butterflies
Beaded pin
Sizzix heart die
Martha Stewart clay kit, bird and branch
Mini branch punch
Assorted flowers
Stamens
String pearls
Pink ric rak ribbon
Websters pages alpha stickers for the title
Prima distress tool.


Monday, 20 May 2013

BUILD A PAGE - ALICE


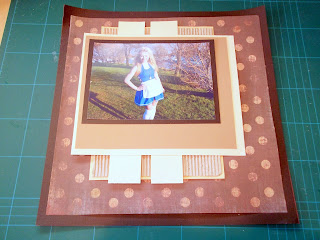
Hi everyone, hope you had a great week end. For this layout I have used a sketch from My Creative Sketches for my inspiration and I have done you a Build A Page so that you can see how to put a page together from start to finish.
I have entered this into a challenge over at the Flying Unicorn to use up all your stash.
I have had this paper for ages!!!
http://flyingunicornforums.com/forum/topic/1982
http://mycreativesketches.blogspot.co.uk/

For this one I chose my pretty papers and just followed along with the sketch.


Hope you followed along. Have a great scrappy day. Bye For Now.

SCRAPPY STASH
Plain cardstock
Polka dot paper - My Minds Eye
Brown burlap
Sizzix Banner die
String
Flowers (see spiral flower tutorial here
 http://theprettypaperpatisserie.blogspot.co.uk/2013/03/hand-made-flowers-tutorial.html
Sizzix alpha
Butterflies
Beaded pins see tutorial here
 http://theprettypaperpatisserie.blogspot.co.uk/2012/06/hand-made-stick-pins.html
Little white bird - Martha Stewart clay kit
Pearls on wires
Sticky back pearls
Cardboard
Prima journaling blocks for the corner and date.

Wednesday, 15 May 2013

SKETCHABILITIES DESIGN TEAM REVEAL #91 - 15TH MAY - PRECIOUS


WELCOME TO MY BLOG AND TO THE SKETCHABILITIES DESIGN TEAM REVEAL.
I loved working with this sketch by Karan Gerber, scroll down to see how I put this layout together.

http://sketchabilities.blogspot.co.uk/
 
Do go visit all the designers blogs for lots of inspiration.
 
First of all gather together all your papers and embellishments.
Mat your photos.
Cut down some matching cardstock to 11x11inches and distress the edges.
Attach this to your backing card with a dab of glue, then stitch around the edge.
Add a doily.
Add a strip of cardstock 11x6 inches across the centre.
I added some brick-work to one half with texture paste and a mask.
Add your matted photos.
Next add a scalloped border.
I then added some pearl border lace.
I made two tags and added these.
 Add a journaling block and some funky fibres.
Next I added some painted cardboard layers in the top right and bottom left.
Now start to decorate with lots of flowers and embellies.
I added lace, pearls, ric- rak, mini roses and a butterfly with beaded pin body  to the top right corner.
And lace, pearls and ric-rac to the bottom left corner.
I added the title and there you have it.
Hope you give this a go.
 
 
PRIZE To be in with a chance to win a pack of pink flowers, just become a follower, leave me a comment to let me know and I will pick a winner out of a hat at the end of the challenge.
 
SCRAPPY STASH
Plain cardstock
Pretty papers
White doily
Journaling tag
Handmade tags (banners)
Pearl lace strip
Ric - Rak ribbon
Mini Roses
Assorted flowers
Butterflies
Hand made beaded pins
Martha Stewart clay kit for the heart
Cardboard
White paint dauber
Funky fibres
Sizzix sizzlits branch die
Sewing machine with black thread
Distressing tool (Prima)
Texture paste
Brick wall mask
Scalloped ruler for the border. 
 
HAVE FUN - HAPPY SCRAPPING AND THANK YOU FOR VISITING MY BLOG
AND FOR ALLYOUR WONDERFUL COMMENTS THAT REALLY MAKE MY DAY.


Monday, 13 May 2013

WONDERLAND


Hi everyone, hope you had a great week end.
For my inspiration for this layout I have used a sketch challenge over on Scrap 365. http://sketchbook365.blogspot.co.uk/2013/04/may-challenge.html
Original sketch by Gabrielle Pollaco


I matted my photos  first. Then I ripped down some pretty paper to 10x10inches.
I adhered this to my background cardstock.
I then added a white doily.
I added my matted photos.
I then started to layer up with cardboard, music paper, script paper, hessian and even a coffee filter!
I added a music paper border at the base of the photos.
Then I added my painted corner swirls.
I then added a dusty attic swirl.
Next I started to decorate with flowers, butterflies, a little bird on a branch and stamens and pearls.
Then I added a few more layers along the outside edges.
I ripped a little window in the top and put some script paper behind.
I added some hearts and the title. Page done!
A quick and easy page for you to try. Should take about an hour if you have everything prepared.
Why not give it a go, have fun.

SCRAPPY STASH
Plain cardstock
My Minds Eye pretty paper
Cardboard
Brown ink
Script paper
Music sheet
Doilies
Butterflies
Pearls
Assorted flowers
Dusty Attic flourish chipboard
Corner flourish chipboards
Sizzix hearts die
Sizzix alpha die
Martha Stewart clay kit to make the bird and branch.
Stamens from Wild Orchid Crafts
Hessian/burlap - I bought from a garden shop
Coffee filter in natural colour
White paint dabber.

Saturday, 11 May 2013

SENSE AND SENSABILITY


Hi everyone. Here is a layout I have done today, using Case File No 70 at C.S.I for my inspiration.
http://csicolorstoriesinspiration.ning.com/forum/topics/case-file-no-70-case-closes-on-may-12-2013


I love these colours so as soon as I saw this, I just had to give it a go

I chose my photo and colours, papers (Bo Bunny) and embellishments and matted my photo.
I cut down a piece of pretty paper to 11x11 inches and adhered to a sheet of black cardstock.
I cut the black card down to 11.5x11.5 inches and adhered to a sheet of pretty pink card.
Next I added a doily, love dollies!
I attached my photo then die cut a clock face and added this.
I attached some pearl lace at the bottom of my photo and some lace at the top.
I fussy cut the tea cups from another piece of Bo Bunny pretty paper and glued down one side.
I then started to decorate.
I added lots of flowers, clay hearts, butterflies with beaded bodies, a stick pin, leaves, a little black and white bird and a mini envelope. I also machine stitched all around the edge.

So - I used all the colours in the scheme. For my evidence I used flowers and circles and woven lace.
For my testimony I used secret journaling tucked inside my mini envelope describing the roles mum and daughter play. Case Solved!!!

I also entered this into a challenge over at Bo Bunny Bo Bunny Layout Challenge - May
http://bobunny.blogspot.co.uk/2013/05/may-layout-challenge-april-winner.html where we had to use a book title for our layout.
Hence, Sense and Sensability by Jane Austin.

SCRAPPY STASH
Bo Bunny papers - Little Miss Collection
Plain cardstock
White doily
Tim Holtz clock face die
Pearl lace
White lace
Assorted flowers
Butterflies and beaded pin bodies
Black hand made beaded pin
Leaves
Martha Stewart clay kit hearts and bird on branch
Black ink
Pink ribbon bow
Sticky back pearls
Hand made mini envelope
Die cut alphas - sizzix
Sewing machine and black thread.
Hope you like it and give it a go.

Friday, 10 May 2013

STUCK ON U SKETCHES DESIGN TEAM REVEAL - ENCHANTED


WELCOME TO THE STUCK ON U SKETCHES DESIGN TEAM REVEAL  
 
http://stuckonusketches.blogspot.co.uk/


Hi everyone and welcome to the Stuck On U Sketches
Design Team Reveal.
Here is a brilliant sketch by Leah, I just loved this one as it came together so easily. Do give it a try.
This is what I did.
 
First I chose my colours from the photo and gathered all my papers and embellies together.
I then cut down a peice of green pretty paper to 11x11 inches.
I adhered this to my background cardstock.
I added a piece of tan card to the base and cut it on an angle.
I added three border strips on top of this.
I matted my photo in green cardstock and inked the edges.
I adhered this to the page.
I then added a doily in the back.
I added some ripped and painted cardboard and some Prima packaging that I inked.
I added some pretty paper strips below the photo.
I then started to decorate with all my flowers and embellies.
I made some of the flowers from mulberry paper.
I cut out two butterflies and added beaded pin bodies.
I added some pearl string and pearl centres to the flowers.
I added a die cut title. There you have it - a great sketch to follow.
 
SCRAPPY STASH
Plain cardstock
Pretty papers
White doily
Green ink
Tan ink
Butterflies
Beaded pins and black wire
Pearl string
Sticky back pearls
Assorted flowers
Mulberry paper to make flowers
Scallop scissors to make flowers
Cardboard
White paint
Leaves
Sizzix alpha die.
 
PRIZE
To win a pack of mixed flowers, just become a follower, leave me a comment to say so, and I will pick a winner at the end of the challenge. Bye For Now and have a great week end.


HAPPY THOUGHTS


HI everyone, I havnt posted in a week as Picassa has been playing up and I havnt been able to load anything up!!
Anyway, this is my latest layout, using a sketch from Scrap That for my inspiration.
http://scrapthat.ning.com/forum/topics/may-spring-into-may-kit-sketch-challenge


So this is what I did.
First I chose my papers and embellies.
Then I matted my photos, and distressed the edges of the mats.
Next I cut down my pretty paper to 11x11 inches.
I adhered this to my background cardstock.
I added a doily, which I matted.
I added  my matted photos.
I then made a scalloped border using a scallop edged ruler.
I added this and a couple more border strips.
I made two butterflies and beaded pins for the bodies.
I made lots of flowers using mulberry paper.
I made a little bird using a Martha Stewart clay kit.
I started to decorate with my flowers etc.
I then die cut some swirls and added these.
I die cut some branches and added these.
I added my butterflies, a tag with the date, fibres and pearl string.
I then made a little split in the top, curled the edges back and added a piece of doily, a cameo and a little flower.
I then added a sticker title and some blue ric rak.
I hope you like it and give it a go.
 
SCRAPPY STASH
Plain cardstock
Pretty papers
White doily
Distressing tool
Scallop edge ruler
Mulberry paper
Assorted flowers
Butterflies
Beaded pins
Martha stewart clay bird from kit
Tim Holtz flourish die
Tim Holtz pine cone die
Funky fibres
Pearl string
Blue ric rak
Cameo